♻️ Upgrade your kitchen grind game — power, ease, and durability in one sleek package!
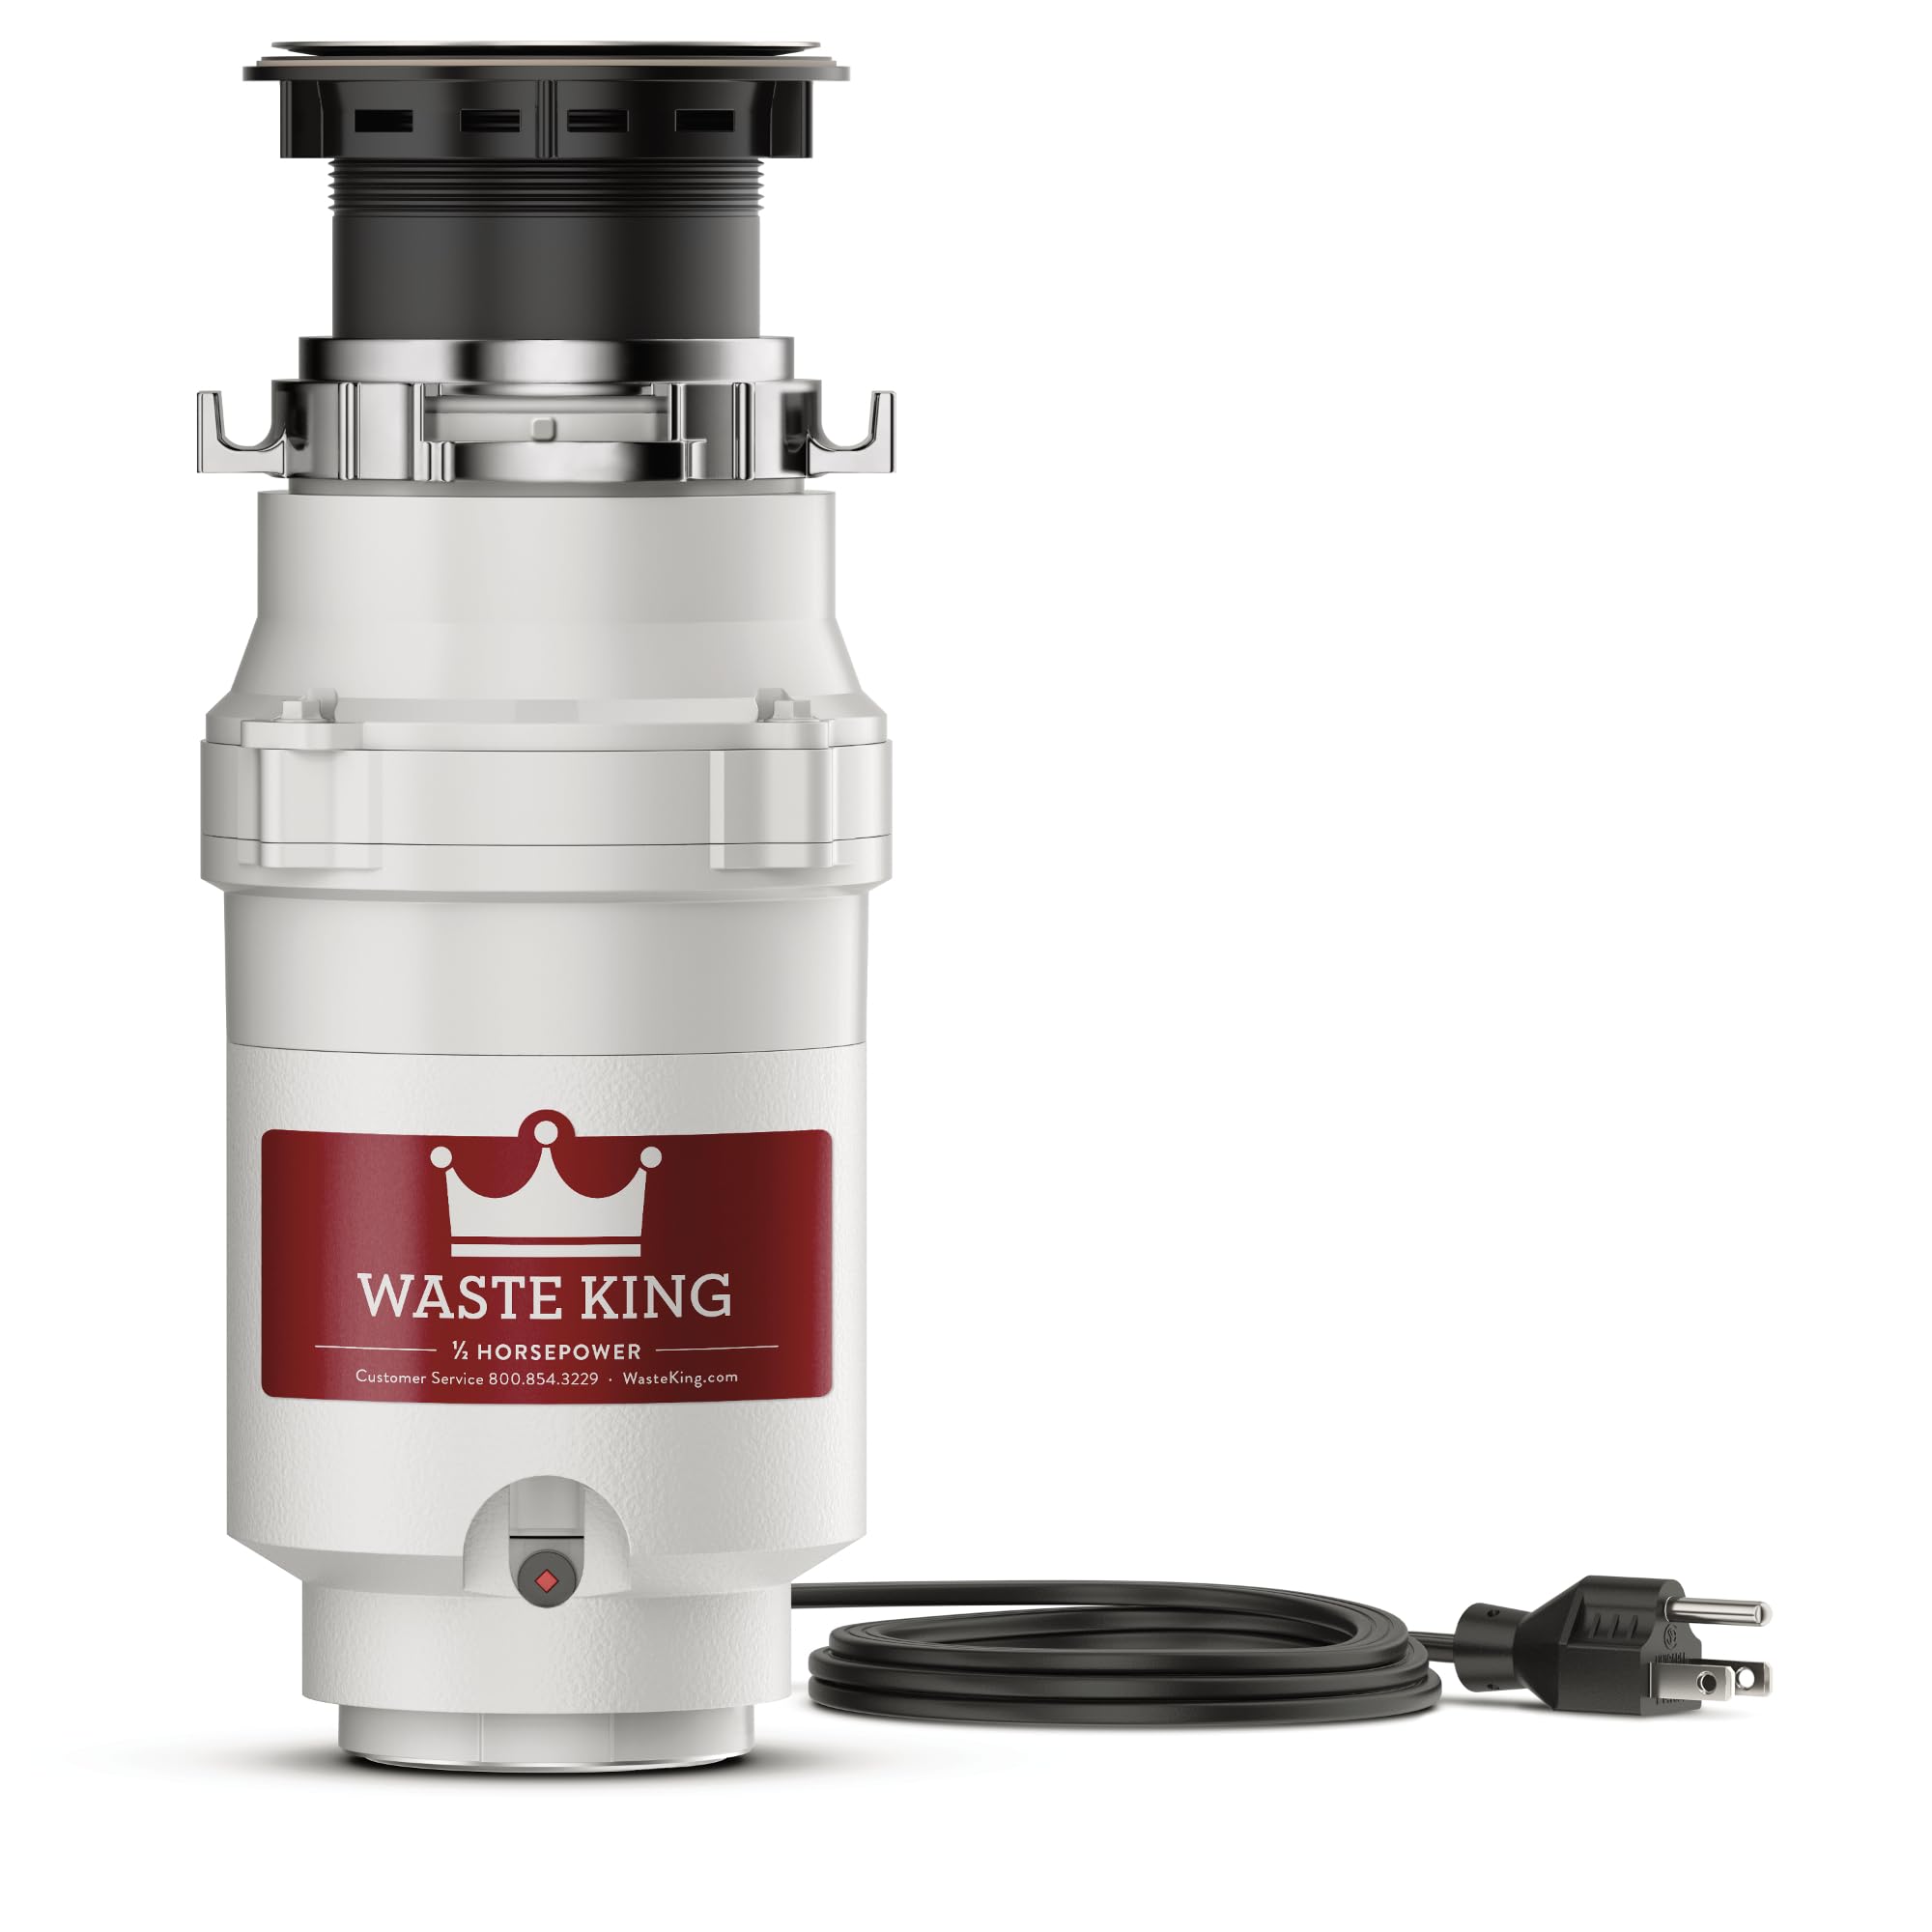
The Waste King L-1001 Garbage Disposal combines a powerful 2,600 RPM permanent magnet motor with a compact, corrosion-resistant stainless steel grind chamber. Designed for easy DIY installation with its EZ Mount system and pre-installed power cord, it offers continuous feed operation and is backed by a 5-year limited warranty, making it a reliable, low-noise solution for modern kitchens.


| ASIN | B000LNIK6C |
| Batteries Included? | No |
| Batteries Required? | No |
| Best Sellers Rank | #2,602 in Tools & Home Improvement ( See Top 100 in Tools & Home Improvement ) #5 in Garbage Disposals |
| Certification | For Household Applications |
| Color | White |
| Customer Reviews | 4.4 4.4 out of 5 stars (46,223) |
| Date First Available | January 1, 2008 |
| Finish | stainless_steel |
| Included Components | EZ Mount Garbage Disposal Power Cord Installation Instructions |
| Is Discontinued By Manufacturer | No |
| Item Package Quantity | 1 |
| Item Weight | 7.5 pounds |
| Item model number | L-1001 |
| Manufacturer | Waste King |
| Material | Stainless Steel, Glass-filled Nylon, ABS |
| Part Number | L-1001 |
| Pattern | 2 Year Warranty |
| Power Source | Corded Electric |
| Product Dimensions | 5.25 x 5.25 x 12.75 inches |
| Size | 1/2 HP - Continuous Feed |
| Special Features | Lightweight |
| Style | Disposal Only |
| Usage | Grinding |
| Voltage | 115 Volts |
| Warranty Description | Limited |
| Wattage | 4.5 watts |
S**H
Waste King Legend 8000 works great, fairly easy install
Overall: Works great, fairly easy install (1 hour or less), much quieter than my Insinkerator Badger, much more powerful than the Badger (1 HP instead of 1/3 HP), replaced 3 bolt with EZ mount without any need for an adapter kit. Amazon: Lowest Price (just over $120), arrived three days after I ordered it even though I selected free shipping (don't yet have Amazon Prime, but thinking about it). Experience: I was trying to figure out what to buy to replace my broken Insinkerator Badger (12 years old). Consumer Reports rated the Waste King Legend 8000 the highest, so that was the default buy, unless I found consumer reviews that recommended otherwise. I read many of the reviews on Amazon.com as well as Consumer Reports, and most said that it was a great buy and fairly easy to install. I was concerned about whether the EZ mount would fit my sink, because my Insinkerator Badger is a 3 bolt mount. One Amazon review mentioned having to purchase an adapter kit to use the EZ mount if you had a 3 bolt install, but others said that they didn't need it, including those that bought and reviewed the adapter kit. I did not purchase the adapter kit, and I did not need it. I am not a plumber, and have only had a minimal amount of experience installing plumbing-related appliances, so I was ready to call a plumber if needed. Not once during the install did I feel that I was in over my head. 1. After reading the directions, the removal of the Insinkerator Badger took about 30 minutes (I was cautious and took more time). The helpful hint about using a screw driver to remove the snap spring did the trick in removing the hardware. 2. I followed all of the instructions, in order, including the hints, which were very helpful. I did use plumbers putty, as I do not have a stainless steel sink, but I did notice that another reviewer also used plumber's putting even though they were installing it with a stainless steel sink. The branding on the chrome top of the sink flange is very minor in my opinion. It was much less noticeable than the one on my Insinkerator Badger. 3. I had a minor leak after connecting the pipes, but it wasn't the Waste King and was just a matter of using a little bit of teflon tape amd rescrewing the pipes together under my sink. It is crucial to make sure that the pipes are screwed together properly or else there very well may be a leak. Check all pipes from both sinks. I also ran my dishwasher afterwards to check that connection (no leak). 4. I did use a little bit of soap the first time around, which was a helpful hint from another reviewer to reduce noise. I did notice that there is a little click when I first turn on the Waste King, which is the impellers swinging into place, but after that, the sound is much quieter than my Insinkerator Badger. For those who are worried about the product itself, I could not be any happier. For those worried about the install, I would say that, if you are the occassional handyperson around the house, and like to try things yourself, this install is a piece of cake. Once again, Amazon, and all of those who take the time to review products that they purchase really came through. I continue to be a very happy Amazon customer.
C**N
Love it so far; good upgrade over ISE Badger
The old 1/3 HP ISE Badger garbage disposal in my house was in the house when I bought the home 10 years ago so the old disposer is AT LEAST that old. It worked pretty well for these 10 years, but during that time it would jam frequently which required me to use the wrench tool to release the jam. Last week, the disposal started inexplicably leaking from the bottom whenever I ran the water on that side of the sink. I didn't spend much time trying to fix it since I had been putting replacing it anyway and decided to go ahead and purchase a new one. I originally wanted a 1 HP model, but saw that the 1/2 HP was half the price and STILL more powerful than my existing one so I opted for the L-2600 Legend instead. Another plus is that it is much cheaper on Amazon then what I find in the B & M stores. So even though I had to wait a few days it sure beats paying double for comparable models in the local stores. The day after the disposal arrived, I went to my local hardware store to purchase the tools I thought I would need and based on what the instruction manual said. The things I purchased separately are as follows. 1) Plumber's Putty 2) Mini Hacksaw 3) Pipe Wrench 4) Wire Nuts 5) Assortment of different sized strain reliefs (called Clamp connectors in the store). Because I couldn't figure out what size I needed I purchased 3/8", 1/2" and 1 1/4". 6) Assortment of water tight connectors just in case Out of these things I only needed the Plumber's putty and one of the Clamp connectors I purchased (3/8" with 1/2" knockout). I returned the unused strain reliefs to the store but kept the hacksaw and pipe wrench to use for future projects. Function This disposal is amazingly quieter than my old ISE, which is good since I just replaced a noisy 10+ year old dishwasher last year. It seems to have no issues grinding up old food or jamming which my ISE seemed to do frequently. I think this is a good relatively inexpensive replacement for your old broken disposal or just as a nice upgrade. I purchased the 1/2 HP because I didn't want to spend too much since it was an unexpected expense. But from what I've read, for most people the 1 HP (Waste King L-8000 Legend Series 1.0-Horsepower Continuous Feed Garbage Disposal) is better especially if you have a big family and/or frequently have a lot of guests over for parties or what not. Neither of these apply to me and since 1/2 HP was STILL more powerful than the 1/3 that came with my home, I was still coming out ahead. INSTALLATION (DIFFICULTY) Power Cord -- Can it be removed? ---------------------------------------------- Before I continue, many people (like myself) may wonder if the Power Cord is removable, the short answer is yes its removable, I removed mine because all the appliances in my home are hard wired Here are the steps I did to remove the cord while preserving it if I want to go back and use it later 1. Unscrew the metal plate on the bottom of the disposal. 2. Find the wires that run from the power cord (should be a white, black and copper wire) 3. Depending on how the wires are connected you may have to use a wire cutter to free the wire from the connector. Mine wasn't connected with wire nuts, but a plastic connector that seemed to be a permanent connection so it couldn't be twisted off. So what I did is stick a utility knife under the plastic connector and cut away at the exposed wire until it came out. I repeated this for the other wire. 4. To remove the copper ground wire, I just unscrewed the green screw to release it. 5. Removing the power cord assembly is a little harder; to do this I inserted a flathead screwdriver end under the rubber plug and pryed it out; this take a few tries as its in there pretty good. A WORD OF WARNING: DO NOT use a utility knife to try to pry it out, I stupidly tried this since I was too lazy to go to my tool box to get the proper tool and ended up stabbing myself in the thumb with the knife after it slipped, after learning my lesson I got the flathead screwdriver instead. 6. Once the rubber plug is released you should now be able to pull the power plug out through the opening. 7. Don't forget to use a wire stripper to prepare the remaining wire under the disposal to connect to your existing wires in your home. ---------------------------------------------- Installation of the Waste King itself was pretty simple; removing the old one...not so much. Prior to me installing a range hood and a dishwasher last year I had no experience installing appliances, but I was able to install this disposal by just following the instructions provided in the manual. Comparing this install to my range hood (non-vented), and my dishwasher, i would say it's harder than installing the range hood but slightly easier than installing the dishwasher. My old disposal wasn't connected to my dishwasher so I decided not to connect the Waste King to it either. I may go back and connect it later on, just not right now. If you want to read on about my installation experience it starts below, otherwise you can stop reading right here. INSTALLATION (TIME AND PROCESS) The install took me 7+ hours. Not because the new garbage disposal was hard to install, it was because the old one was such a pain to get out. While I had no issue getting the disposal itself out, the old sink flange was virtually impossible because it looks like the people who installed this disposal screwed the mounting bracket on too tight and ABOVE the threading on the lower part of the sink flange. As a result, no matter how many times I turned the mounting bracket it wouldn't go anywhere because it wasn't catching the threads to move down and come loose. If the sink flange and mounting bracket weren't so old, I would have just installed the Waste King over on that using the Easy Mount adapter kit, (which I bought separately just in case). But because it was so old and I really wanted to switch to the easy mount system anyway, I was determined to get it off. Normally, after removing the old disposal, you should be able to screw the mounting bracket off from under the sink and lift the sink flange up from the top of the sink. However because the mounting bracket just would not screw off because it didn't seem to be able to catch the threading. I decided to try to bend the edges of the sink flange that sits on top of the sink far enough so I could push it down through the sink instead of lifting it up. However I had no idea was I was getting myself into when deciding to try this. This process alone took a good 4 to 5 hours because whenever I would bend one side another part would stick out making it too wide to go through. After about 3 hours of using my wrenches (the hacksaw I bought was useless in cutting the flange), I went to the garage and got my tree branch cutters to try to cut the old flange so I could bend it more. The branch cutters made the job a little easier but still took almost two hours to get the flange bent enough so that I could push a part of it under the sink so I finally hammer the rest through. I also ended up slightly damaging the circular opening of my sink in doing this, but hopefully the plumbers putty will continue to stop any leaks as a result of the damage. UPDATE: Turns out I made this much harder than it needed to be. After examining the old sink flange assembly after removing it, I noticed a metal ring around the top of the threading that was preventing the bracket from screwing off. I did see this when trying to get it off but didn't know what that it was a separate piece and I thought it was part of the threading. Just out of curiosity I inserted a flat head screw driver around the edges of the metal ring and it popped right off making the mounting bracket easy to screw off. I am kicking myself for not seeing this before and it would have saved me 4 hours and would have prevented the damaged I caused. Oh well, I'll know for next time and hopefully you won't make the same mistake I did. After FINALLY getting the old sink flange off, installing the new disposal with the EZ Mount System was pretty simple. I put the new sink flange in and following the instructions, checking for and correcting any water leaks before I continued. While following the EZ mount instructions I didn't think the rubber cushion would be strong enough to hold the disposal without falling down, but a quick check showed that it would hold. After getting the sink flange prepared to hold the disposal next was the task of connecting the wiring. If you have an outlet under your sink, then USE it, it saves about a half hour of labor. Unfortunately I don't have an outlet under my sink and I didn't want to incur the extra expense of installing one under there, so I had to stick with hard wiring. As far as connectors go, I ended up using one of the water tight connectors instead of the 3/8" clamp connectors I originally planned to use. Reason being is that while testing out the connectors to see which ones would fit, the water tight connector was a perfect fit and I just never took it off and after the ordeal of getting the old sink flange off, I didn't want to waste any more time. I used my tool box to lay the waste king on then I connected it to the wiring in my home. The hardest thing here was getting the ground wire around the green screw. So I just ended up taking the green screw out completely, placing the ground wire directly over the hole, and then screwing the green screw back in. After I had the disposal connected to my wiring, all that was left was to mount the Waste King to the sink flange. This was incredibly easy and only required hammering to get the notch to the locked position. After mounting the Waste King now was the time to reconnect all the pipes. Because I don't run my dishwasher to my Garbage disposal, I only had one pipe to connect and surprisingly, the opening of the waste king was at the exact same level as my old ISE was; so the old pipe lined of perfectly. Everything was now hooked up so I turned the power back on to the disposal and let it run with running water. And SURPRISE!! Leaks! Leaks from under the sink, and leaks from the piping. I applied more plumbers putty under the sink as well as re attached the pipe and tried everything again. This time there were no noticeable leaks but I still am not ready to call the install a success just yet. I did this install on the 26th of March and have been monitoring it periodically for and standing water under my sink. So far no leaks, but I will probably give it another week or so before I'm 100% confident in my install.
J**Y
Great product, little on the expensive side
Our old garbage disposal broke, and my husband replaced it with the Waste King Garbage Disposal for our kitchen sink. It arrived quickly and was easy to install. It’s been working great so far—powerful, quiet, and no issues at all. The only downside is that the price is a bit high, but overall we’re happy with the performance and reliability
I**N
Quality Item/Upgrade from In Sink Erator
I purchased this item from Amazon Warehouse at a significant discount due to the damaged box. When I opened the box (which had never been opened), I noticed that the accessories (drain elbow, hardware, sink mounting rings, etc.) were inside of the garbage disposal. After turning the disposal upside down, I was able to locate all accessories. I also removed the instruction booklet from inside the box. I would advise anyone installing a Waste King disposal to read the directions as the mounting system is slightly different from In Sink Erator (specifically, the quick mount system). After looking at the directions, I began removing my old In Sink Erator (ISE) and the drain mounting pieces from the sink itself. One thing I could not find was how to release the old mounting ring from the ISE on the underside of the sink as it was extremely rusted from leaking. FYI, if you're removing this, there is a clip on the inside of the ring that pops out easily with a screwdriver, allowing the ring to come off the sink drain that inserts from the top side of the sink. Once I removed the old drain mounting hardware, I cleaned off the old plumber's putty and used abrasive to make sure it was all gone. Once cleared, the new sink drain mounting system was easy to install. I used the rubber gasket provided and tightened down the plastic screw ring on the underside, with the cardboard ring above the plastic piece. DO NOT use plumber's putty AND the rubber gasket; it's either/or. Once the new sink drain was tightened down, I installed the quick mount ring. I slid the quick mount ring up the tube of the drain and then placed the rubber piece ONTO the end of the tube. DO NOT try to to slide the rubber piece up the tube or between the metal ring or it won't hand down properly. If you need help, there are YOUTUBE videos showing this. If you are having a hard time, you are not doing it correctly and it is not the Waste King disposal. Once the quick mount system is in place, the disposal slides on easily and I was able to mount the existing plumbing to it without any changes. One item I did need was a thick rubber gasket from the drain elbow provided. I placed this gasket onto my existing plumbing so that the drain could be tightened down properly. I then mounted the dishwasher drain line to the disposal AFTER punching out the plastic plug in the dishwasher drain line. I removed the small, white plug from inside the disposal even though the directions stated you could just grind it up. USE: I found the Waste King to be significantly quieter and smoother operating than the same HP ISE. The ISE it replaced was VERY old, but I recently replaced a disposal in another home with a new ISE and found it to be pretty much the same as the old ISE's. So far, the Waste King handles any scraps quickly and efficiently with less vibration and noise. I do have to be careful what foods I put down the drain due to our pipes though. Overall, this is an excellent garbage disposal for the price and I would highly recommend this item to anyone. I cannot comment to the reliability of this disposal but it does have a 5 year warranty.
D**6
A good disposer at a good price
This disposer replaced a 13 year old InSinkErator BadgerI that started leaking. It spins fast and is relatively quiet except at startup because the cutters jerk into place. It works well, rated #1 in Consumer Reports testing a few years ago, comes with a lifetime in home service and corrosion warranty, and is a lot less expensive than anything in its class. If you want a quieter disposer consider the KitchenAid Superba or the Evolution Excel. The disposer hangs down 16" from the bottom of the sink, so make sure you have enough room. I don't know why it comes with a power cord since most homes don't have an electrical outlet under the sink. If there's no outlet under your sink, you can either put one there (go to HD or Lowes and purchase a box and attach it to an inside wall), or attach the new disposer to the wires currently going to your existing disposer or outlet, which is the preferred method and may be code in your area. If it's been over 10 years or so, consider replacing your faucet and all other plumbing valves under the sink at the same time as the disposer, especially if you see any evidence of leaks. It's also a good time to clean your existing plumbing pipes or buy new ones. The whole set (plastic) can be purchased for less than $10. The power cord is fairly easy to replace but may be a little tricky for some. There's a metal cover plate on the bottom of the disposer that is attached with one nut. Remove the nut and then the plate and you'll find a black wire and a white wire crimped to the power cord wires, so you'll have to uncrimp them with pliers or an electrical crimping/stripping tool. Located under the plastic cover is a green colored ground screw. Removing it with a Philips screwdriver allows removal of the green ground wire. Once the wires are unattached, you then remove the power cord. It has a rubber piece that's held in place with a metal bracket and must be pushed out of the bracket. I found this to be a little difficult to do since it is very tight. Just use a screwdriver and keep trying. After that and before you attach your home wires to the disposer, replace the bottom cover plate and attach the new sink parts and disposer to the sink (consult the drawing in the instructions). Use a small amount of liquid hand soap or shampoo on the bottom surface of the rubber gasket to make the disposer turn easier. You must hold the metal mount ring in place with one hand while pushing up and turning the disposer at the same time. Make sure you understand how disposer installation works and then remove the disposer and bottom cover plate. At this point knock out the dishwasher plug if necessary and install the curved black waste elbow with rubber gasket, or a straight waste drain that connects to an opposite drain. I did the latter but had to cut it shorter to fit and used an InSinkErator rubber gasket purchased at HD. Before you connect your home cable wires to the Waste King, or to a new electrical box, use conduit to surround the cable and protect it. HD carries a 1/2" gray plastic type called Liquid Tuff used for wiring assemblies that comes with 6 ft. of conduit and 2 connectors - one straight and one 90 deg. - for under 9 bucks. It has everything you need and is worth the extra protection. First attach one of the conduit connectors into the metal power cord bracket at the bottom of the Waste King. Push the threaded end with the attached O-ring or gasket into the bracket hole and then screw on and tighten the locknut. At this point, make sure all electrical power to the circuit is off. Being careful, estimate how much conduit you'll need, cut it and then run your home cable through it, leaving a few inches of excess wire to connect to the disposer. Also, be sure to leave a few inches of conduit so you can insert a few inches into the floor or wall where your home cable enters. Wait to insert the conduit into the floor until after the disposer is installed. Next connect your home wires to the new disposer. In most home wiring in the US black wire is power, white is neutral, and green or bare wire is ground. So connect wires black to black, white to white, and bare or green to the green colored ground screw. Conform the ground wire into a clockwise circular hook shape and put it around the ground screw and tighten. I reused 2 red wirenuts that were used on my old Badger to connect the black and white wires. Do not use electrical tape to connect the wires - use wirenuts. If you don't know how to use them, it's not difficult and there's plenty of help on the Internet. Now attach the bottom cover plate and then insert the conduit into the connector and then install the disposer, and don't forget to replace your dishwasher drain hose. Insert a few inches of conduit into the floor.
S**R
Waste King and Easy Mount Installation A+
I purchased and installed this new Waste King 1/2hp disposal after removing a 25 year old Waste King 1/3hp disposal. It made it easier as plumbing lined up and height was same under my cabinet. I followed directions closely and watched online video. Only recommendation, be sure the rubber cushion mount is seated into the groove correctly. I used support to hold up disposal and had adequate lighting and tools. I am a 79 year old female and took on the challenge. Figured if I failed I would then call a plumber. Disposal was about 8 pounds so not too heavy for me. First time I ever installed a disposal. Took me about 90 minutes as I worked slowly and double checked everything. All works perfectly, no leaks, no wiring involved as cord is already attached. Like this disposal very much because if I dropped something into it, it has a wide enough opening for my hand to fit to retrieve object, whereas, other makers have smaller openings. Also, was able to complete installation more easily because my cabinet had easy access whereas I was not having to lay on my back to install. Thank you
T**M
Excellent disposer and incredible value, but frustrating custom flange compatibility
I moved in to a new home recently and found that the existing disposer was in need of replacement. Instead of replacing just the disposer, I decided to go ahead and completely replace the entire sink, including the faucet, flanges, and disposer. I decided to purchase most of these items on Amazon due to the excellent prices and free Prime shipping. However, I was troubled by the lack of documentation and details regarding the compatibility of the different parts. I'm writing this review along with a review of the disposer flange I purchased in an effort to fill in these gaps for future purchasers. For the disposer, I went with the Waste King L-1001 Legend Series 1/2 HP Continuous Feed Operation Waste Disposer; unfortunately, the flange that comes with the disposer has a highly reflective chrome finish which will not be suitable if you want to coordinate with faucet hardware that isn't also chrome. Though there are many custom flanges to choose from, the Waste King will not be compatible with most of them since it utilizes the EZ Mount system for attaching the disposer to the sink. This assembly is not compatible with the majority of the custom finish disposer flanges found on Amazon and in most other stores; most are intended for Insinkerator (ISE) disposers. There is an adapter kit available ( Waste King 3101 ISE Adapter Kit ), but I would highly recommend only using this adapter if you are replacing an existing ISE disposer and want to use the hardware already attached to your sink; if you are starting from scratch you would still need to purchace the ISE mounting hardware in addition to the adapter. I should also note that there are some Waste King branded flanges for sale, but the only ones I found that are compatible with the EZ Mount system have plastic finishes, like white, biscuit, etc. Waste King flanges that offer a metal finish are only for Waste King disposers that use the very different 3-bolt mounting system, which are a bit more expensive than the EZ Mount variety. If you plan to start from scratch with all new components as I did, using an EZ Mount disposer along with a suitable disposer flange like the Waste Maid Custom Sink Flange/Stopper Set I eventually purchased will simplify your installation and help you avoid headaches and delays caused by ordering incompatible parts. If you insist on a certain brand of disposer flange you will have to get the flange, ISE mounting hardware, and the adapter. This should work, but at a much higher cost than the Waste Maid flange alone. I won't go into too much detail about the disposer itself; anything I would say has already been posted. It's compact, it's powerful, and it's an excellent value. On top of all that, it's also the quietest disposer I personally have ever used; however, I should note that I've only ever had Badger junk before this and I have it mounted to a very solid and heavy cast iron sink. Your mileage may vary when it comes to noise and vibration if you're using a lighter sink. Installation was a breeze once I had the correct type of flange. Like some others have mentioned, I would recommend installing an outlet under your sink if you were considering rewiring the disposal with an existing connection. Installing an outlet will be easier than replacing the existing cord and will also simplify future replacements/upgrades. Finally, an outlet and box costs less than one dollar, so it's really a no-brainer. In conclusion, I would not hesitate to buy a Waste King again, but I'm pretty confident that I won't even have to for a long time. If you need a new disposer, Waste King is the way to go; just make sure you get the right kind of flange if you don't want to use the stock one.
P**H
Best Value, and truly "EZ" installation as advertised
I just received this product yesterday and installed it myself today. Obviously, I have only used it a couple of times so far and I am very pleased with the extremely easy installation (necessary, for I am not that handy, especially with plumbing). The unit is working perfectly so far. It has a lifetime warranty, unlike competitors 3-7 year warranties; however, if I ever need service it appears I have to return the unit with receipt to Amazon...so we will hope for a long, long life of use. The instructions profess grinding many things (bones, etc.) that I would never put down a disposal, so I will be anxious to see how it performs on Thanksgiving when my wife continues the tradition to ignore my warnings and put 10 pounds of potato peelings down the disposal at once. After reading numerous reviews of continuous feed disposals and watching other comparisons on YouTube (http://youtu.be/BX57lMiFGuo), the Waste King L-8000 1.0-Horsepower was a clear winner for me in choosing to replace our Kenmore, which barely outlived the warranty. I was not familiar with Waste King, and was leaning toward a comparable InSinkErator -- Ah, but when comparing price, quality, warranty and more, there really isn't a comparable InSinkErator, so I ordered the L-8000. (The InSinkErator has a single advantage: a metal drain flange compared to the plastic flange on the Waste King. Hardly a deal-breaker, but the reason I gave a 4-star rating, instead of 5 stars, to the L-8000). The EZ Mount system works as advertised. You may read some reviews about a rubber ring that creates difficulty in installation, but Waste King has responded with double emphasis on how to complete the install easily and without incident. Just in case, here is a very helpful video walking you through the installation (https://www.youtube.com/watch?v=PfDABrRLcjk). The only tools I used for installation were flat and Phillips screwdrivers, plumbers putty, and a steel punch, although the instructions say you might need more. I also used a bowl to prop up the unit, freeing both my hands while I hooked it up. This is a good idea. I was able to use my existing dishwasher hose and coupling, so I did not need to replace the connector kit. The L-8000 comes with a cord already wired and ready to plug in after installation, so no electrical skills are needed, thank goodness. Another nice featured compared to other brands is the removable and, therefore, replaceable splash guard (you know, that rubber guard that slightly reduces something going down the drain that should not). The L-8000 is big and will take up a bit more valuable space under your sink than smaller brands. However, that is because it has more insulation so it may be quieter than others. It is at least quieter than our old Kenmore, and the price was impossible to beat for such a powerful unit (7 amp, 1.0 HP, 2800 RPM). Again, my rating and review are based on the easy installation and overall quality of a brand new unit. Perhaps I'll come back and add some more after those Thanksgiving potatoes!
Trustpilot
4 days ago
3 weeks ago


