


🎉 Elevate Your Viewing Experience with Style!
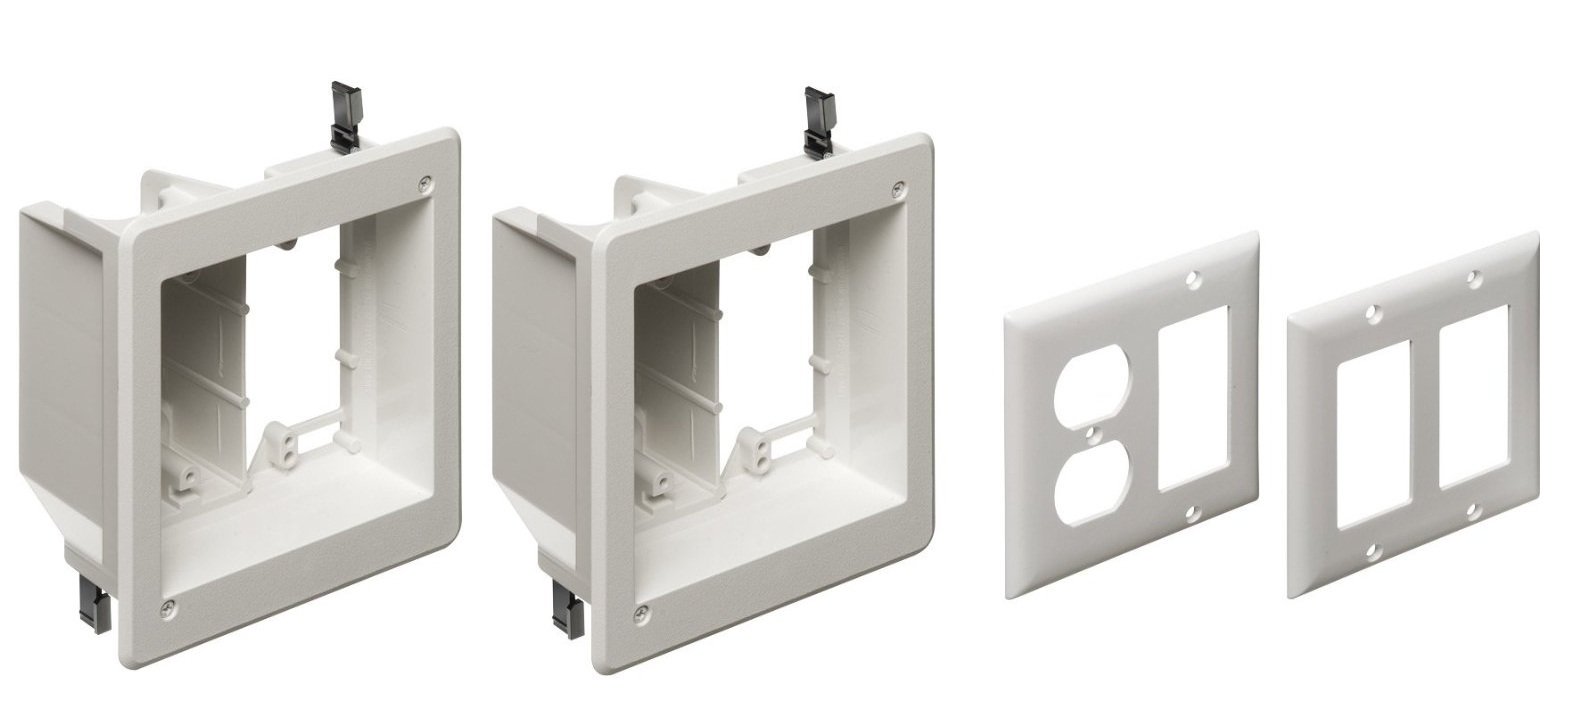
The ARLINGTONTVBR2505K Flat Panel TV Cable Organizer is a premium 2-gang kit designed to provide a clean and organized look for your home entertainment setup. Made in the USA, this non-metallic, paintable trim plate features a recessed bracket that hides wires behind the wall, ensuring a clutter-free environment. Ideal for all types of TVs, it offers easy installation and secure mounting, making it a must-have for any modern living space.
M**R
Great Product!
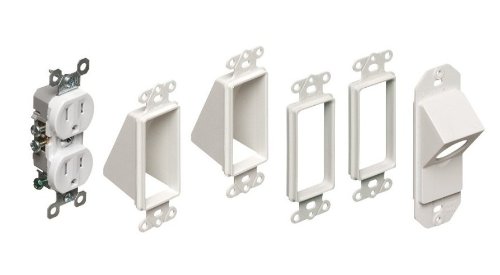
This looks clean on the wall, hides my wires, and powers my television with little effort involved. The second outlet at the top is handy for powering a second device (ex. sound bar, Chromecast, etc.), while the two different options for the second gang plate (plastic chute vs. rubber slotted plate) gives options on how you want to manage your cables. The instructions included are weak, but I have included a step-by-step below. I hope it helps!Instructions:1) Plan and measure. After you start cutting sheet rock the ability to change your mind starts coming with costs, so double check your placement before you cut. If you are doing this at the same time as a television mount job, mount the TV first so you can see where to place the top box for zero or minimum visibility. Both boxes need to be between the same studs if you want to do your install without climbing in the attic to switch sections in your wall and run all that cable (don't do it). Side note: This does not come with a template to use to draw on your wall pre-cut. Work around this by cutting one out of the box the kit came in. The recessed boxes aren't perfectly square so make sure you label the top of your template. I made mine by tracing the kit on the box, cutting it out, then cutting out the inside of the template to trace where I need to cut. Trace the inside of the template on the wall with a pencil and you are good to go.2) Cut. This is step is self explanatory, but I would add that if you have insulation in your wall like I did you should try and find a shallow cutting tool for your sheet rock. It is easier to fish the wires through if you haven't cut the paper backing on your insulation.3) Fish your AV cables and Romex through the wall BEFORE installing the kit in the wall. If there is no insulation, this should be a cinch. Go through from the top, pull through the bottom. Just don't let go; if you drop a wire in the sheet rock it is easier to buy another one than to fish it back out. If you have insulation, feed a wire fishing tool in from the top and pull it out the bottom. Attach your wires to the tool at the bottom, then pull them through. It would be wise to cover the ends of your wires in plastic wrap to keep dust out of your plugs. Make sure you have left slack to work with in your Romex. Side note: If you have some handy, fish through a length of speaker wire you do not need. If you need to pull through additional wires later, you can simply fix them to the speaker wire and pull them through. I did not do this and regretted instantly.4) Feed your wires through the boxes and use the screw-flaps to secure the kit in place.5/6) The order doesn't matter, but it is time to finish the kit. For your AV wires, pick the fixture you want them to exit the kit with and install. I used the rubber plates because they can hold more wires. I've got 4 Twisted Viper HDMI cables, 1 shielded Digital Audio (Fiber Optic) cable, 1 shielded component cable, 2 composite cables, 1 coax cable, and a Wii Sensor Bar extender fed through. I don't think it could hold much more than that. Feed your wires through your chosen fixture and attach the fixture to the kit with the chosen screws (top and bottom). Now for the electrical. If you have never wired an outlet like this, youtube can provide the needed information. No breaker needs turned off because you aren't tied in to electricity. After the outlet is wired in at the top and screwed in to the kit, head for the inlet. I don't know the proper terms, but the part you use to fix your inlet wire to the kit comes apart. Put the exterior half of the fixture and the internal part with the teeth on the inlet wire, put the unattached fixture the wire feeds through the kit with on the wire, then put the interior half of the fixture on the wire. Attach all of this together near the end of the white exterior of the inlet cable, then attach your wires to the Romex. Push the extra Romex back into the wall and attach your completed wire fixture to the bottom part of the kit.7) Feed all your visible wires through the 2 gang faceplates and screw the faceplates to the kit.That's it!
I**S
BY FAR the best kit I've found yet
It's important to note that I'm a professional installer. I've used many different power bridge type products and even tried to put together my own kit. With that said, this is BY FAR the best kit I've found yet. It's a great solution for someone like myself. I'm not a licensed electrician so I cannot add to the circuitry of the home and I'm committed to maintaining code compliance as well. Since it's against code to run anything other than Romex inside the wall you should definitely avoid using a standard power extension cord (which I have seen before).Before finding this kit my go to kit was an actual Power Bridge brand kit. My biggest complaint about that kit was the cord for the power inlet was never the "right" length. Always either too long or too short, mostly too long which meant using zip ties to manage the cord. This kit solves that problem with the ability to shorten or lengthen the power inlet cable with an adjustable "hose" type fitting. I love it. I do wish this product also had 4 "tabs" instead of just two on each box, but it's still great.Next is the ability to cut a two holes in the wall instead of four. The kits I used before required a high voltage old work box for the power and a low voltage old work box for the A/V cabling. This kit, as you can tell from the picture, has both high voltage and low voltage in a single box.The low voltage side does incorporate the Decora style outlet, so you can substitute different plate adapters if you so choose. I prefer the "bulk cable openings" that the kit comes with.No, this kit does NOT include Romex. Some reviewers gave a bad rating because of this; they're fools. It's not in the picture, so you shouldn't assume it comes with the kit. Romex is cheap at Lowes or any electrical supply. I buy it in bulk to save money, but homeowners may want to stick with 6-10ft.The one thing I wish it did include is a template. I ended up making my own template by measuring and cutting out the right size from the cardboard box the kit comes in. Then you can make sure it fits properly in the cardboard before cutting your sheetrock/drywall.There's no excuse for poor planning. Always be sure you measure multiple times before you cut. Also, if you have a stud finder, do a vertical sweep to see if there are any horizontal braces between the studs. This can throw a major kink in your installation plans. Other tools which will assist with the installation are a stud finder, drywall saw, "fish tape" or "fish sticks" for fishing the wire inside the wall (especially important if you have insulation in the wall) and a level.If all else fails, check Angie's List for a good professional to do the job, or find Install Heroes on the Amazon Local Services page in East TN.
K**R
Good product easy to install
A much easier way to get power for a wall mounted TV.
A**W
Easy Install
This set worked really well since I didn't want to move any power over to where I wanted to mount the TV. Easy install and instead of the cable guides for HDMI etc. I used HDMI mounts which fit perfectly.
S**.
Easy to use
Second time I’ve used this product. Easy to install and will use for all my hidden cables
K**C
Super Easy To Install
I installed these in less than an hour and it worked perfectly in concealing the spaghetti bundle of wire for my wall mounted TV.
F**G
Watch out for the duty and handling charges.
Product is great and met my needs. I did not expect to pay handling charges for brokerage from the USA
Trustpilot
2 weeks ago
3 days ago
