We remain fully operational. Our teams are working around the clock to ensure your deliveries continue safely.

DOWNLOAD THE APP


Customer Services
Copyright © 2025 Desertcart Holdings Limited
DOWNLOAD THE APP
🌌 Unlock the universe in your backpack — see more, share more, explore more!
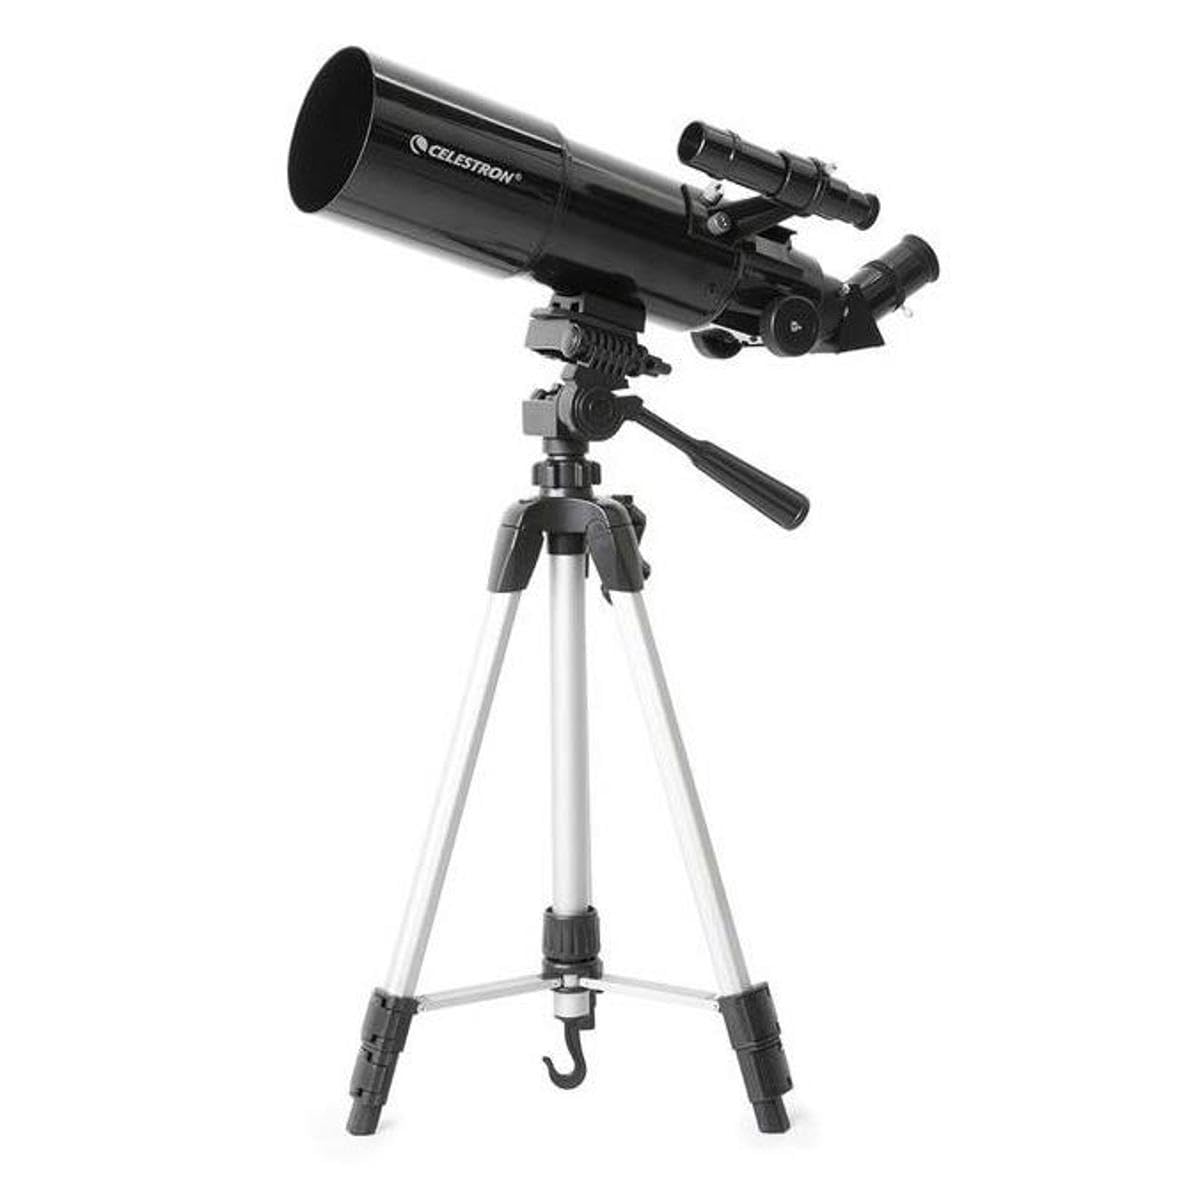
The Celestron 22030 Travel Scope is a portable, beginner-friendly refractor telescope featuring an 80mm fully-coated glass objective lens for bright, detailed views. Weighing just 4.5 pounds, it includes two eyepieces (20mm and 10mm), a full-height tripod, a travel backpack, and a smartphone adapter for digiscoping. Bonus Starry Night software enhances your stargazing experience by providing sky maps and celestial info, making it perfect for millennial professionals seeking a stylish, easy-to-use gateway to astronomy and nature observation.


| ASIN | B07J15P2N3 |
| Best Sellers Rank | 2,013 in Electronics & Photo ( See Top 100 in Electronics & Photo ) 2 in Telescopes |
| Box Contents | 20mm and 10mm Eyepiece, Mount and tripod (preassembled), Optical tube |
| Brand | Celestron |
| Brand Name | Celestron |
| Coating | Fully Coated |
| Compatible Devices | Smartphone |
| Customer Reviews | 4.3 out of 5 stars 22,233 Reviews |
| Dawes Limit | 1.45 Arc Sec |
| Exit Pupil Diameter | 4 Millimeters |
| Eye Piece Lens Description | Plossl |
| Eye piece lens description | Plossl |
| Field Of View | 1.7 Degrees |
| Finderscope | Built-on StarPointer™ red dot finderscope |
| Focal Length Description | 457.2 millimeters |
| Focus Type | Manual Focus |
| Global Trade Identification Number | 00050234220309 |
| Item Dimensions D x W x H | 32.3D x 57.2W x 14.2H centimetres |
| Item Type Name | Telescope |
| Item Weight | 4.5 Pounds |
| Item height | 5.6 inches |
| Manufacturer | Celestron |
| Model Name | Travel Scope 80 with Backpack & Smartphone Adapter |
| Model name | Travel Scope 80 with Backpack & Smartphone Adapter |
| Mount | Altazimuth Mount |
| Objective Lens Diameter | 80 Millimetres |
| Objective lens diameter | 80 Millimetres |
| Optical tube length | 457 Millimetres |
| Optical-Tube Length | 457 Millimetres |
| Power Source | Battery Powered |
| Telescope mount description | Altazimuth Mount |
| UPC | 050234220309 |
| Unit Count | 1.0 Count |
| Zoom Ratio | 2 |
E**Y
Brilliant little scope - 100% recommend.
"The best telescope is the one you use the most" so they say. I have searched the internet, read hundreds of articles, read magazines, toyed with the idea of getting a 'proper' telescope (such as the Celestron Astromaster 114 reflector or the refractor 70AZ) but had a moment of clarity: apart from the first few weeks, when am I REALLY likely to go to the effort of setting up a big scope? I mean they're really big and unless you keep it by the back door it means lugging it down stairs, plonking it in the yard and wrestling with the various knobs and bits to, finally, get a view of the moon or a nebula. Sure, they'll look good but to be honest, like my rice-cooker or the sandwich toaster it'll sit there gathering dust and eventually end up broken or in the loft... Now, I thought of binoculars but, I have some of those and they're 10x mag. They're fine if you like to see streaks of light as the stars zip about your vision like fireworks. Get a tripod? Well, for the money, big (I say big when actually the biggest are only 15x) binos are not all that great and like someone on already said Amazon saide you'll need to be Data from Star Trek if you plan on holding them - forget it. No really, forget it - bins are a big disappointment for the stars. Only German soldiers in my WW2 picture books and bird watchers have them. The Celestron travel scope is like one half of a MASSIVE pair of binos. From 20 to 40x mag they walk all over binos in terms of brightness and magnification. I have packed it in its little bag (very useful believe me) and carry it up the Malvern Hills. Try doing that with a reflector.. In the perfect 360 view up their I've seen the heavens explode into life. I can get it outside, set up and marvelling at the moon or a nebula in 2 mins. Gaze and Go. Every night I have a quick scan at the heavens then get back to putting bath sealant around taps or whatever grown-ups do at night. Great. Build quality is absolutely great. Sure, you have to be delicate with the controls and not heavy-handed but it's a telescope - what did you expect? If you're too rough to handle it then take up judo instead. I am careful with my lovely little scope and it opens up the skys for me and my little daughter every clear night. I can't believe how brilliant it is. My daughter saw a hot air balloon in the sky today - so small it was barely visible. In 45seconds we'd found it on the Travelscope and could count the occupants in the basket and watch the flames light up the red envelope - completely perfect. Maybe you could get a better stargazer... maybe you could get a better bird watcher... but could you get a lovely little instrument that could do both for 70 quid? (2 million US dollars)if I drop it and smash it I'll be sad but get onto Amazon and get another. It should be 160 quid (85 million dollars).. but don't let Celestron know they've mis-priced it! Want a cheap but perfectly useable scope for looking at the moon and birds and ships at sea? Want to use it every day? Are you not a Wall Street banker? Get this little beauty. If you really get hooked with astronomy then in a year get a reflector. You'll still only use the travel scope mind you! Hope my review gets you looking up and going "Wow!"
G**F
the telescope not that I am an expert in such things but being a photographer I do understand light and lenses appears to be exc
Where do I start, this was bought a year ago for my 13yr old son who decided to take Gcse Astronomy, so this is a parents revirw with a little input from him. Its a lovely affordable kit and comes in one box, the telescope not that I am an expert in such things but being a photographer I do understand light and lenses appears to be excellent the eyepieces are good quality and similar to a camera with an added lens can be improved upon by buying set of more expensive ones but then this is for a child and they arefit for his pruposes. The bag is lovely as it means the whole kit is in one place and easily stored a massive plus point for anybody whose the parent of a teenager who sees his or her bed room as a massive skip with a door. Now for the negative in my eyes the tripod if you can afford it replace it, it is a really low end budget model and is not very stable and easily adjusted in my eye's, the good news is if you are the owner of one for photographic purposes they fit on this base perfectly. Overall I would say this was a perfect compromise between cost and quality. Having used it now a few times over the last year I think it is good value for money and a great starter kit if like me you have a young person taking up a new hobby and can't afford to purchase an all singing all dancing model. If you wish to use this for Astrophotography and have a Digital Slr all you need to purchase is a T-Mount ring for your brand of camera. There is a celestron adaptor eyepiece which we do have but you dont necesarilly need to purchase one as it has a t2 thread on the focusing barrel. my advice is if you can find one of these for about £60 buy it you won't be disappointed. I have also used it as a day telescope bird watching it is not ideal or looks the part when amongst "professional" bird watchers but does a reasonable job. Update we have just decided to up grade this product Sept 2015. Its good!! made sure I did not waste £500 pounds but after almost a year we are upgrading and its going to be a big hit. We have used it for astro photography but it needs a motorised mount to get better pictures hence the upgrade. With wildlife things are great and we've managed some decent bird pictures and lovely landscapes can be zoomed in on. I bought a barlow adaptor and t2 adaptor for my Nikon Digital SLR and it give a lovely picture but you do need to take the pictures in manual setting as all the gizmos on my D90, D80 and D50 bodies do not work due to no electrical connections. I have learnt a lot and my son has also last nights blood moon was lovely through the lens just ensure you have a moon filter.
M**0
A great telescope !! a must buy !!
Well I have been wanting a telescope for a while,Im a total beginner. So I researched loads and liked this one due to it being compact, and easy to take out and about. I have a keen interest in Astronomy and wanted this for that reason. Many have pointed out flimsy tripod. I dont find tripod that bad. Good if your 5ft 1 like me, prob not so good if your tall. I find as long as your gentle then tripod not a problem. Another thing that made me get this, was the price and wow I would of paid more! It came today and I thought it was so easy to set up, great instructions. I could not believe my luck, clear skies just a few hours after I set it up. So off I went to the garden , what a great view of all those stars , I was like a kid! But what a cold night. So I decided to try in bedroom, as I saw it was a clear view of Cresent moon. So I set it up there. I was blown away with the view I got of the moon , all those craters and so clear too. It arrived real quick and came with a rucksack to put it in, and its so light but quality is so good! I cannot recommend this telescope enough, it is amazing for the price. All I need now is moon filters and a good x2 barlow lense. Just waiting for book (turn left at Orion )to arrive, then I will get hours of stargazing and planet searching out of this great scope . You must buy this ! :)
A**R
Perfect Telescope for Both Beginners and the Best!
An amazing telescope for beginners and good people. It is decent as an astrophotographer and the magnification of this model is a strong 125 times enough to see rings of Saturn and stripes on Jupiter. The tripod it comes with is poor so I recommend getting a stand separately. Great product!
W**X
A right curate's egg of a bundle.
I bought this telescope in 2015 when it cost £39.00 for the "Amazon exclusive" version, I'm writing this review in 2020 when it costs £79.99 or £89.99 "Amazon exclusive". The difference is that you get an additional 4mm eyepiece and a 3x barlow, in my opinion they are not worth paying extra for, being of such poor quality as to be pretty much useless. [11/2022 Edit: at £80 in the Black Friday Sale and given how much prices have risen since 2020 this bundle is a better buy] I bought this telescope to replace a better one that had been damaged. I had been quite enthusiastic about astronomy in the past, but my interest had waned somewhat, so I just wanted a simple affordable telescope, that I could use occasionally with my existing accessories. The best part of this kit is the OTA (optical tube assembly: the actual telescope itself). There is a bit too much plastic for my liking, but it does the job when used with a solid mount and a decent eyepiece. I would describe the optical quality as reasonable for a budget scope, not great, not awful. The 45 degree diagonal is also of reasonably good quality, and is great if you want to use this as a spotting scope. I prefer a 90 degree diagonal for astronomy. The bag this comes in is also decent, made of a cordura type material and lightly padded. Now for the not so good, the eyepieces let the scope down, the 20mm is better than the 10mm, neither are good. The tripod is not bad in and of itself, it is a perfectly reasonable, cheap, lightweight tripod, that works well with small and light cameras. The problem is that it is hopelessly mismatched with this telescope, which needs something a good deal sturdier, putting the two together is absurd. The worst part of this kit is the finderscope, it is cheap, nasty, and mine went in the bin. So would I recommend this kit? Not at £80-90, at a discount though it might be worth it. The thing to bear in mind is that to get the best from this telescope you will need to replace much of the kit with better items. That wasn't a problem for me as I've used this with a red dot finder, proper astronomy mounts, and a range of eyepieces I already had. So if you are an astronomer looking for a "grab and go" scope or just a budget short tube refractor then, at the right price, this might fit the bill. For beginners though you should be aware that you will need, at a minimum, a better mount and a decent eyepiece, and ideally a better finder too. A sturdy photographic tripod should suffice for mounting, but few non-astronomers are likely to have eyepieces and finders just knocking around. This means that to get the best from this telescope you will end up having to spend more money, and that in turn means that it may be worth considering kits that cost a bit more but include everything you need. As an example the Skywatcher Startravel 80 Telescope with Stable AZ3 Stand and Accessories is a slightly better telescope and includes 2 plossl eyepieces, a red dot finder, and a proper astronomy tripod and mount for an extra £80-90[11/2022 Edit: The price difference has increased], which you could easily spend on buying all that separately. Also consider the Skywatcher Heritage 100P very different as a reflector on a Dobsonian type mount, but only £10-20 more, and often recommended for beginners. I have never installed the astronomy software included with this scope as I am happy using the, free and open source, Stellarium. As a spotting scope this does the job, again with a better eypiece and tripod, but my Kowa is smaller lighter and sharper (and cost 3x as much).
R**M
Beginner Telescope.
I am a beginner to astronomy. I bought this Celestron Travel Scope 70 as it seemed very affordable. It came with everything listed in the description. I found it very simple to setup, didn't need the instructions. Everything seems reasonable quality, considering the price point of £104. The tripod is light weight but ok if you are not too rough aligning the scope. I had my first outing tonight. I viewed the moon which was almost first quarter (half Moon). It looked awesome with the 20mm eyepiece (20 x magnification). I didn't have time to try the 10mm eyepiece (40 x magnification). As the Moon was only in the sky for 40 minutes before it dipped below the horizon. I would recommend this telescope. It is light weight and easy to transport so it can be used for other things. A day's walk bird watching or viewing wildlife is easily achievable.
Z**Y
Surprising good for the price!
You wouldn't imagine a scope so cheap could be worth it, but this scope isn't only good, it's damned good, and seems very well built. Firstly, it is so light that fully packed in its strong rucksac I can hold up the whole caboodle with only my little finger. The supplied lenses are also excellent and give a nice sharp view of the Orion Nebula, I can also see some of Jupiter's moons. As for our moon I can zoom in to clearly view individual craters, though the supplied Barlow lens is dreadful, and so well worth buying a better one. I also take the scope out on my mobility scooter for very clear views of boats far out at sea, it's also great for bird watching as the field of view is wider than expected. Another great feature is the free astronomy software. I'm just an occasional amateur but the program is so easy to use and prints out a very nice, and yet fully customizable localized star map for any date of the year. I also highly recommend searching for the free download intro version of Stellarium. I knocked off one star because others are right, the supplied tripod is rather unsteady, I experience much better use of the scope with a proper camera tripod.
D**D
Celestron 70mm Travel Telescope: great value spotter/astro scope – with potential as a 400mm F5.7 telephoto lens
For around fifty quid this is a decent little travel ‘scope. The main tube is aluminium, the objective lens is an air spaced doublet, and its dual photo-tripod / dovetail mount will also allow it to fit on a proper astronomical equatorial mounting. Throw in a backpack, a couple of eyepieces, an erecting prism and a tripod and you have an excellent value package. The bundled eyepieces are considerably better than expected for the money and give x40 and x20 magnifications (10mm and 20mm respectively). The rack & pinion focuser and the objective lens mount unfortunately are both made of plastic. The tripod is wobbly when the legs are extended and the pan/tilt head is not the smoothest I’ve seen - but it is better than nothing and you can always buy a decent photographic tripod or even a proper equatorial mount later. The optics of this package may not be perfect but they are fine for direct visual use - offering sharp detail, low colour fringing and fairly wide flat-field views. Whilst perfectly usable as a spotter, you should note that the 'scope is not weather-proof. I bought this on a whim – interested to see whether it might be usable as a telephoto lens. Where else are you going to find a new 400mm f5.7 lens for this money? Out of the box, the ‘scope seems reasonably sturdy (tripod excepted). For direct visual use, the image quality it offers is very respectable and much better than any of the half-dozen sub £100 spotters that I have to hand. As a telephoto lens, however, it suffers from low contrast due to internal light scatter from the side-walls, a lack of ultimate sharpness from optical misalignment, evident edge of frame focus-softening (due to field curvature) when using large sensors (APS-C or larger), and of course, from the curse of all refractors: chromatic aberration. Here’s a quick dissection of the product - as delivered … T-Mount The handbook doesn’t even bother to mention it – but the outside of the eyepiece holder is threaded. If you have a T-mount adapter for your camera then you can mount your dslr etc directly on the back of the ‘scope for prime focus photography. Rotatable eyepiece mount The eyepiece mount is a screw-fit onto the chromed focuser tube (both are plastic, sadly) and has an associated locking collar – together these features allow you to square-up any attached camera without having to fiddle with a T-mount’s grub screws. Adjustable pressure plate on the focus tube: A knurled screw at the back of the plastic focuser housing allows you to softly clamp the focuser tube in place (to prevent inadvertent focus shifts). The chromed plastic focuser tube slides smoothly in its guides and, with very little backlash in the rack and pinion, offers precise and easy focusing. Focus travel: For visual use (20mm eyepiece plus erector prism) the closest focus is about 13ft from the front of the scope. The focuser tube has about 70mm of available travel - and the point of focus lies about 50mm outside of the fully racked-out eyepiece holder. Notice that this means that you cannot focus the scope when using eyepieces alone (for traditional inverted astro views), the erector prism (or an eyepiece extension tube) is essential to provide an adequate optical path length to give a focused image. The scope, however, readily allows infinity focus with a dslr on a T-mount (tried with Pentax and Olympus dslrs) – though with mirrorless compact system cameras extension tubes may be required to compensate for their shorter lens-mount to sensor distance. With a heavy camera, however, to reduce the extent of ‘rack-out’ of the focuser and the consequent strain on the thin plastic focuser tube, I'd advise the use of a camera-extension T-tube. Extension tubes have the added advantage of enabling closer focus. Eyepieces: The eyepieces have standard astronomical 1.25 inch push-fit mountings – with real, chromed-metal, nose-pieces. The 20mm eyepiece is a three element inverse Kellner (I’ve not taken the 10mm one apart yet!). It offers a very respectable image: geometric distortion is not excessive and sharpness is good across the claimed 50-degree apparent field of view. The 10mm eyepiece is ok – but the apparent field of view is noticeably less than that of the 20mm one. Lens Cap: The supplied lens cap is a two piece item – offering the option of viewing through a central aperture of about 42mm in diameter (effectively reducing the scope’s aperture from f5.7 to about f9.5) … handy for looking at bright targets. The restricted aperture also has the useful side-effect of reducing chromatic fringes. This smaller aperture, however, causes a degree of vignetting - so that photographs darken towards the edges and corners of the frame when using 4/3rds and larger sensors. For smaller sensors (e.g. ¼ or 1/3 inch web-cams or CCTV cameras) this is not a problem. Alignment: The optical axis of the focuser is out of alignment with the centre of the objective’s mounting (by about 4mm in my case) and it shifts as you tighten the focus tube clamp screw. No collimation or centring adjustments are provided. Moulding ‘flash’ in the lens holder and on the lens retaining collar means the objective lens is not squarely seated or evenly clamped. Contrast: The objective lens is not edge-blackened so image contrast is lower than it could be. The lens retaining collar is polished and reflects general glare down into the scope. The inner barrel of the eyepiece mount is polished plastic (very bad - if using a T-mount for prime focus photography). The push-on lens hood is too short to offer much protection from stray off-axis light. The internal baffles and the smooth matt black painted interior are of only limited effectiveness in controlling light scatter. Field curvature limits the scope’s photographic (prime focus) usefulness to small sensor cameras (4/3rds or smaller). Mechanical: A heavy camera attached to a 1.25 inch push-fit adapter (e.g. for eyepiece projection) would be in serious peril of falling to the ground because the plastic eyepiece holder has only two, small, eyepiece-securing screws. Only the T-mount option offers adequate mechanical security to an otherwise unsupported camera. Some simple suggestions for DIY Improvements (this is for dedicated tweakers only): Please note – implementing some of the following suggestions will invalidate your guarantee … so proceed at your own risk. 1 - Fit a longer lens hood: Non image forming light, bouncing off the interior of the scope, floods your camera’s sensor with useless illumination – sapping colour-saturation and contrast from the scene. This is less problematic with direct visual observation (or photography through an eyepiece) - as the eyepiece’s restricted field of view shuts out some of this indirect light. A camera’s naked sensor, on the other hand, has an extremely wide field of view, it can ‘see’ the illuminated side-walls just as well as it can see the direct image-forming light from the lens, so considerable pains should be taken to prevent indirect light falling on it. The simplest and least invasive improvement would be to extend the length of the plastic lens hood using a tube of (black) cardboard … 12 inches or so should work wonders. 2 - Line internally with velvet or felt: The interior of the narrow bore focuser tube is particularly prone to scattering off-axis light and funnelling it down towards the camera’s sensor. Black felt is a good lining material though the best absorption of stray light is obtained with velvet. The front half of the main tube will also benefit from a lining of black cloth. 3 - Insert an eyepiece’s nose-piece (for prime focus photography): The inner barrel of the eyepiece holder is polished plastic – it reflects light easily and for prime focus photography this needs to be tamed. The simplest solution is to borrow the chrome nose-piece from one of your eyepieces, line it with felt and fit an O-ring over one end. The O-ring will stop the nose-piece falling into the ‘scope and damaging the objective lens. The O-ring will also block the sliver of light that squeezes through the gap between the outside of the nose-piece barrel and the inside of the eyepiece holder. 4 - Remove mould flash from the lens mount and retaining ring: The objective lens sits on a ring moulded into the plastic lens holder and is then clamped in place by the screw-in front retaining ring. Both the seating ring and the retaining ring show slight moulding ‘flash’. This needs to be removed. Use a small craft knife to scrape away the excess plastic from the lens mounts – to provide a level seating surface and an evenly-distributed retaining-pressure for the lens. When reassembling, the retaining ring should be tightened only just enough to stop the lens rattling within the mount … excessive and uneven pressures will cause the lens-pair to distort. 5 - Black-edge the objective lens The matt-ground edge of the objective lens scatters non image forming light into the ‘scope. The lens is a doublet:: a pair of lenses separated (and held together) by three small plastic wedges sandwiched between the front and rear elements. You can remove the lens-pair from its mount (taking care not to separate the two elements) by unscrewing the front retaining ring. Cleanliness is vital - handle the lens only with soft glass-cleaning cloths or cotton gloves. Use a black permanent marker pen to blacken the edges of the lens pair. Note – the thinner of the two lenses is the outermost one – so reassemble accordingly. 6 - Paint the lens retaining ring matt black: The lens retaining ring has a smooth polished inner surface which reflects stray light down into the scope. Line it with felt or paint it matt black. 7 - Collimate: Although no collimation adjustments are provided there are a couple of simple things that can be done to improve the scope’s optical alignment. You will need a laser collimator for this – available on Amazon from around £20. If you fit the collimator in place of an eyepiece, its beam will partly bounce-back from each of the air-glass surfaces of the lens. Three reflections should be seen in the collimator’s window (four - if you are extremely unlucky) – they will not be narrow pinpoints as they are reflecting from quite highly curved surfaces. Ideally, however, all the reflections should centre on the laser’s exit aperture in the middle of the collimator’s screen. You will be lucky indeed to have three such centrally co-located reflections. In my case, initial tests showed only one reflection on the collimator’s screen … the other two were so far off-axis that the reflected beams didn’t even make it back into the eyepiece holder! 7.1 - Align the Axes of the Focuser and the Main Tube: To see how far out of ‘true’ the axis of the focuser is with that of the main tube try the following test. On a thin sheet of paper, scribe a circle with a drawing compass. The scribed circle needs to be exactly the same diameter as the outside of the main tube. Remove the lens hood and the objective lens-holder then temporarily tape or glue the paper circle over the open end of the main tube - ensuring that the rim of the tube lies exactly on top of the scribed circle. The pinprick on the paper (caused by the compass) will then lie on the central axis of the main tube. Fit the laser into the eyepiece holder and switch on. The distance between the central pinprick and the laser spot shows just how far out of alignment the focuser is with respect to the main tube. If the laser beam lands on the centre of the scribed circle, consider yourself lucky. If, however, the laser spot is far adrift from the scribed circle’s centre point then you can try the following tweaks: Remove the three screws that fix the focuser to the main tube. Rotate the whole focuser assembly and see whether the laser spot moves towards the centre of the paper circle. I was fortunate; I found that I only needed to rotate the entire focuser unit by one screw-hole (i.e. by 120 degrees) to obtain a reasonably centralised laser spot. If you find that an intermediate degree of rotation gives the best result, you can bore three new pilot holes in the focuser’s plastic body – to accept the original retaining screws. More drastic remedies include elongating the three screw holes in the main tube - allowing the entire focuser to be 'wiggled' into alignment. 7.2 - Centre the Objective Lens: The objective lens is a loose fit in its holder – there is perhaps a millimetre or so of lateral rattle-room to play with. Having first aligned the focuser’s axis with that of the main tube, you may then care to try moving the lens from side to side, within its holder, to try to make the multiple laser reflections all fall on the centre of the collimator’s screen. This needs to be done with the scope pointing vertically up - and the lens clamping ring removed. There may not be sufficient ‘free play’ available within the lens mount to achieve perfectly returned reflections – but, as in the case of the focuser unit, you can also try rotating the entire lens mount by 120 or 240 degrees to improve the degree of coincidence of the multiple laser-spot reflections. The reflections test is extremely sensitive and the simple the act of tightening the eyepiece retaining screws to clamp the laser will cause large shifts in the positions of the returning laser spots – so don't be overly concerned with precise spot locations … just getting them all onto the laser's target screen is achievement enough. None of the above suggestions should be regarded in any way as condemnation of the 'scope. As a visual scope for spotting or simple astronomical viewing, the compromises of design and construction have been well chosen by the manufacturer and, straight out of the box, it performs much better than its modest price tag might suggest. Asking it to perform in more demanding photographic applications, however, shows the need for better control of stray light. Fortunately these simple mods are well within the capability of anyone raised in the ‘Blue Peter’ school of diy – and tackling them should reward you with a more versatile and better performing bit of optical kit. I give it five stars – for its value for money – and for the ease with which inveterate diy-ers (like me) can have a go at pushing its performance towards the limits of its theoretical capability.
Trustpilot
1 week ago
5 days ago