
DOWNLOAD THE APP


Customer Services
Copyright © 2025 Desertcart Holdings Limited
DOWNLOAD THE APP


🔐 Style meets security: your jewelry’s new best friend.
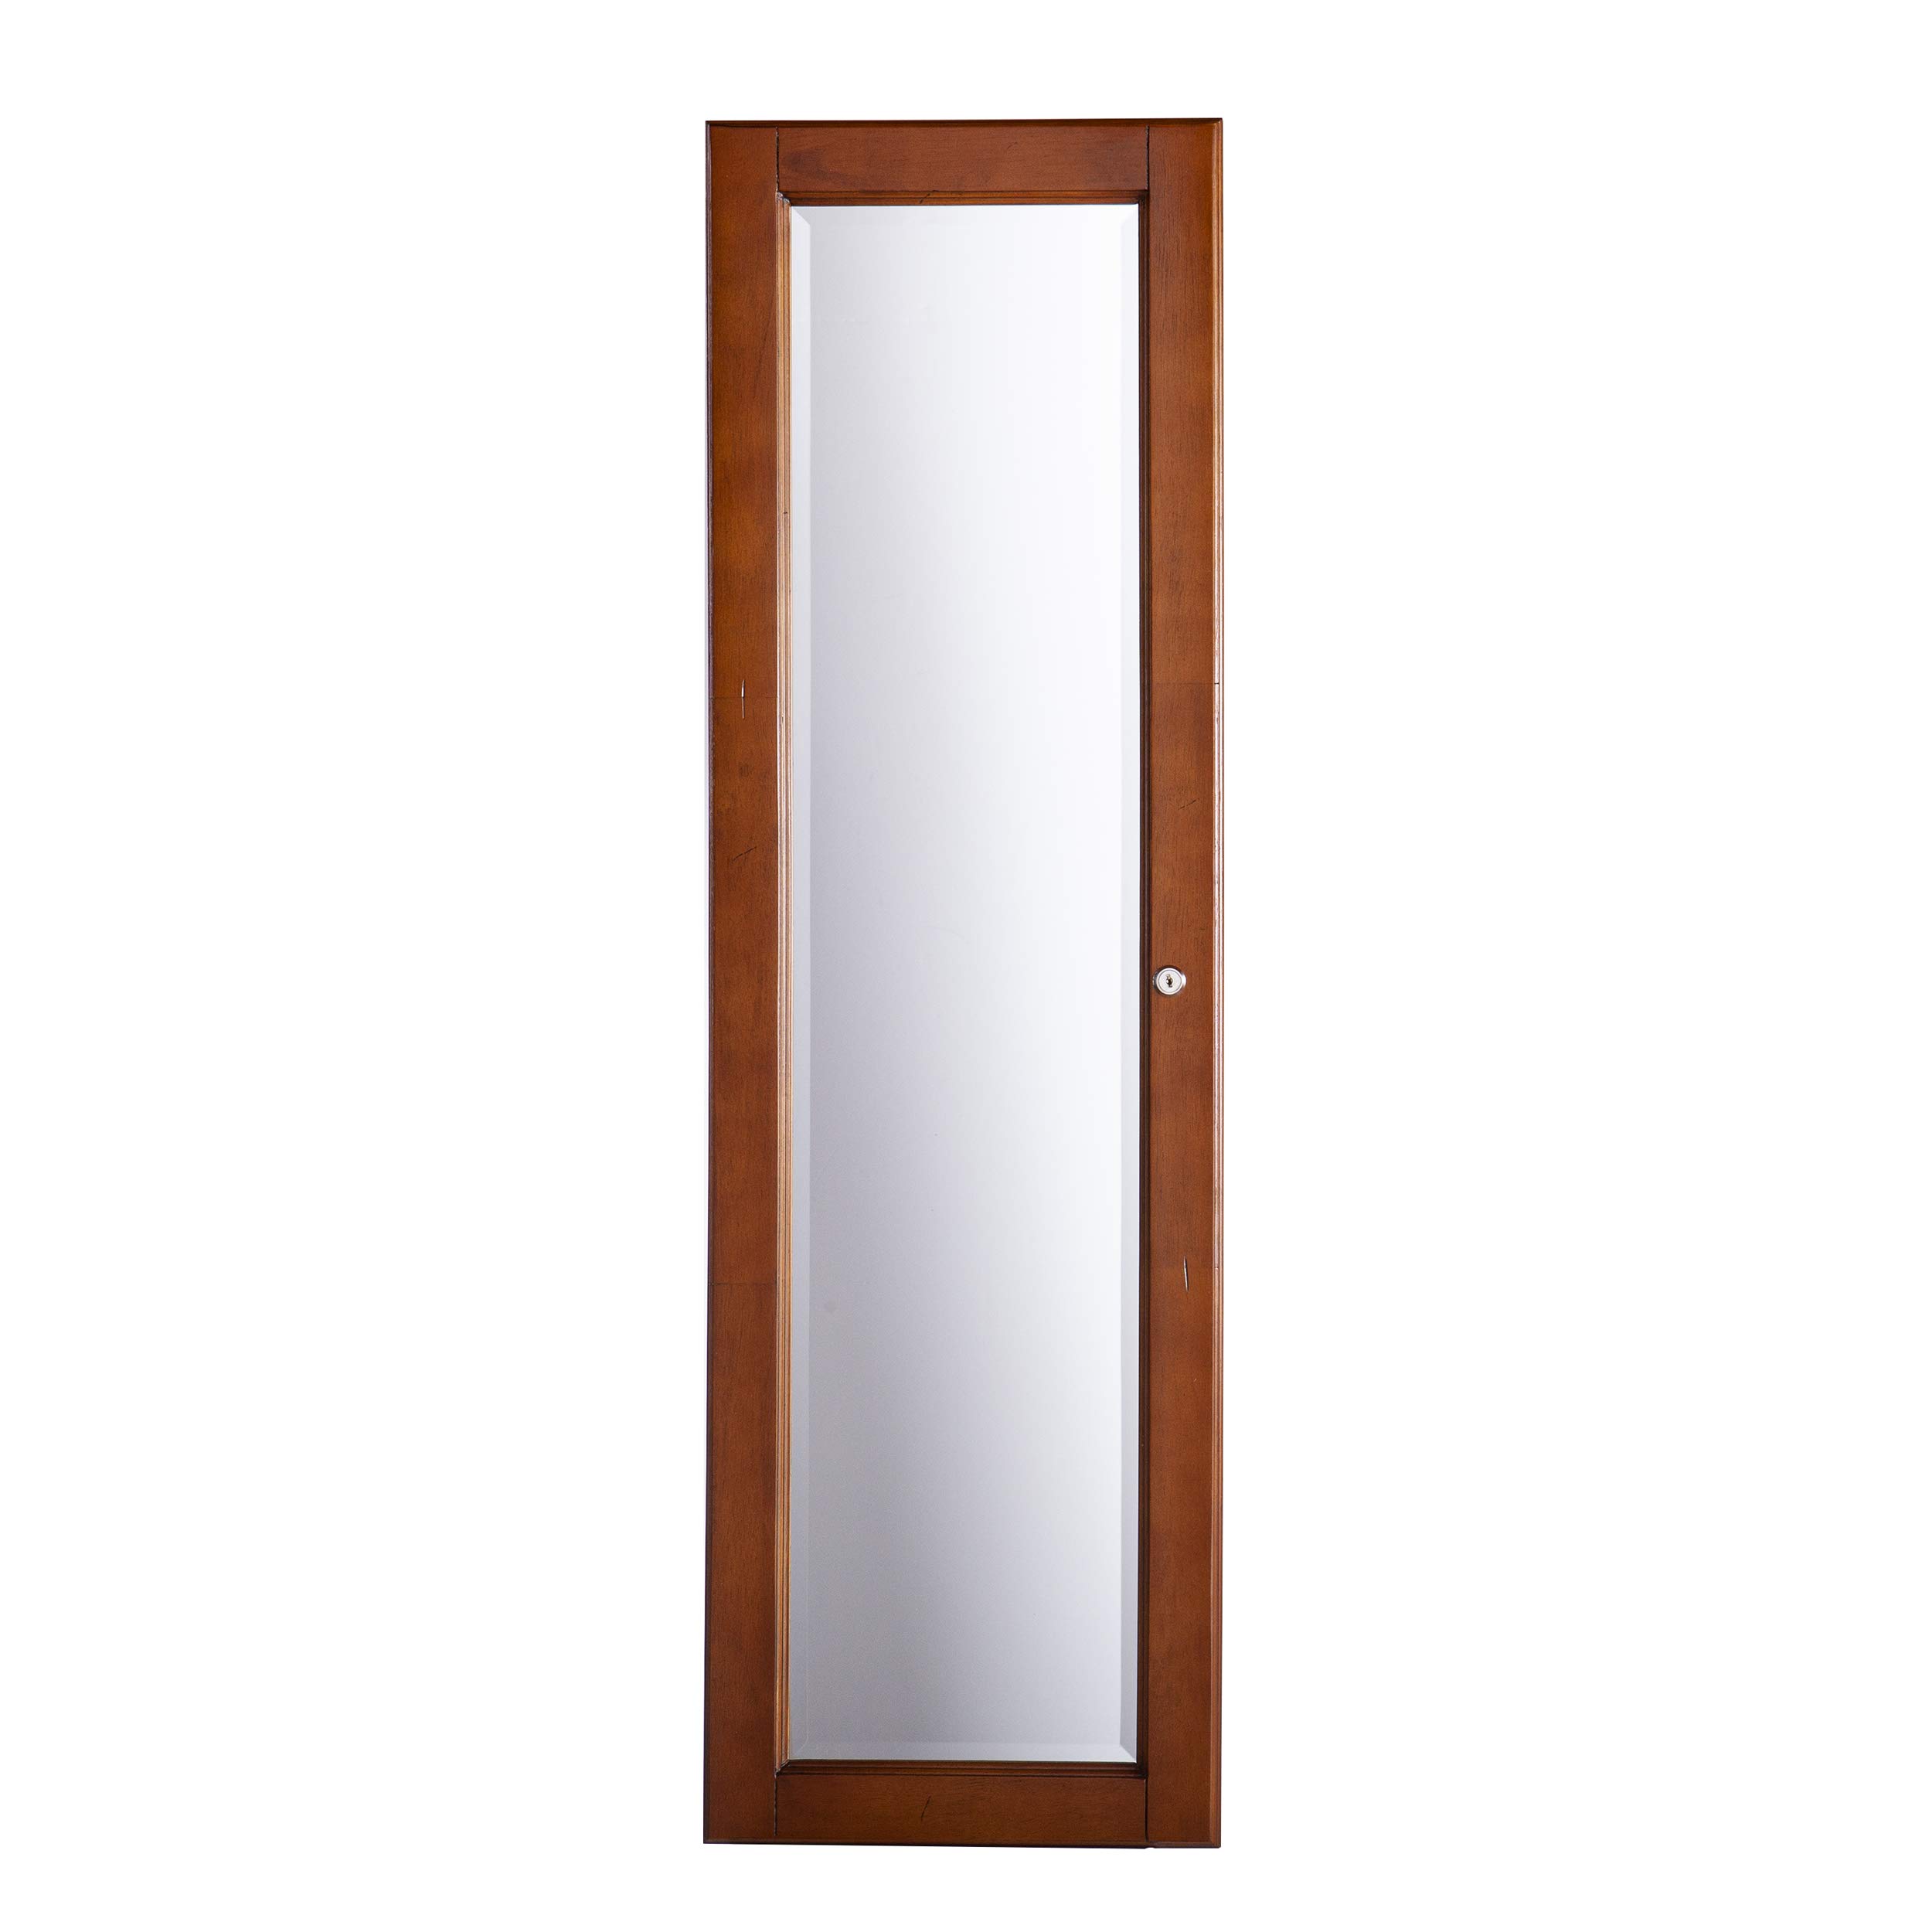
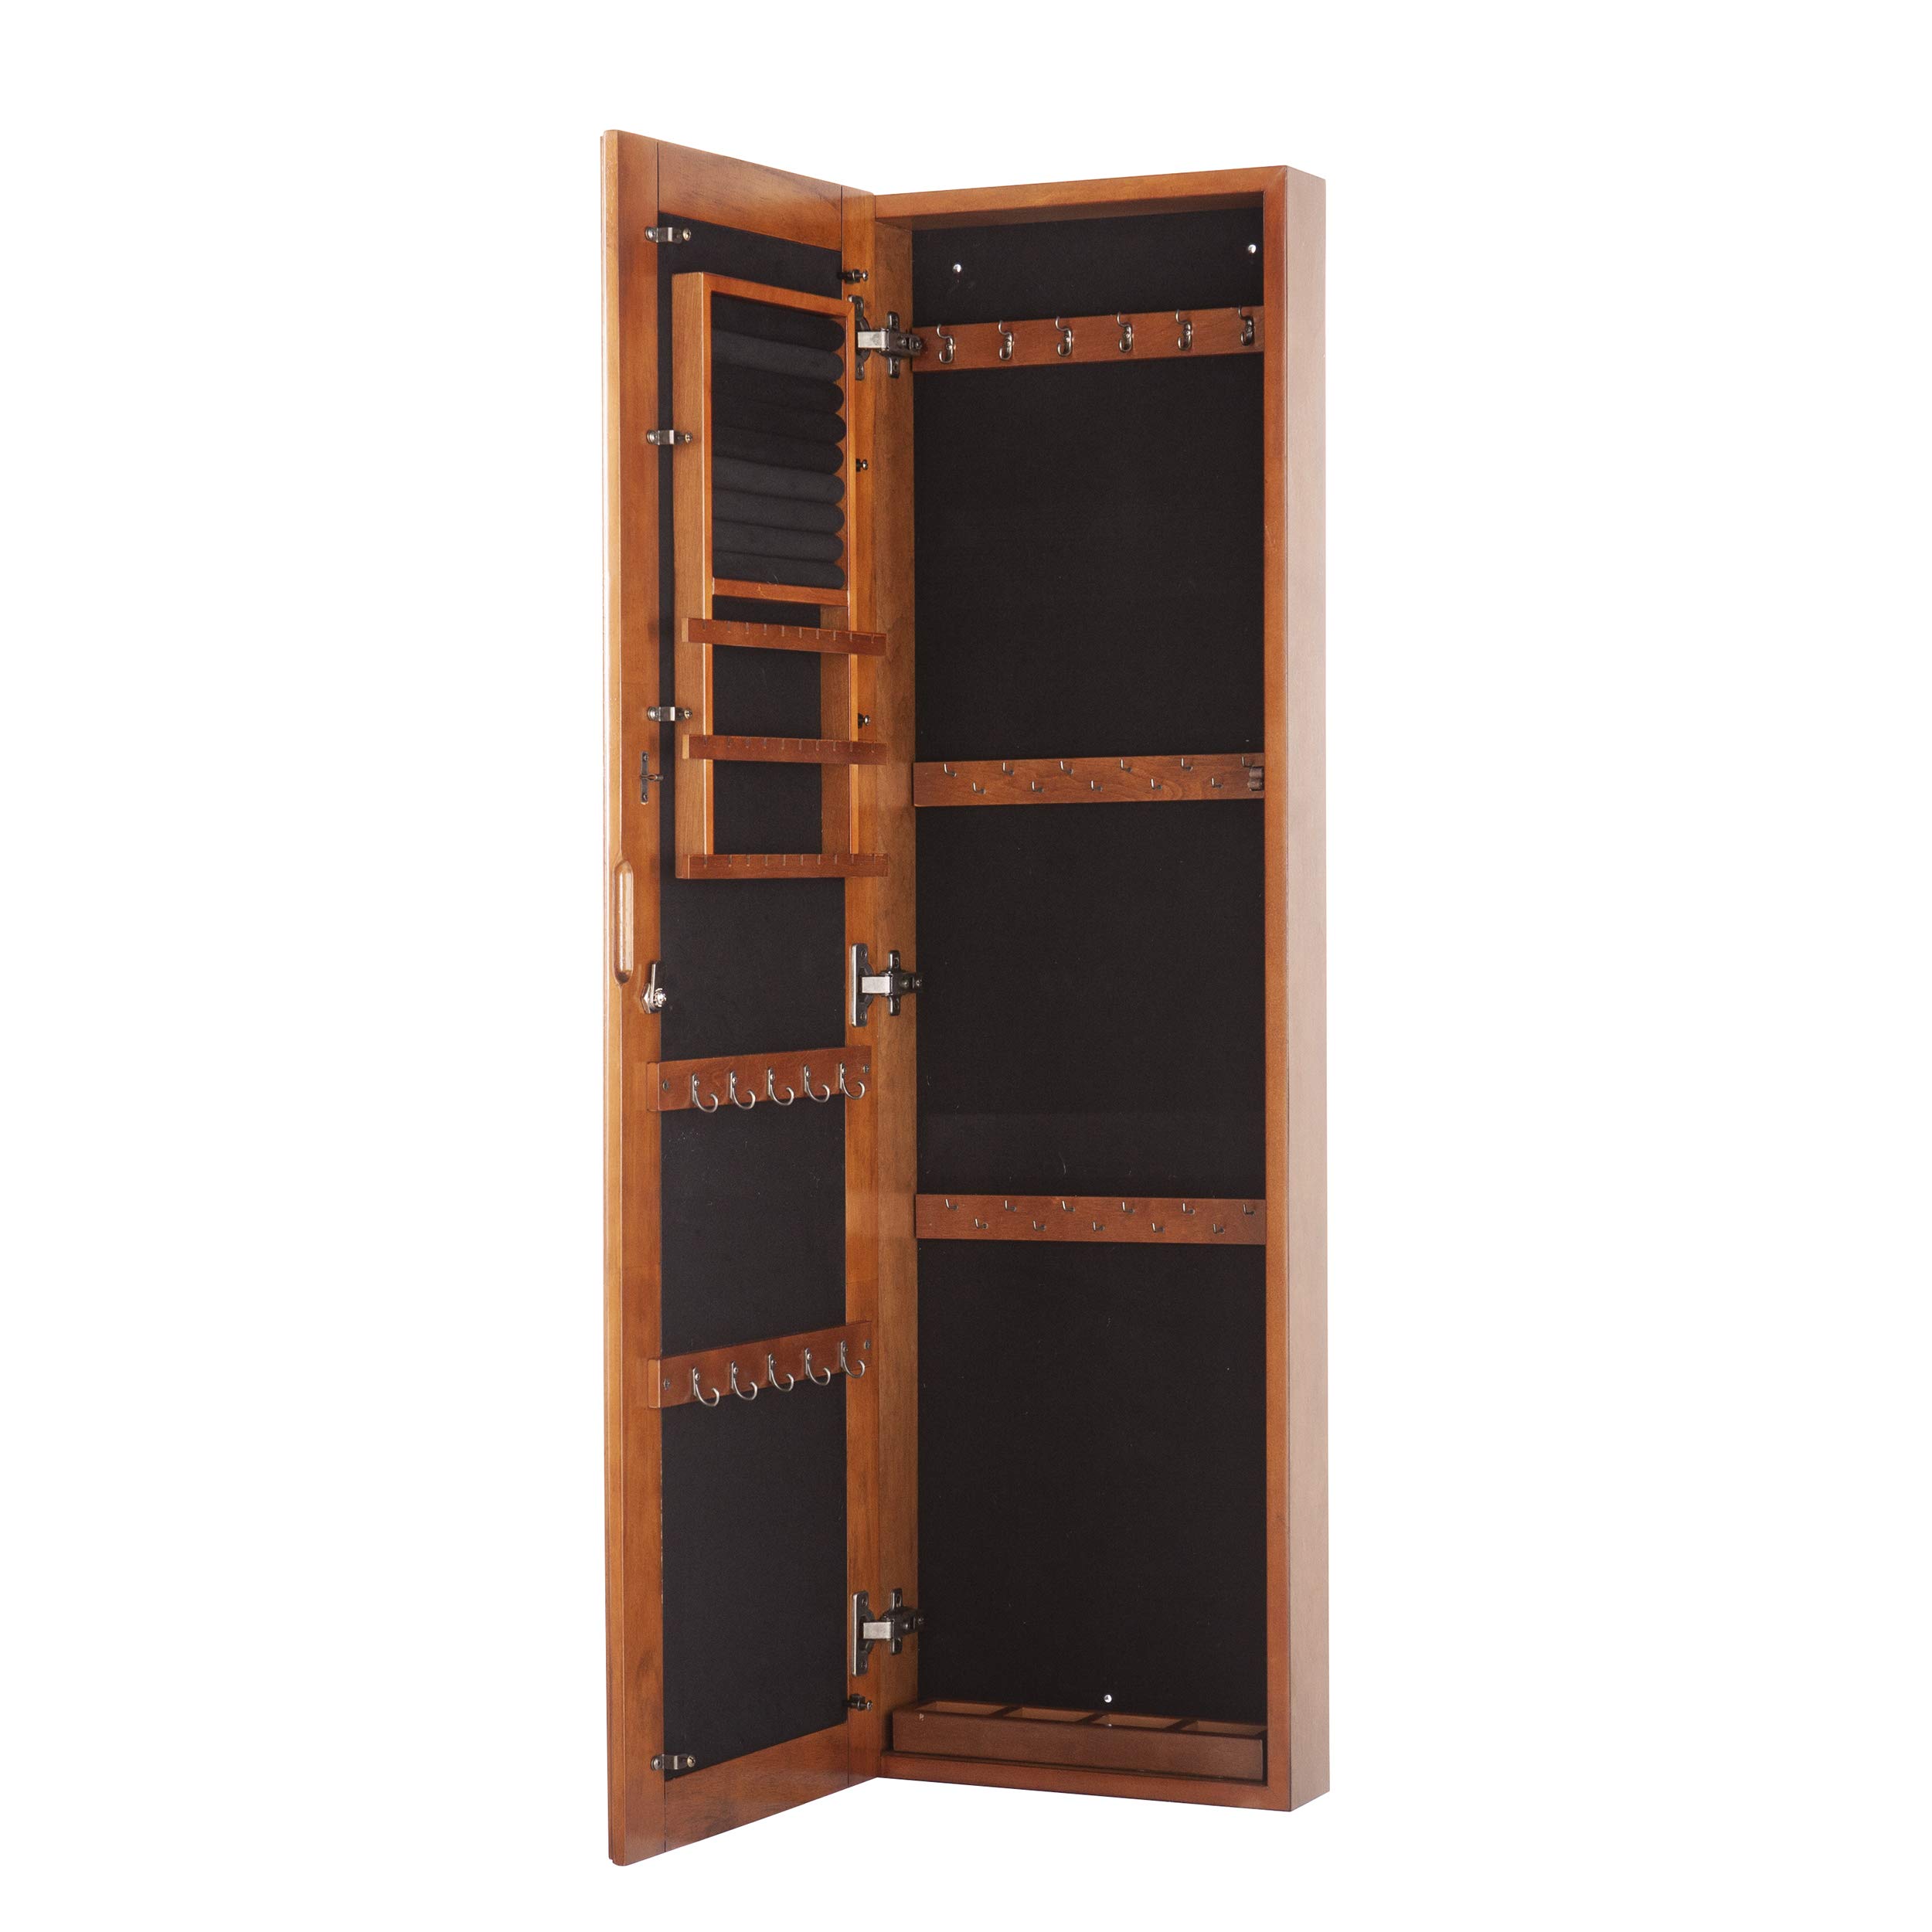
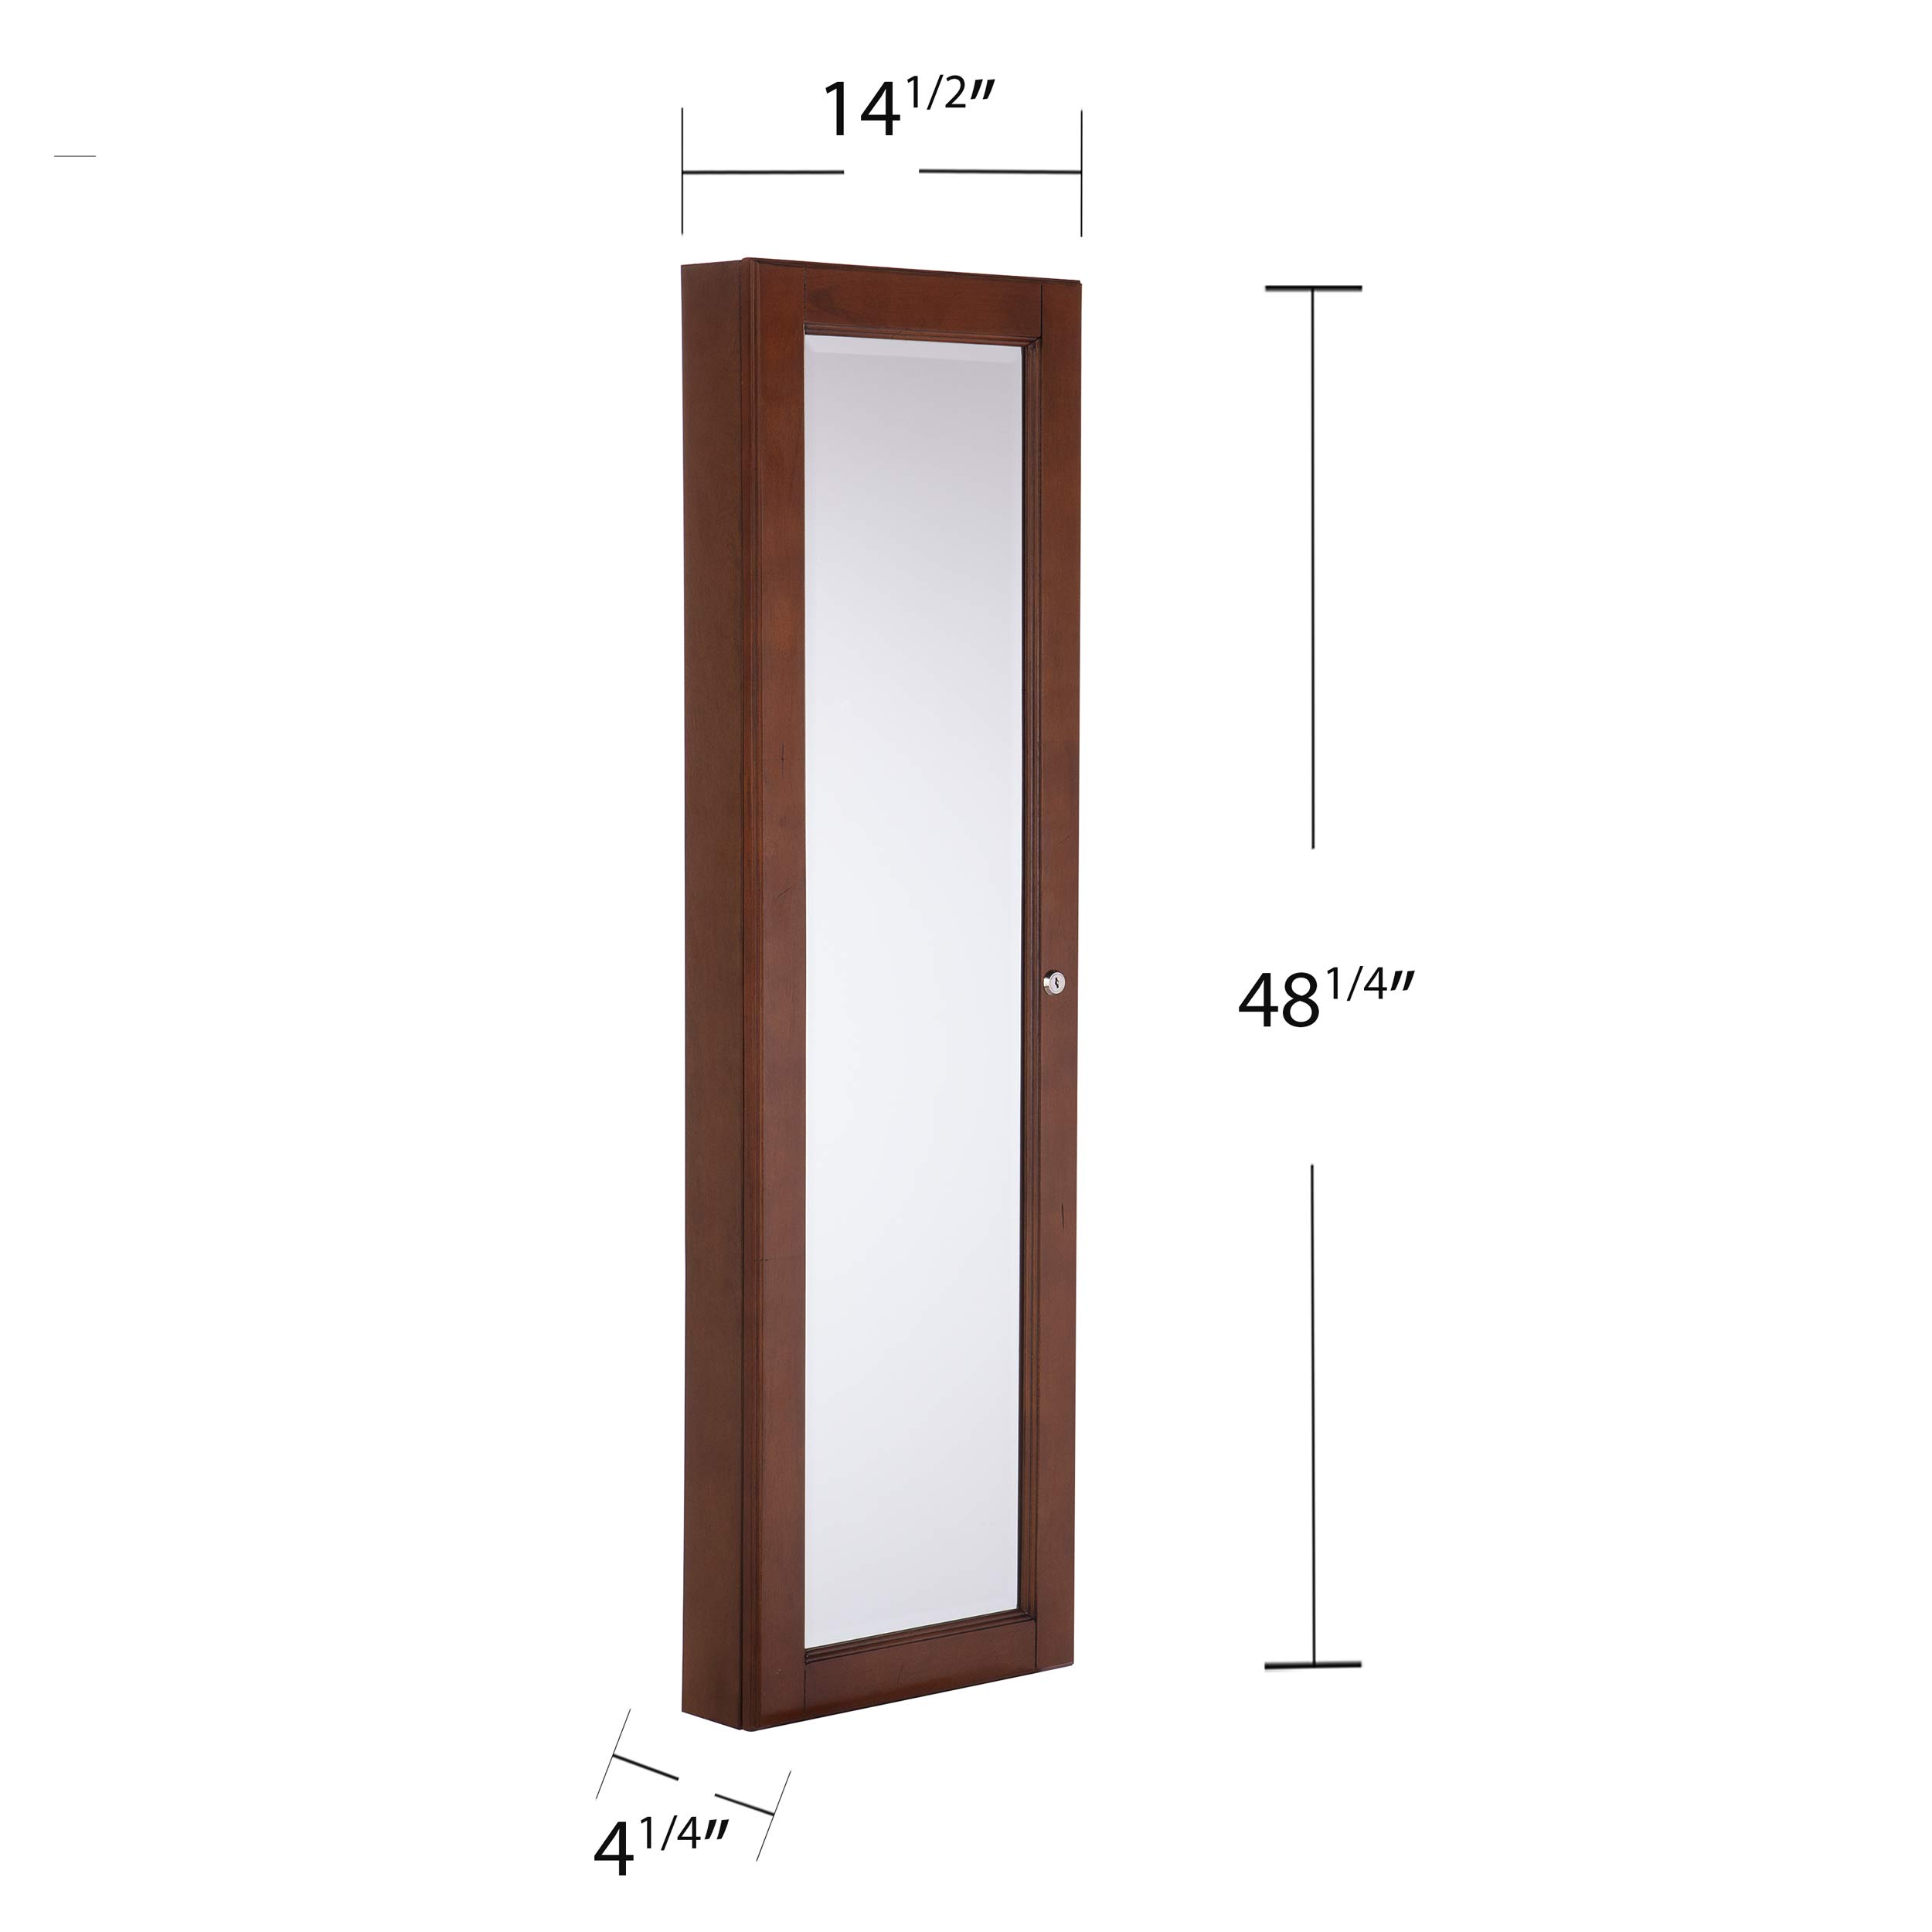
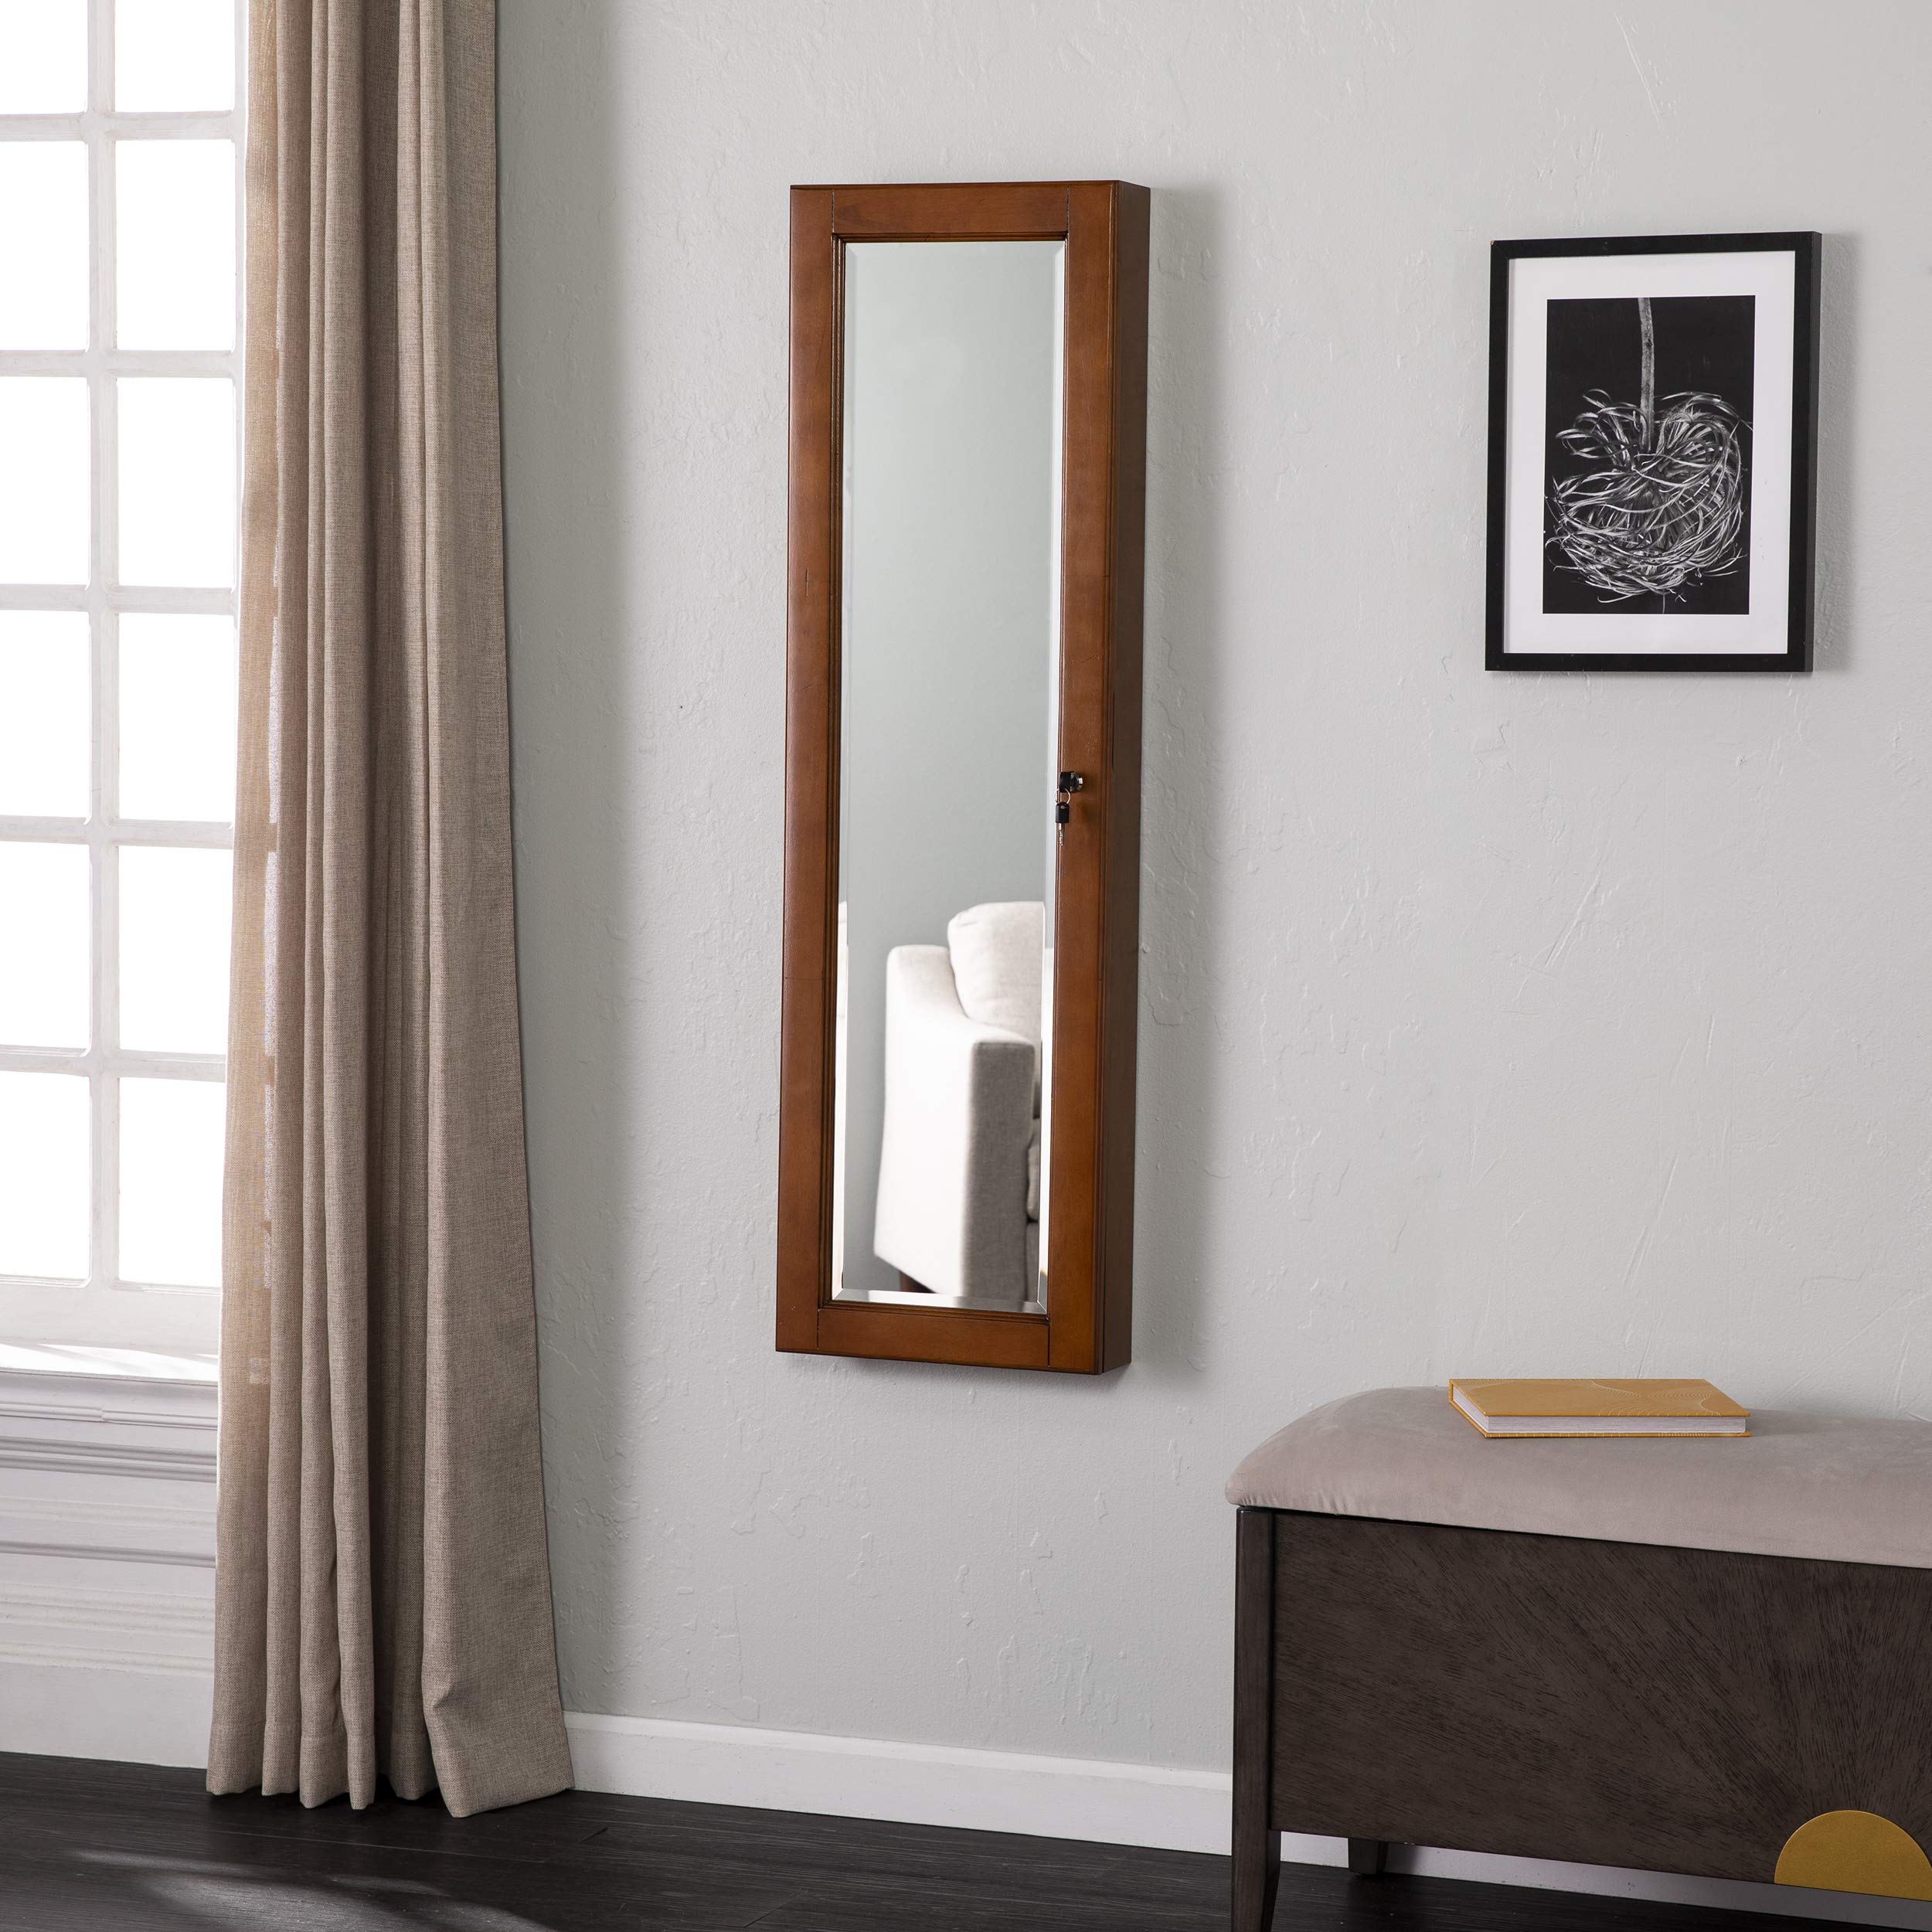
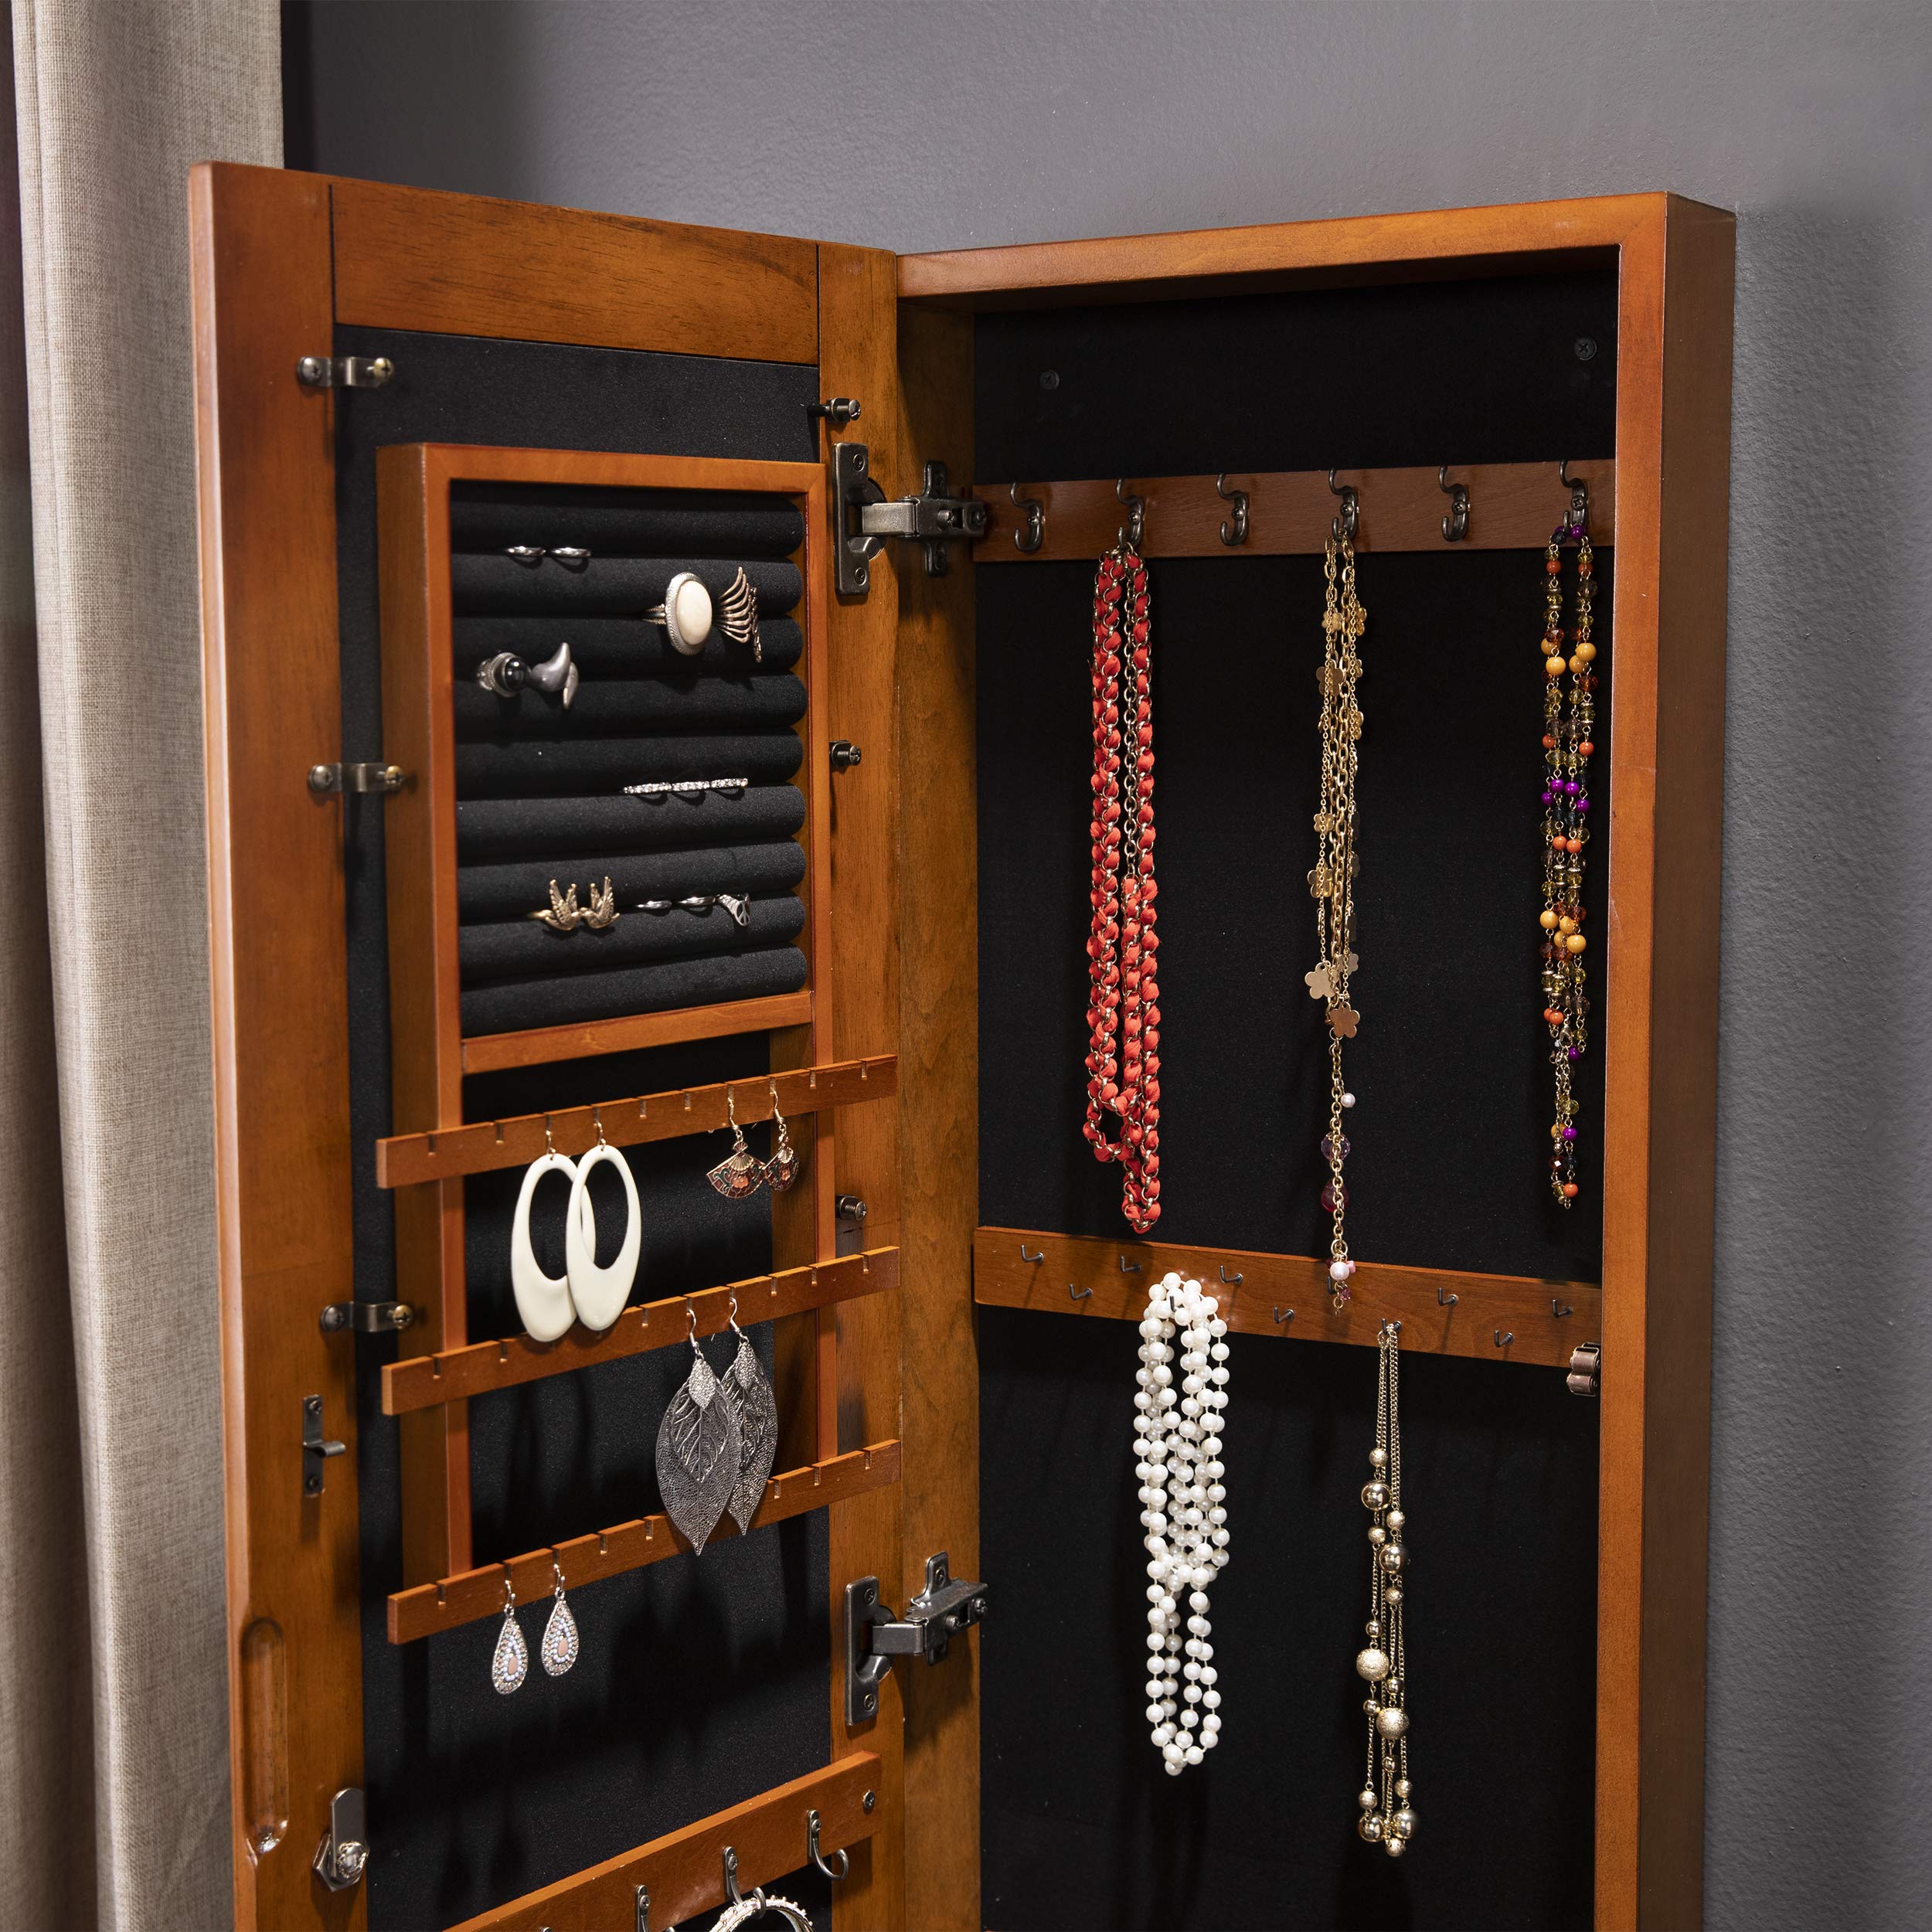
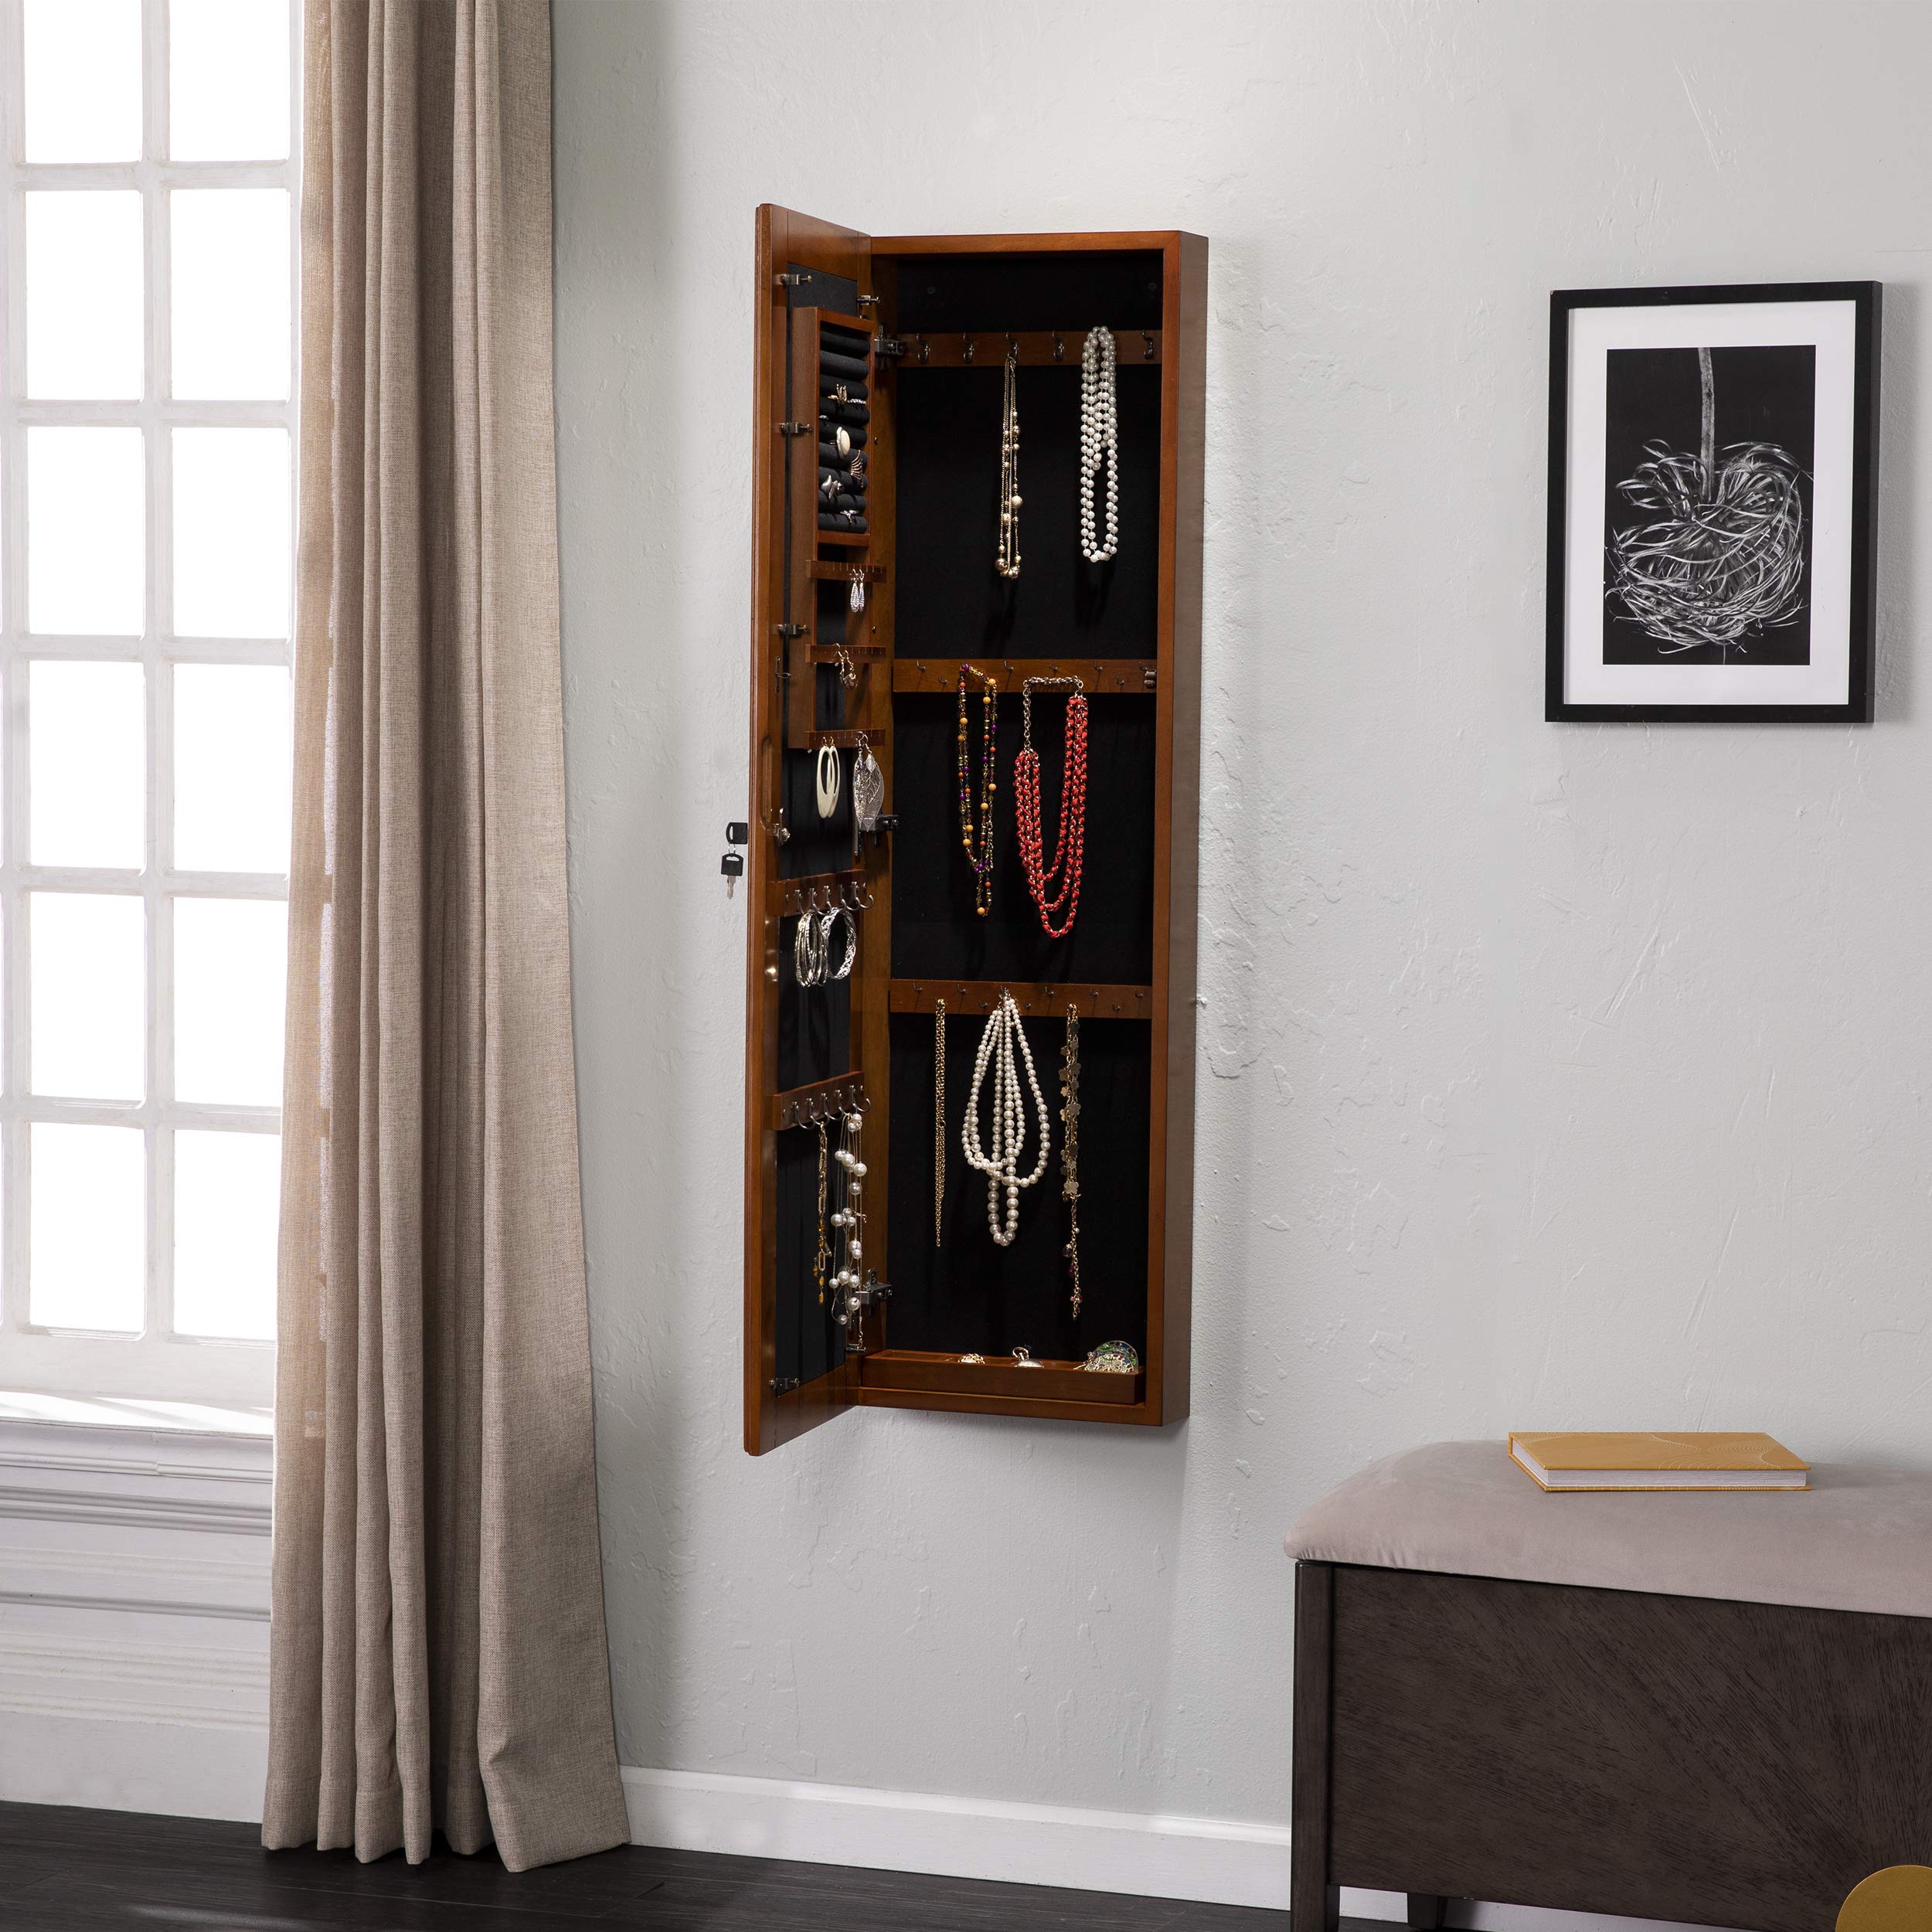
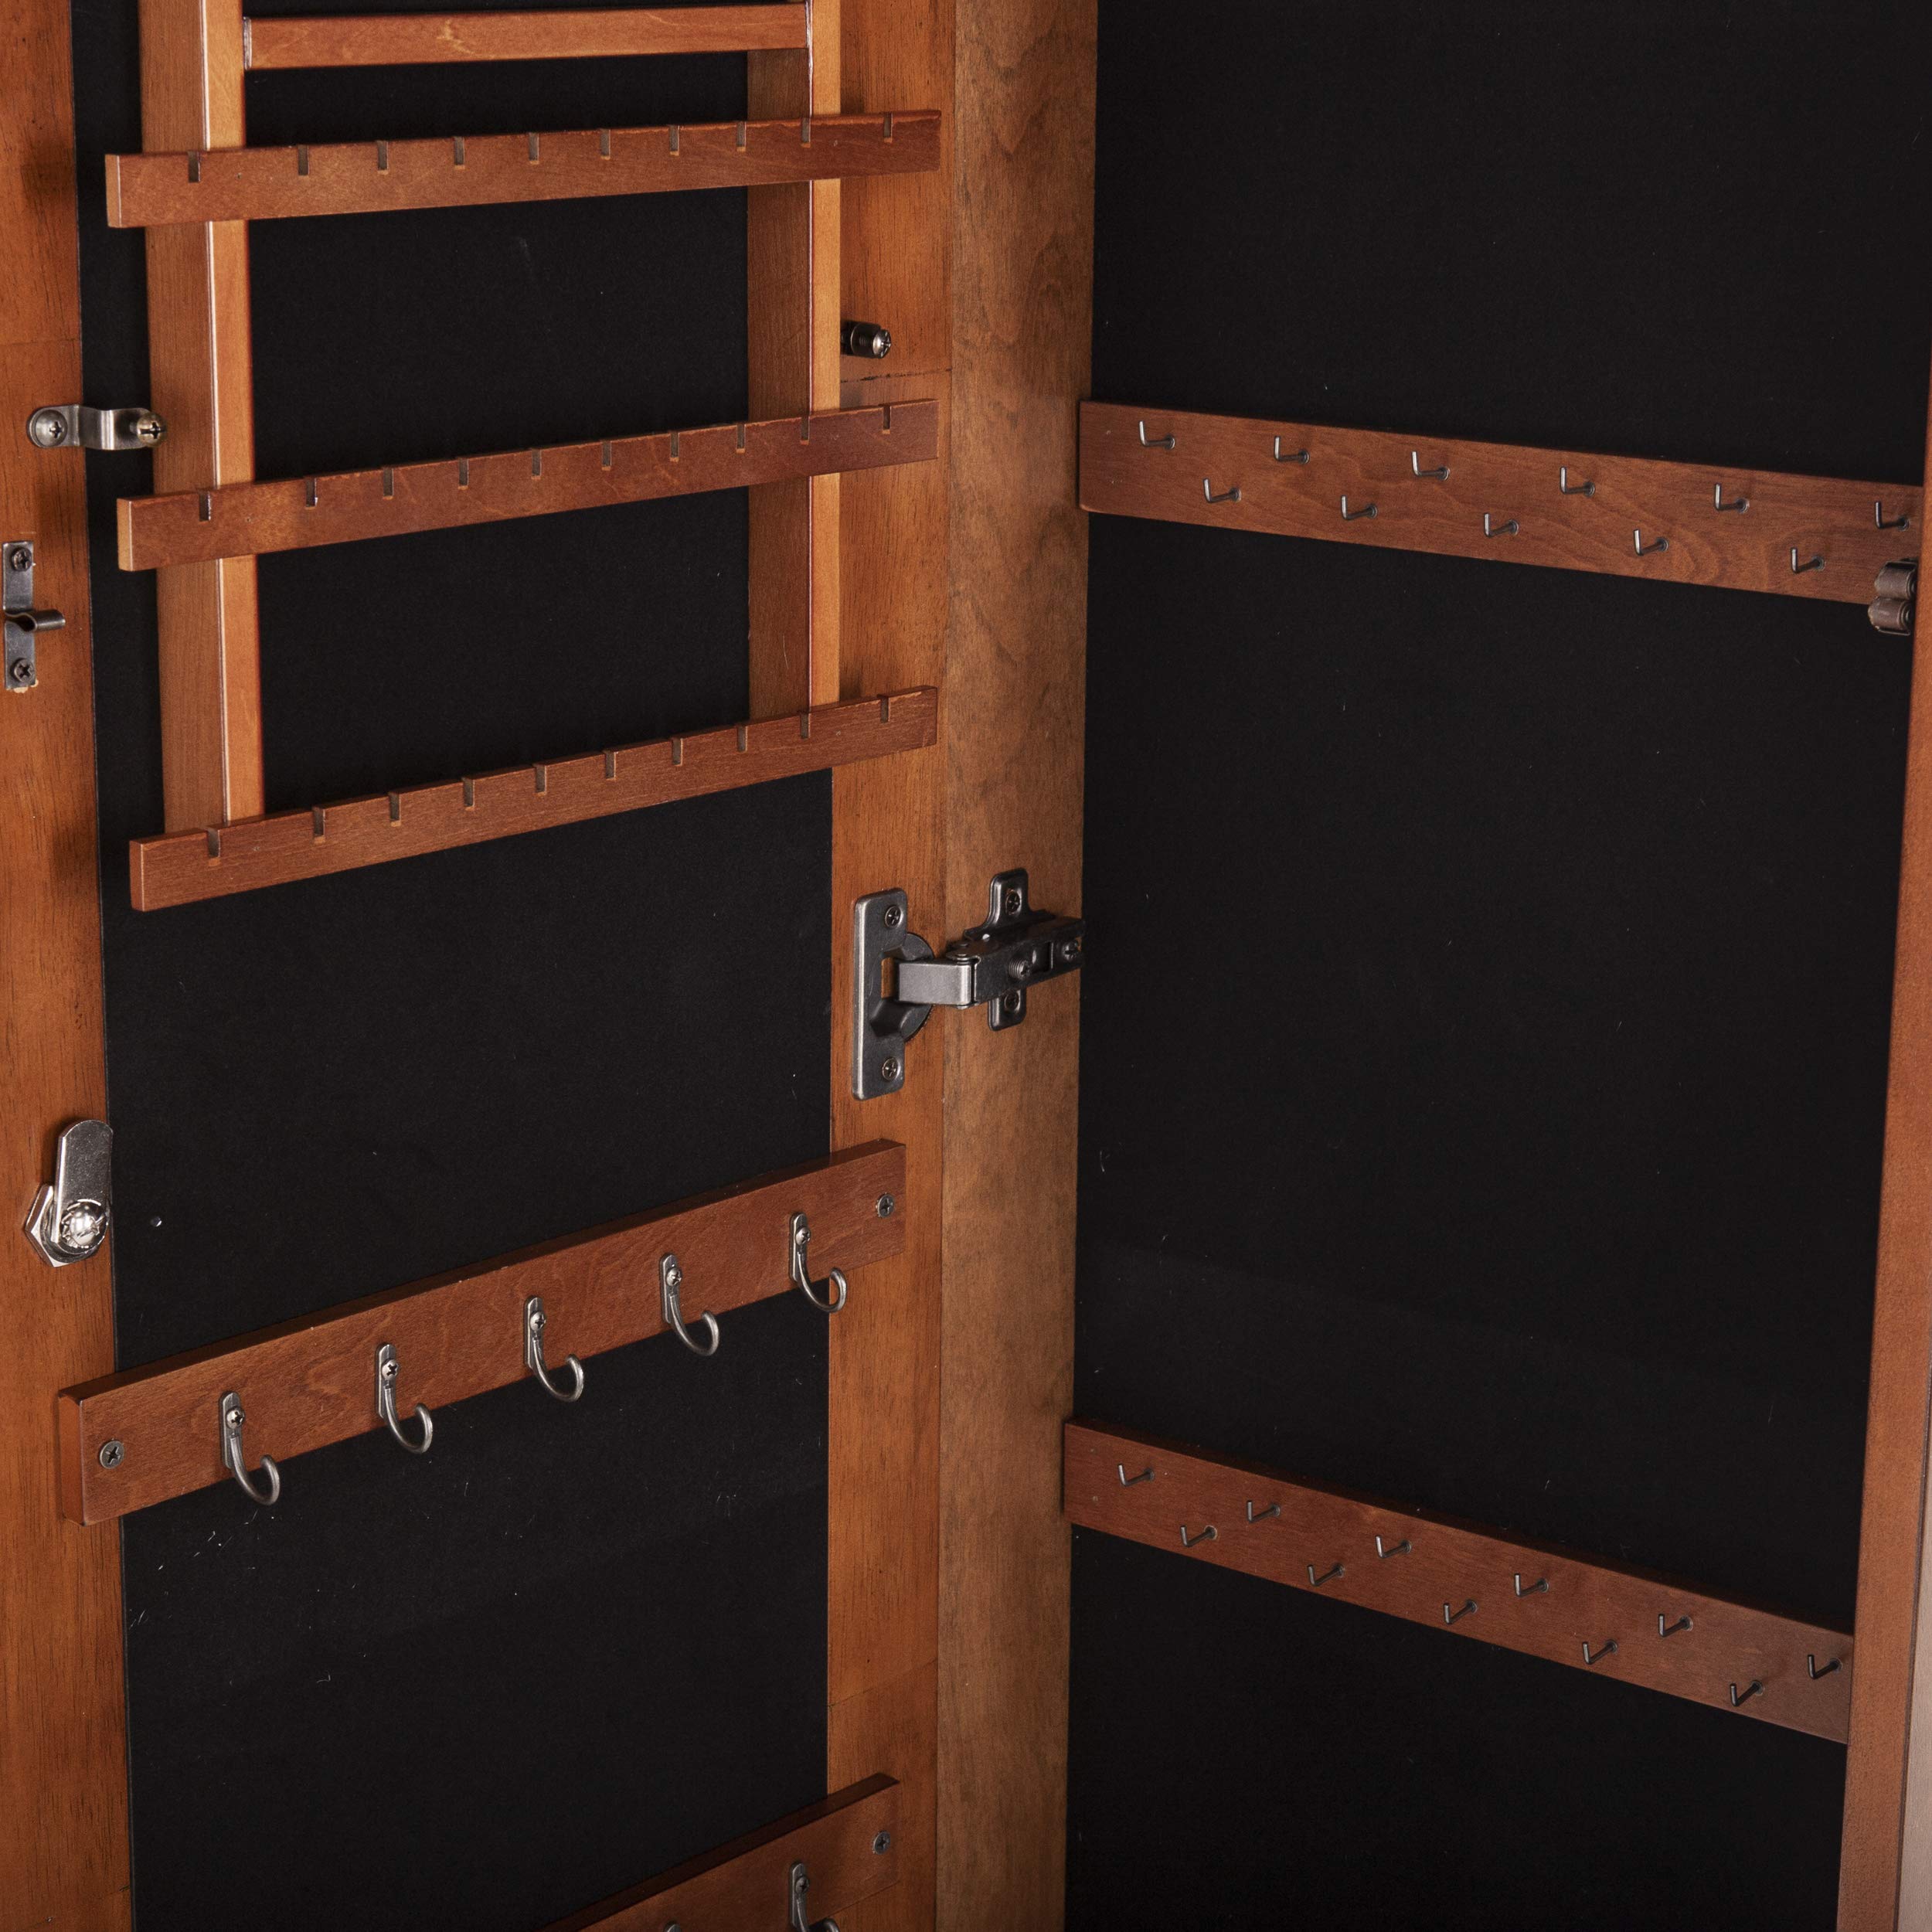
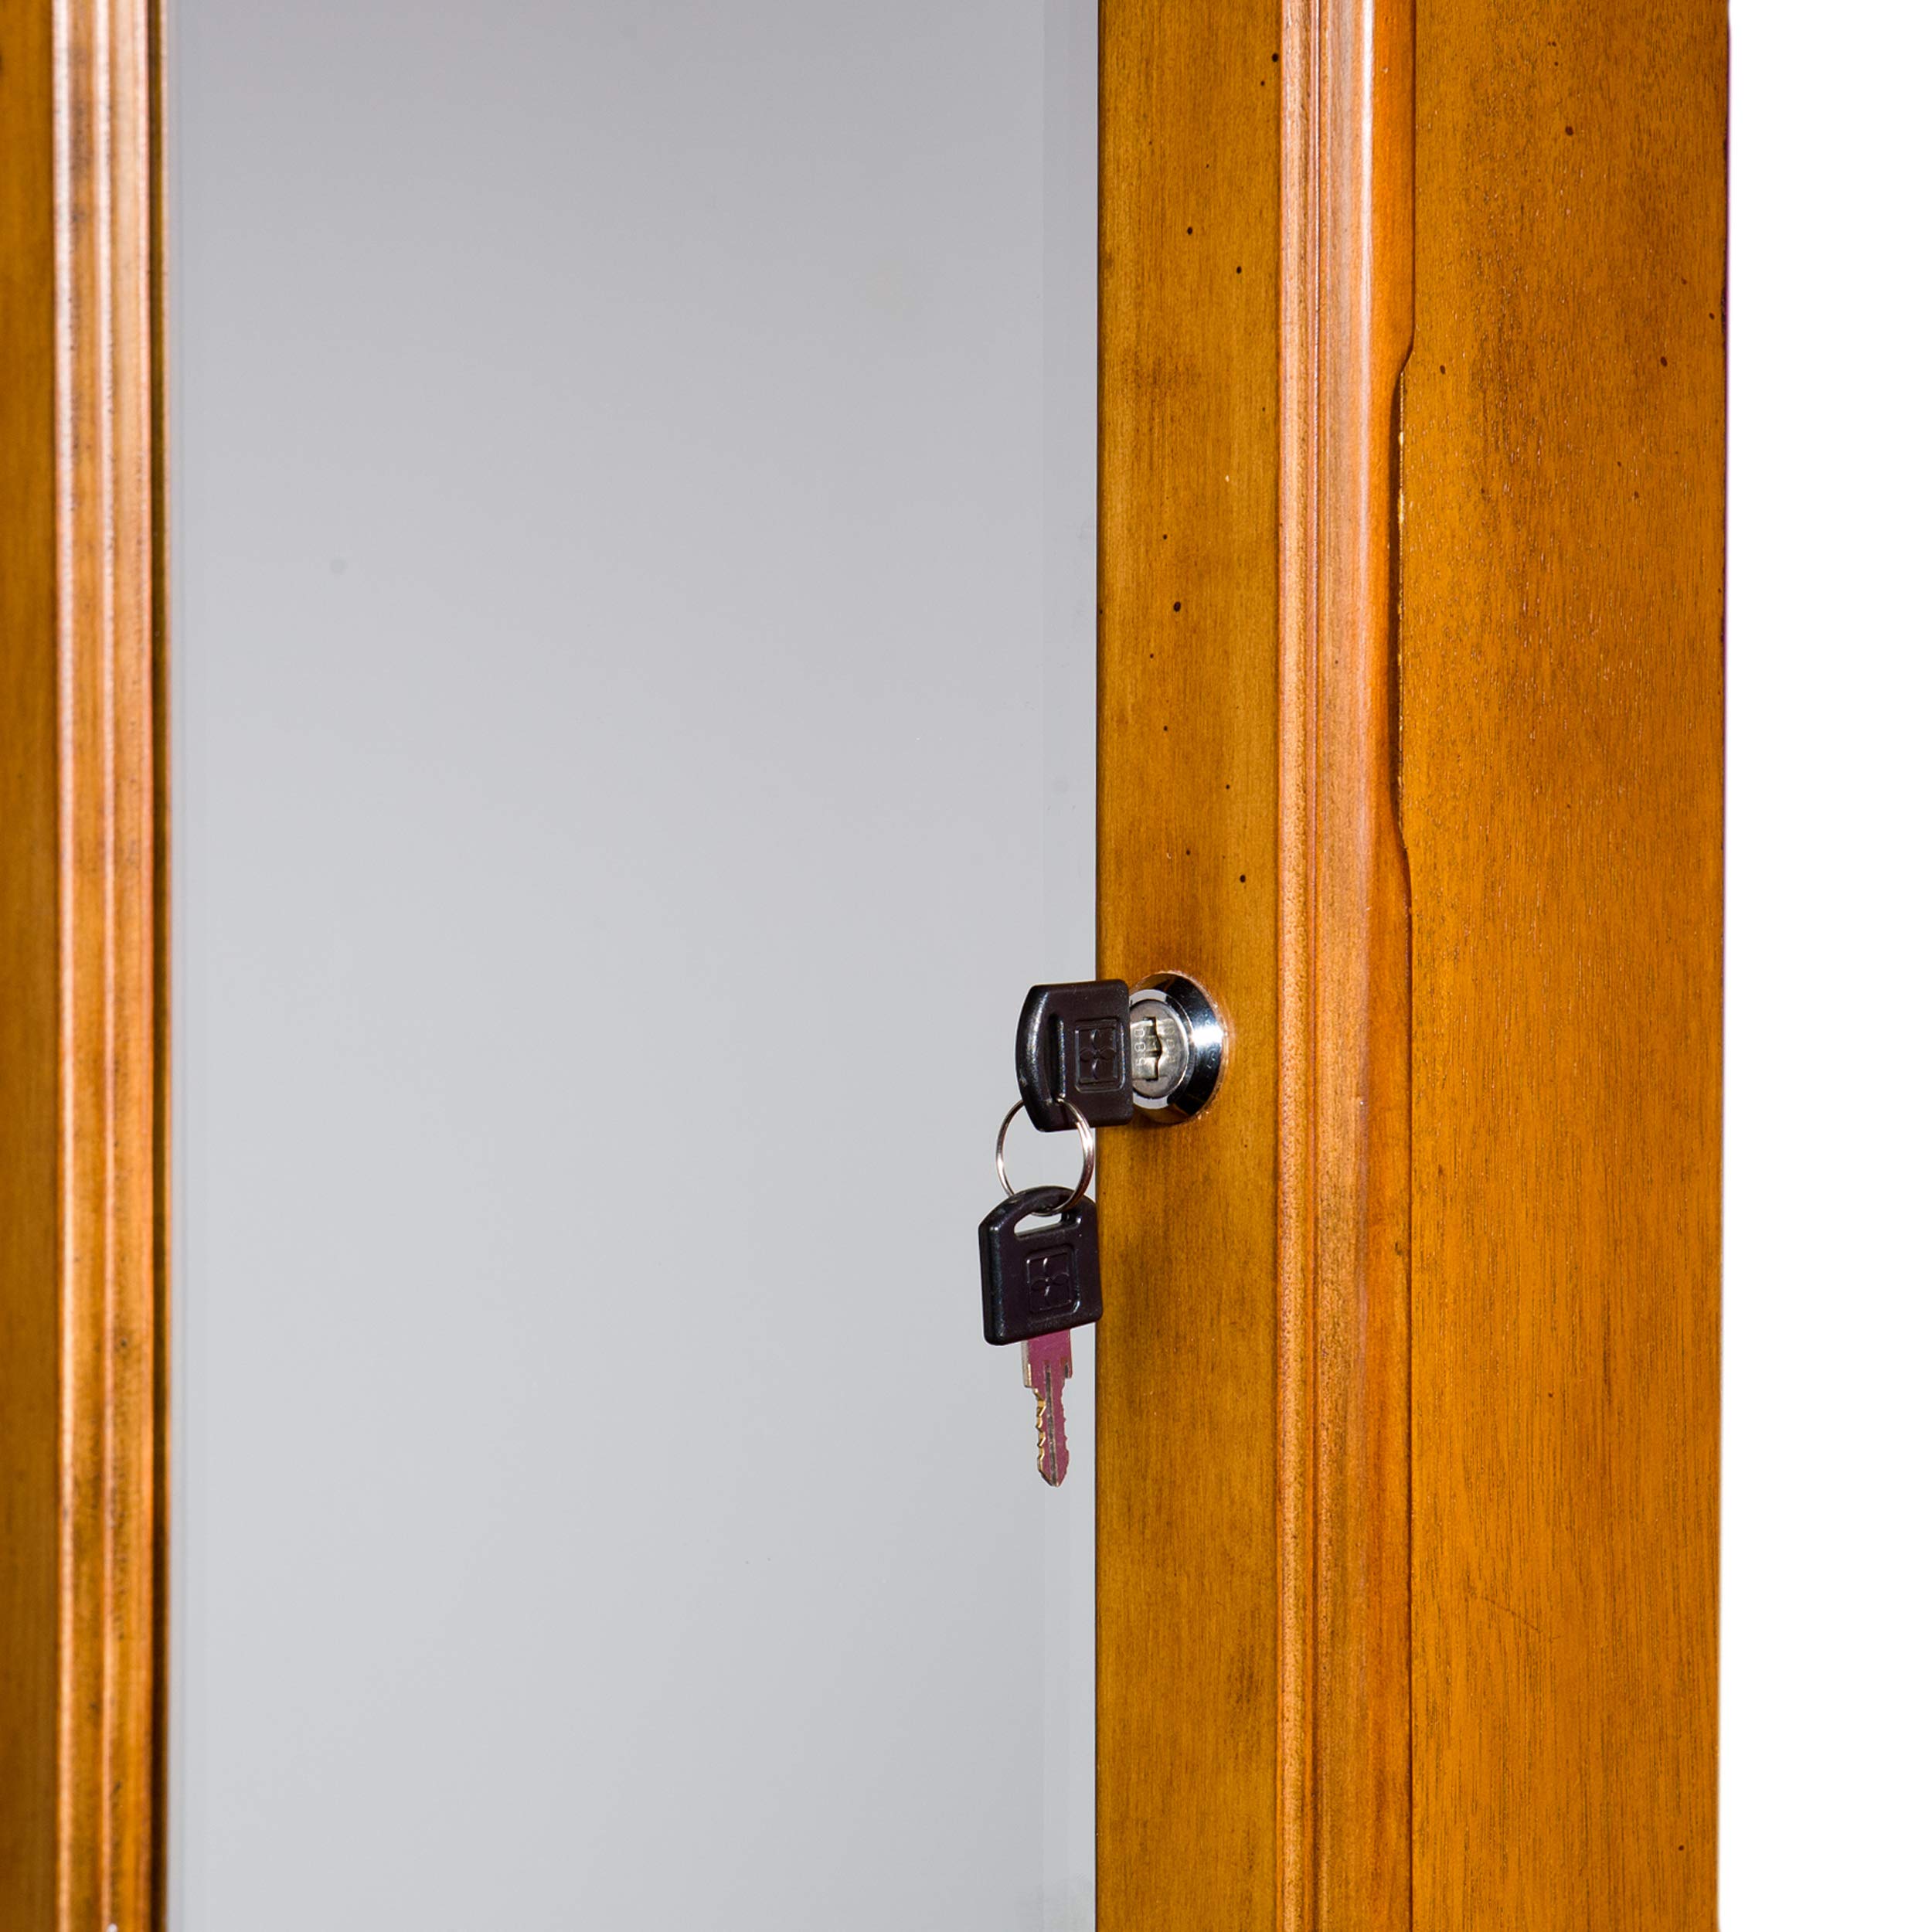
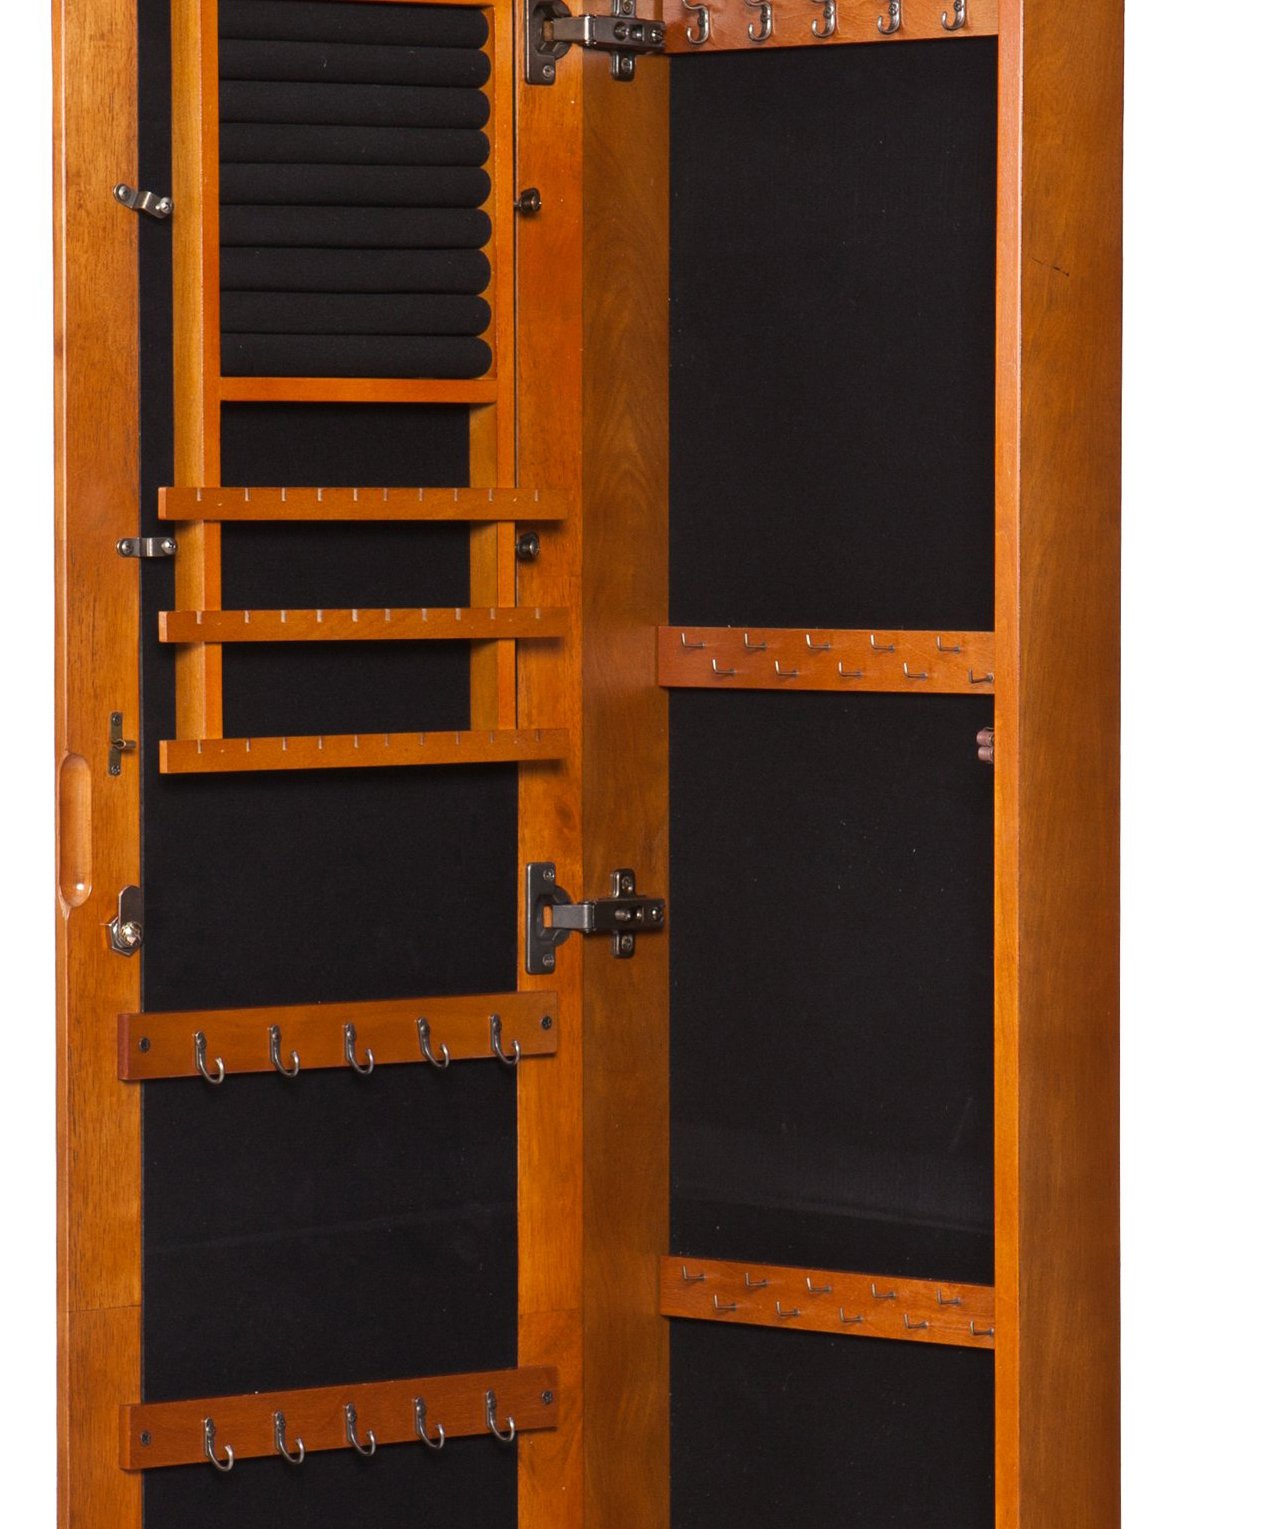
The SEI Furniture Wall Mount Jewelry Storage Mirror combines a secure keyed lock with a stylish beveled mirror and a distressed oak finish. Designed for optimal organization, it features multiple hooks, cushioned ring holders, and storage bins within a slim, wall-mounted cabinet measuring 14.5" W x 4.25" D x 48.25" H. Crafted from quality materials and ready to hang, it’s the perfect blend of function and elegance for any modern professional’s space.
| Color | Oak |
| Brand | SEI Furniture |
| Material | Glass, Wood |
| Style | Traditional |
| Special Feature | Necklace / Tie HooksLockingExternal Mirror |
| Recommended Uses For Product | Ring |
| Product Dimensions | 4.25"D x 4.25"W x 48.25"H |
| Target Audience | unisex |
| Shape | Rectangular |
| Finish Type | Wall Mounted |
| Inner Material | Metal |
| Number of Drawers | 4 |
| Item Weight | 31.5 Pounds |
| Number of Compartments | 1 |
| Number of Items | 1 |
| UPC | 715007581031 707137123472 091037166586 037732050645 852672936916 037732704968 037732804514 |
| Manufacturer | Southern Enterprises, Inc. |
| Global Trade Identification Number | 00037732050645 |
| Item Weight | 31.5 pounds |
| Item model number | VM5064 |
| Is Discontinued By Manufacturer | No |
| Weight | 32 Pounds |
T**T
Satisfaction On the Second Try - Amazon Service Was Great!
My husband wrote the following review:“The SEI Wall Mount Jewelry Mirror is a nicer product than I was expecting. It is a much deserved Valentine's gift for my wife which she picked out. We both think it's pretty spiffy. It was packed well, the corners are square, the hooks were properly installed, the lock and keys work easily, and the cherry finish is nicely done. Note: in my photo the finish may appear lighter than it really is. That is because I gave it more contrast so that you could better see the reflection in the mirror. I was the designated installer and I have a few tips for you on that subject.First, I encourage you to inspect the mirror carefully before you mount the item on the wall. Yesterday, because of mirror distortion, I mailed the one in the photo back to Amazon via UPS. Amazon absorbed that expense. A replacement arrived a few days ago and there is no problem with it. Amazon's service in getting us the replacement was superb! I have included a photo of the original one because the distortion on the upper half of the mirror shows clearly. Notice how my aluminum straight edge (that I use for wallpapering) appears to be bent. Believe me – it is absolutely straight. If you get one of these and it tests out the same way, possibly raising one ear and lowering the other and putting a subtle asymmetrical cone on one side of the top of your head and none of that bothers you - go for it. Otherwise, ask for a replacement because, at least for us, it was worth the minor inconvenience. And, since I used snap toggles the second one got installed in just a matter of a few minutes!Here's how I missed the mirror imperfection, (until after I had mounted the cabinet on our wall): When I took the top off the box I uncovered the mirror and checked it right away. I straddled it as it lay on the floor, leaned down, peered upon it and noticed nothing out of the ordinary. This is because the distortion increased with increasing distance from the mirror – and I was up close. I installed the item on the wall so that when my wife rounded a corner from her closet she could see the mirror from a distance of 12 feet - giving her a nice full length view. As one approached the mirror from that distance the distortion continued but decreased some. Standing right up close to the mirror it was not as noticeable. I suspect the fault lies not with Amazon but with the manufacturer's quality control.Now for the installation. The cabinet is too narrow to use two studs. The instructions advocate using a stud when you have drywall, no matter what. Of course, probably more often than not (and if you're picky like me) centering would end up making no studs available. In my case I was lucky enough to be able to center on one stud using the single hole at the vertical mid-line near the bottom of the cabinet's back. For the two holes near the top (spaced 9 3/4” center to center) I used snap toggles. I had never used snap toggles before but now I'm sold on them; in my opinion they put other types of toggles to shame for this kind of job. I suggest you “Google” “snap toggle” if you've never seen one so that you will know what to look for. YouTube instructions for snap toggle installation are also available. I got mine at Lowe's for less than three bucks for a package of two – 3/16” diameter bolt size (which fits the cabinet's holes perfectly). That size requires a half inch hole in the drywall – so it helps to have a half inch drill bit. It was a piece of cake! And here is one terrific and unexpected benefit: Leveling is really easy! Those half inch holes allow for enough play so that you will have no trouble at all tightening it down into a perfectly level position. I would not be uncomfortable using snap toggles on drywall in all three attachment points as they are very strong.My advice: Take your time, think it through, and, as others have advised, don't use the attachment hardware that is provided with the unit unless you like to live very dangerously. I used an end table to set the cabinet up against the wall because that table was almost the right height. A few pieces of Styrofoam sheeting that came in the packing worked as nice shims to position the cabinet to exactly the right height. Magazines or cardboard would do the same. I could have done the job without assistance. However, my foreman, (or is that forelady?) was nearby so I had the added advantage of those two delicate extra hands, just to play it safe. Please have fun with the project so that it's a pleasant experience for the recipient.
J**R
Great organization for your jewelry without taking up space
First let me say that I've been wanting some type of jewelry armoire for years... the last time I had anything to organize my jewelry, it had a pirouetting ballerina music box in it (I was about three years old). So, part of my enthusiasm for this product is a reflection of how desperately in need I was for a jewelry storage solution.That said, I am absolutely in love with this wall-mounted jewelry armoire. I have amassed a decent number of earrings, necklaces, and bracelets over the years, and this armoire (surprisingly) holds just about all of them. Before I bought this, I kept my jewelry in various drawers with dividers. No matter how careful I was to keep necklaces separate, they became tangled almost instantly. I've broken necklaces because of this. So, it was a joy to see all my necklaces, bracelets, and earrings so very neatly hanging in a way that they can't possibly become tangled, and I can instantly see and pull out the one I want. The double hook section is great for sets that belong together.A surprising benefit: A lot of the stray earrings I had that I thought had lost their match years ago, I discovered I still had both! In the process of organizing my jewelry, I also found three necklaces I thought I had lost, including my wedding-day pearls. I feel like I've won new jewelry! Of course, as I said, this would happen no matter what kind of jewelry armoire you use, but still, that has made it worth every penny already.The armoire has far more ring storage than I could possibly ever use (I only have four rings, and I'm usually wearing two or three of them), so I use the ring storage area for smaller earrings. It works perfectly, but you have to make sure you push them securely in so they won't fall out.By far, the most wonderful thing about this armoire is that it basically takes up no space at all. I put mine in my master closet behind the door, which was wasted space anyway (and now I have the bonus of a full-length mirror in the master closet!). This is the ideal piece for anyone with limited space. I actually have a fairly large bedroom and closet, but I still like the compactness of it.When I write reviews, even overwhelmingly positive ones, I like to list any drawbacks... but with this armoire, I honestly can't think of any. The one thing that put me off initially was that the oak finish has a bit of faux distressing, including some random dark marks. When I first opened the box, I thought, "UGH"... but now that it's on the wall, it looks a lot better than I thought it would. I would probably buy it in cherry if I were buying it again. The oak goes well with my closet shelving, though, so I'm happy with it.If you have a huge jewelry collection (e.g. hundreds of necklaces), this probably won't be enough storage for you. But if you have a normal-sized collection, this is the perfect amount of storage.One tip for installing if you don't have someone who can hold it up while you drill the screws into the wall: I installed this by myself using a couple of large boxes. I stacked the boxes on the floor where I planned to install it, and set the armoire on top. The boxes held it perfectly still while I drilled it into place.As other reviewers noted, the wall anchors that come with it are flimsy. I keep a supply of heavy-duty metal anchors from Home Depot because I never use the flimsy plastic anchors that come with things like this. I don't consider that a drawback, but be aware that you'll want to spend a dollar or two on heavy-duty anchors.Bottom line: This is a fantastic, perfectly-sized, well-crafted way to storage all your jewelry. I've had mine for about a week now, and I find myself going into the closet, opening it, and just *staring* at it (what can I say, it's fun to see things well organized! LOL). I wish I'd had this years ago!
M**2
Excellent armoire with horrible mounting hardware
This is a quality product that is solidly built and looks beautiful once mounted on the wall. My wife loves the amount of storage it provides and all the options for different pieces of jewelry. HOWEVER, the mounting hardware that they included is a joke... Spend a few extra bucks at the hardware store and mount it properly.My installation advice would be as follows:(A second pair of hands is highly recommended)1. Take the door off (removes half the weight and makes for a less awkward install)2. Put 4 to 6 round stick-on felt pads on the back to protect the wall3. Hold the unit on the wall where you want to mount it, level it, and mark the three holes (don't worry if there isn't a stud behind any of the holes, just put it where you really want it to hang)4. Use a 5/8" drill bit for all the holes that are not into a stud (if there is a stud behind one of the holes there is no need to drill, just use a 2" self-tapping cabinet mounting screw in that hole)5. Put #3/16" x 3" toggle bolts (plus washers) through the cabinet holes and install the toggles on the other side (7 to 9 turns)6. This is where the second pair of hands helps... Hold the cabinet up to wall and push the toggles through the holes. Make sure you hear the toggles open up on the other side of the drywall. Then pull the bolt head towards you to ensure the toggle grabs the inside of the drywall. While pulling the bolt towards you, start to screw the bolt tight (If you don't apply outward pressure, the toggle will just spin inside the wall)7. Check the level again and tighten all toggle bolts and/or cabinet screw if you used one (***caution*** do not over tighten the toggle bolts and pull them through the drywall8. Reattach the door and clean upHope this helps
Trustpilot
3 weeks ago
1 week ago