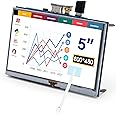
👾 Elevate Your Projects with Touchscreen Precision!
The ELECROW 5 Inch Touchscreen TFT LCD Display Monitor offers an 800x480 HD resolution in a compact design, making it perfect for Raspberry Pi and other compatible devices. With its industrial-grade resistive touchscreen, this monitor is built for durability and versatility, supporting various platforms while ensuring energy efficiency and ease of use.
| Standing screen display size | 5 Inches |
| Screen Resolution | 800 x 480 |
| Max Screen Resolution | 800 x 480 Pixels |
| Number of USB 2.0 Ports | 1 |
| Brand | ELECROW |
| Series | RR050 |
| Item model number | RPA05010R |
| Item Weight | 3.99 ounces |
| Product Dimensions | 2.76 x 4.72 x 0.35 inches |
| Item Dimensions LxWxH | 2.76 x 4.72 x 0.35 inches |
| Color | Black |
| Voltage | 5 Volts |
| Manufacturer | ELECROW |
| ASIN | B013JECYF2 |
| Country of Origin | China |
| Is Discontinued By Manufacturer | No |
| Date First Available | August 7, 2015 |
I**T
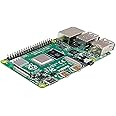
Rasberry Pi 3 - Easy Install Instructions
This screen is a great little device. It is bright and crisp. The touchscreen works well. Installing it took me quite a few tries though, so I thought I would post my findings to help someone else.I have have only tested this on a Raspberry Pi 3 running Debian Jessie, but it may work on other versions and flavors.Strong recommendation: Do not bother downloading the so-called "driver" noted in various places. The version for Debian Jessie is really just a script that copies configuration files (that seem to have some errors) into your /etc/ directories that brick your device. Happily, there is no need to do this, you can easily modify the files yourself.Prior to connecting the new display, do the following:The only software you need is for the touchscreen. You can get this with "sudo apt-get install xinput-calibrator"Then edit /boot/config.txt to add the following lines:----------------------------------------------------------------------------------hdmi_group=2hdmi_mode=1hdmi_mode=87hdmi_cvt 800 400 60 6 0 0 0dtparam=spi=ondtparam=i2c_arm=ondtoverlay=ads7846,cs=1,penirq=25,penirq_pull=2,speed=50000,keep_vref_on=0,swapxy=0,pmax=255,xohms=150,xmin=200,xmax=3900,ymin=200,ymax=3900 <======Note this is all on 1 line!dtoverlay=w1-gpio-pullup,gpiopin=4,extpullup=1----------------------------------------------------------------------------------Shutdown the pi, and connect the display. When you power it back up, you should have a perfect display. You can now calibrate the touchscreen by running Menu-->Preferences-->Calibrate Touchscreen. Click each of the four targets when requested and then you will get a text window which explains what you should put into a calibration file. For the Pi, the filename should be /usr/share/X11/xorg.conf.d/99-calibration.conf.And presto, you are done. I bricked my Pi 4 times getting this figured out...it is silly how easy it is once you know what needs to be done.Good luck!
F**X
Solid, bright, works great.
This little screen is fantastic, and a pretty dang good deal, to boot! I wanted to make myself a little portable Pi-based machine to take with me on the go, and a 5-inch screen seemed just about the right size. There are plenty of choices here on Amazon, but I decided to give this one a shot since it could also be used as a regular HDMI monitor.As the instructions note, this will not work with your Pi right out of the box; it needs some drivers and configuration settings tweaked first, or it'll light up and look like it's broken at first. A helpful note card included with the display lists a couple websites - one is the company's wiki that lists step-by-step instructions on setting things up, and the second is a helpful youtube video that gives a full run-down as well. Following the instructions on the wiki was a snap - Just install the latest Raspbian, copy/paste some configuration settings, clone Elecrow's git repository, run the binary, and reboot. Voila, a bright, sharp, vibrant display, ready to go.I'm currently attempting to find a nice case to put it all in for safer transport, but even without that, I'd say this is a great choice if you just want a small touchscreen display for your Raspberry Pi.
J**H
Great looking screen, but the touchscreen is not as large as the screen.
Great looking screen, however the touch area is a tad bit smaller than the display area.For the price, it is a fantastic value. The HDMI connector works well, and it comes with supports for adding it into an enclosure.The stylus it comes with is nothing to brag about, but it indeed works.Display is sharp enough to read most text on it.I hooked this up to my raspberry pi3, and it immediately displays thru the HDMI port. The power is also shared between the raspberry pi and the display itself, however I did get power warning indicators meaning that I ended up using two USB wires to power both the display and the raspberry pi module itself.Things to note: As others have indicated for these displays, when initially using this, it will not natively fill the screen all the way. Meaning that you will need to have the proper drivers, and also add the correct display parameters to take advantage of the full screen.The second thing that I noticed, is that you will be required to manipulate the drivers for the touch screen aspect of it. Luckily there are some guides around, and some calibrations that you will need to do to get it working properly. To have mine work properly what I needed to do, was to reduce the display size to match (as well as possible) where the touch screen could actually sense. No, it will not sense at the edges of the screen, so you will need to play around with the display area in order to be able to hit the menu bar.Version of os: Raspbian JessieChanges to get it to display full screen:Open terminal and use the command: sudo nano /boot/config.txtCopy and paste this into the /boot/config.txt___________________________________________________hdmi_group=2hdmi_mode=1hdmi_mode=87hdmi_cvt 800 480 60 6 0 0 0dtparam=spi=ondtparam=i2c_arm=ondtoverlay=ads7846,cs=1,penirq=25,penirq_pull=2,speed=50000,keep_vref_on=0,swapxy=0,pmax=255,xohms=150,xmin=200,xmax=3900,ymin=200,ymax=3900dtoverlay=w1-gpio-pullup,gpiopin=4,extpullup=1---------------Within this file you will also need to adjust the borders to reduce the actual display size to correlate with where the touch screen would sense any 'touch'.But before you have any idea where the touchscreen will work or not, the tool I used is xinput-calibratorYou calibrate the touchscreen, and then copy the information (believe it was within /usr/share/X11/xorg.conf.d/10-evdev.conf) However it shows you two locations that can store this information.Be sure to watch the exact lines you edit, otherwise it will fail to boot properly and you will be forced to fix it thru the text prompts.Hope this helps, after playing around with it a bit, it is very useful once you get it working properly!Glad I purchased this, no regrets! Removed one star due to the touchscreen not sensing the entire display area, however for the price, it is acceptable.
Trustpilot
1 day ago
4 days ago