Desertcart purchases this item on your behalf and handles shipping, customs, and support to Sri Lanka.
🚀 Upgrade your drive, keep your controls—effortless tech for the savvy driver!
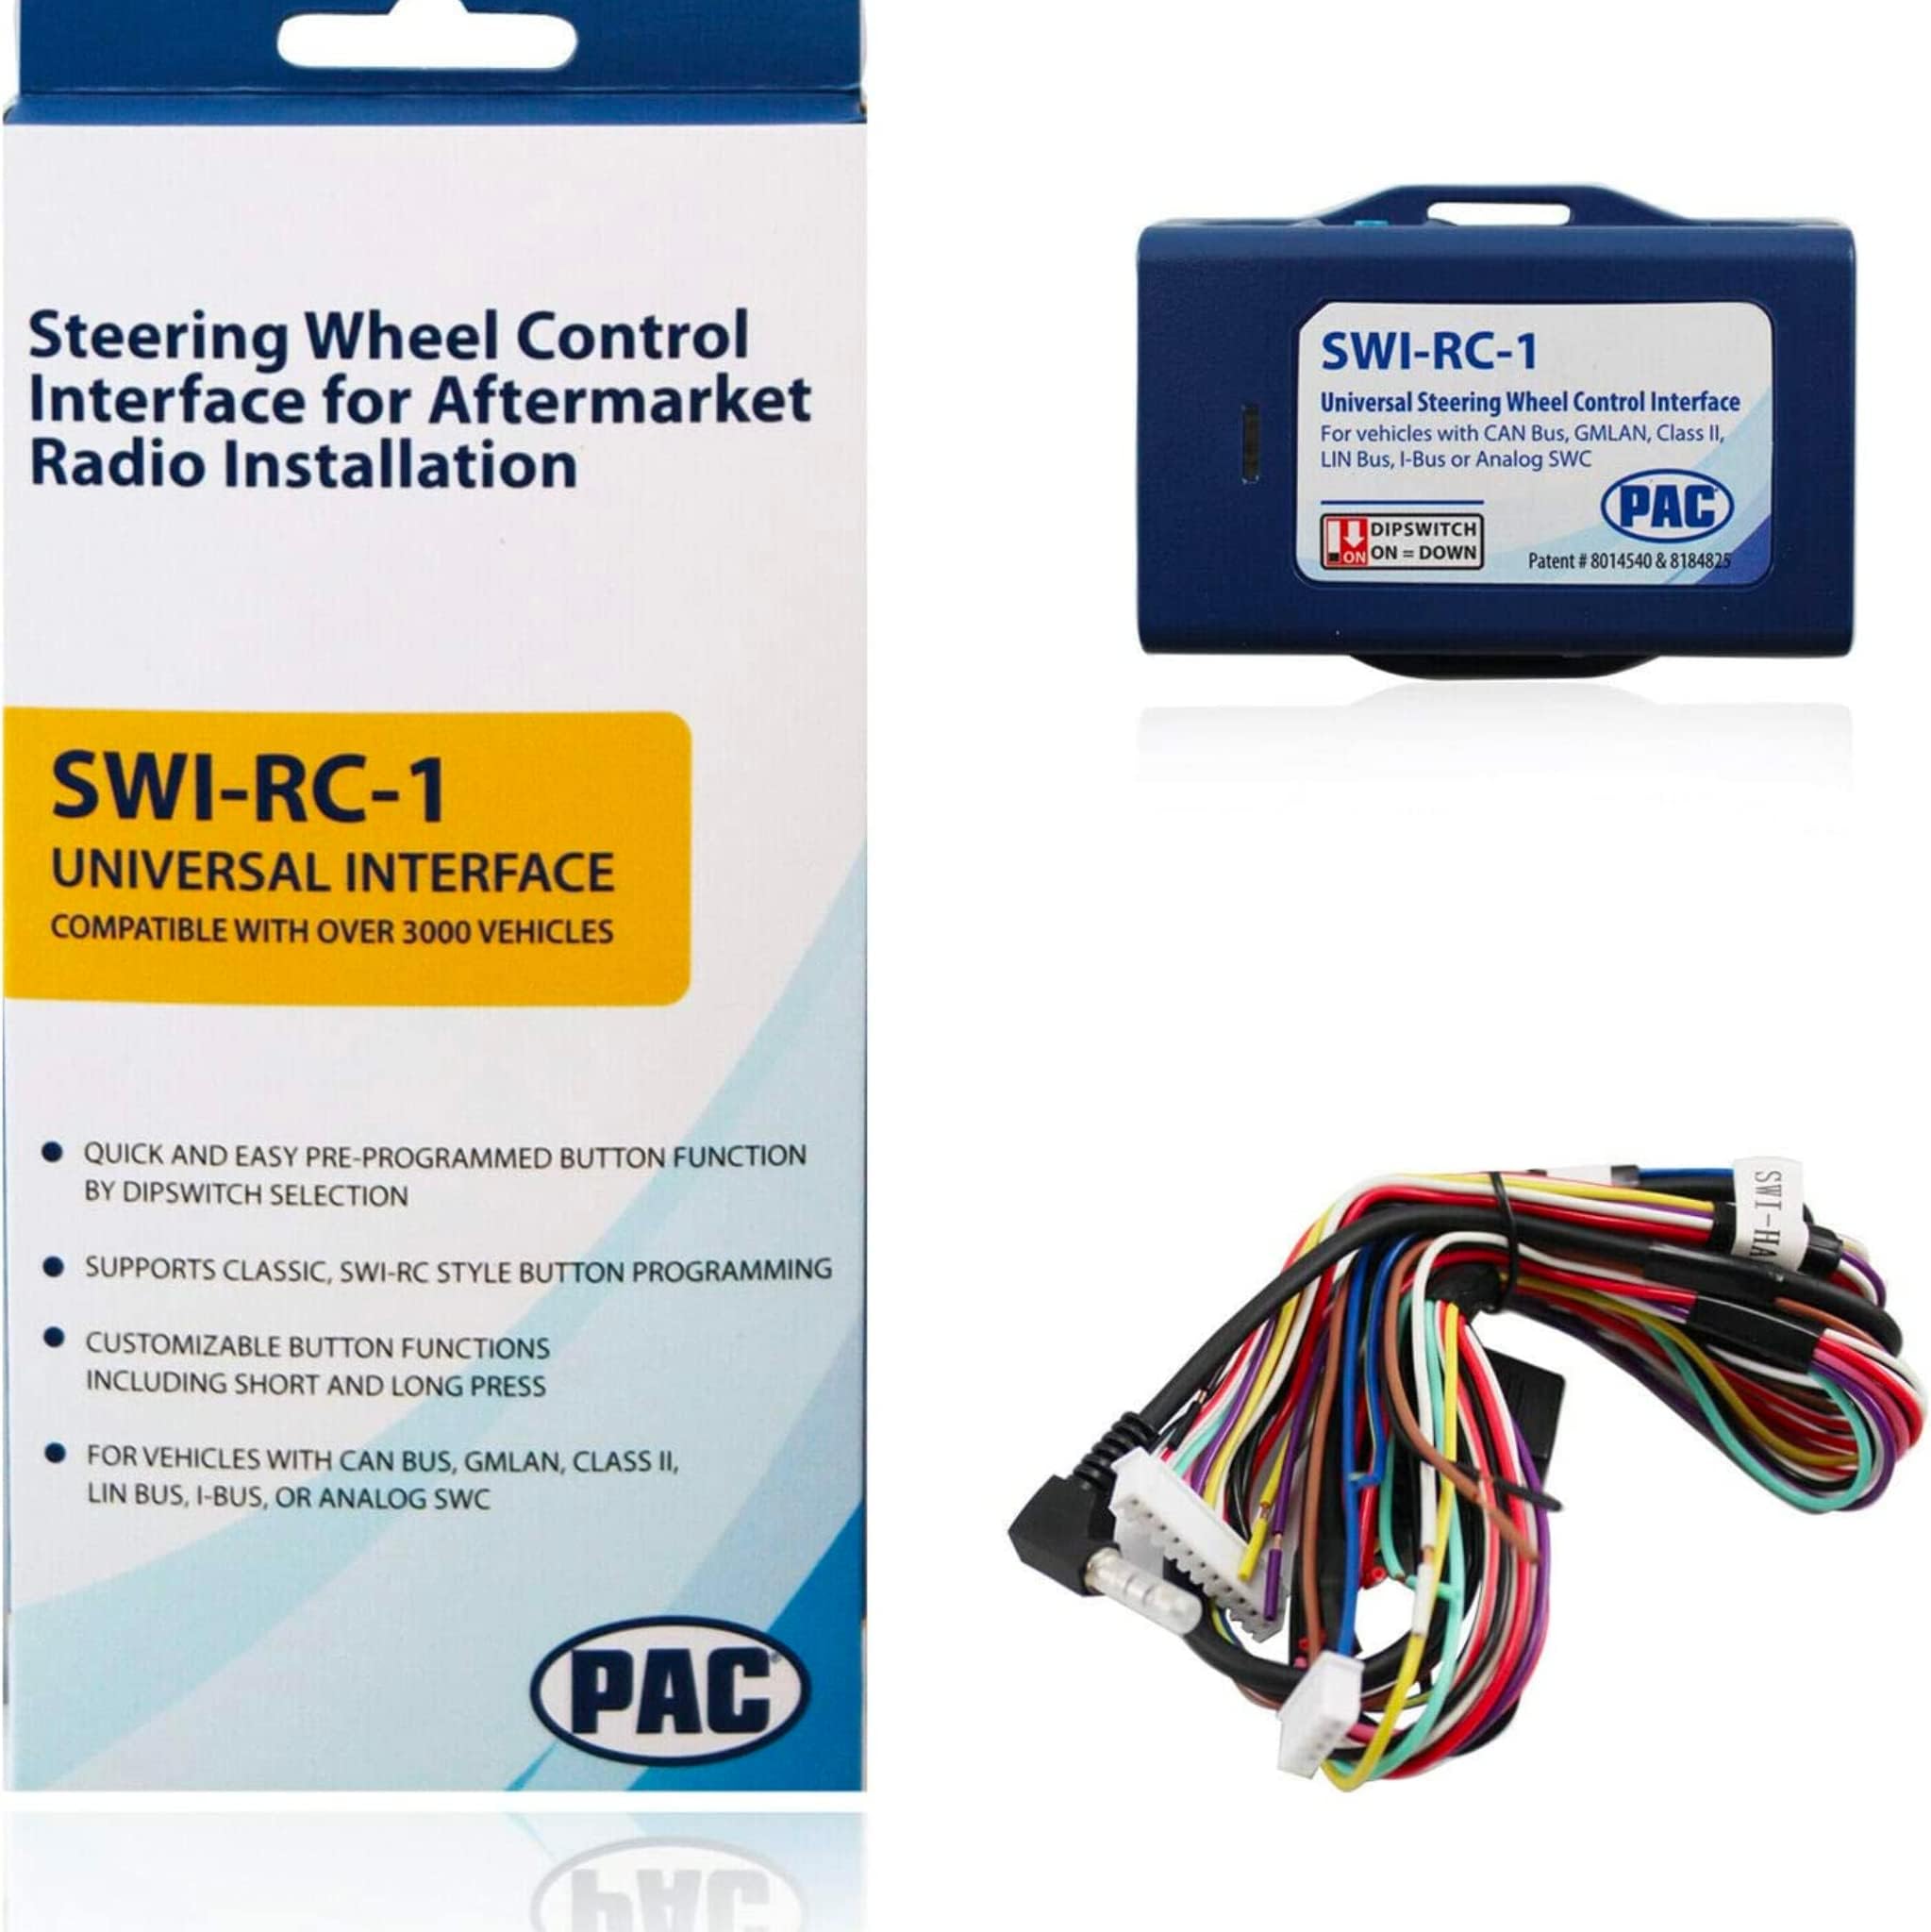
The PAC SWI-RC-1 is a cutting-edge steering wheel control retention interface compatible with over 3000 vehicles featuring CAN-Bus and analog SWC systems. It supports most late-model radios with 3.5mm or two-wire remote inputs, offering easy DIP switch or manual button programming for personalized control. Installation is streamlined via a web-based app, and it includes a 2-Amp 12V accessory output to simplify wiring. Designed for professionals who demand seamless integration and retention of factory steering wheel functions during aftermarket radio upgrades.


| ASIN | B004HKBY8G |
| Best Sellers Rank | #28,413 in Automotive ( See Top 100 in Automotive ) #25 in Automotive Replacement Radio Electrical Accessories |
| Brand | PAC |
| Brand Name | PAC |
| Color | Blue |
| Customer Reviews | 4.1 out of 5 stars 3,676 Reviews |
| Display Type | No Display |
| Global Trade Identification Number | 00606523108843 |
| Included Components | product, manual |
| Item Highlight | For Most Late Model Radios with 3.5mm Jack or Two Wire Connections | DIP Switch Programming | Plug & Play Stereo Harness |
| Item Type Name | install interface |
| Item Weight | 0.1 kg |
| Manufacturer | pac |
| Material | Plastic |
| Material Type | Plastic |
| Model | SWI-RC-1 |
| Number of Items | 1 |
| Part Number | SWI-RC-1 |
| UPC | 606523108843 |
| Unit Count | 1 Count |
| Voltage | 12 volts |
| Warranty Description | 1 year |
P**G
This one works for me, be patient.
2005 Lincoln Navigator with Jensen Receiver with Bluetooth and Sirius/XM radio. I moved the Jensen head unit from a Toyota Sienna which was using the Metra/AXXESS SWC-1 for steering wheel controls. But after installation into the Lincoln I could not get the SWC-1 to work. Now I REALLY enjoyed volume and mute from the steering wheel and was frustrated that I couldn’t get it to work in the Lincoln. So I ordered the PAC SWI-RC which came swiftly in a sealed original box. Wiring was simple enough, power, ground, and SWC signal wire from factory harness Pin 18. The SWI-RC would light up, but the steering control was all wrong. Down volume equaled tuner frequency down, and that was it. What I had to do was dive deeply into the instructions and program the device manually. In other words, the PAC SWI-RC didn’t see the correct signals from the Lincoln despite sensing the vehicle. I ended up following the detailed instructions for manually programming. You basically have to touch each steering wheel button in a sequence to train the SWI-RC to use that button for the desired function on the radio. It took a while but finally I have a working device to use my Jensen head unit with my Lincoln steering wheel controls. Excellent product, and I am happy! If you have this issue, be patient and follow the directions for manual programming if it doesn’t sense the correct vehicle right away.
T**R
Works well once you understand the programming timing
The SWI‑RC‑1 works well, but I ran into an issue where only the first three buttons on my steering‑wheel controller would program correctly. The rest caused the LED to blink red/amber in normal mode. The problem wasn’t wiring or resistance — it was the timing of the button press. My aftermarket steering‑wheel control unit (a generic Chinese model) needs a moment for its resistor circuit to stabilize. Pressing each button slightly longer during programming (not long enough to register as a long‑press) solved the issue completely. If you’re stuck, adjust your press timing and it may fix everything.
A**R
Product good instructions bad
This thing works great. The product itself I would rate 5/5, however the installation instructions were not great and in fact partially wrong. The site has you put in your vehicle and radio and then shows you the wires to connect to the harness and then to the radio. It showed me the 3.5 mm jack for connecting to the radio, however to actually connect to my radio it used the blue and yellow wire. I also have a lot of experience with radio wiring and knew which wires it was looking for me to connect. It is easy to install if you know what you are looking at, otherwise it will take some more time because you may have to research and make sure you are getting the right wires. The instructions i would say are like a 2.7 out of 5, but once you get it hooked up it’s fantastic.
A**E
Full/midsized gm trucks, Atoto unit. *long post* useful info
I brought 3 of these. The first one i received did not work and had the smell of being burnt coming out of the box. Instructions are completely vague and totally useless for any full sized General Motors truck from 99-2002. This section is for all the gmt400 folks who do the UK3 steering wheel control upgrades using buttons from Bravada,Blazer, Jimmy, S-10, Yukon Denali and Escalade. Or If you own a 99-2002 Bravada, Blazer, Jimmy, S10, Yukon Denali, Escalade with Factory UK3 steering wheel controls This unit can work but not with the given instructions from the website. If you want this unit to work properly when you go on the website and set the vehicle for a 1994-1996 Oldsmobile nintey eight or Eighty eight. Both of these vehicles had factory steering wheel controls. The Dipswitch setting for the 8 switch location is absolutely WRONG. The unit will not recognize the button inputs. What I did was set my Dipswitches as if it was in a 1996 Oldsmobile Nintey eight and finally I saw results. The Dipswitch setting they recommend for all the full and midsized trucks is 1 down, 2 up, 3 up, 4 down, 5 up, 6 down ,7 up, 8 up. You will not get results with this. Or at least I did not. I used the Oldsmobile set up which was 1 up, 2 3 4 down, 5 up, 6 down, 7 8 up. This section is for all with an Atoto A6, a6 pro and probably just about any Atoto Android radio. The Dip switch section here is also wrong on the website. This is a 4 switch section that is to pair with whatever radio you are using. For atoto the Dipswitch setting on the website reads out 1 up 2, down, 3 down, 4 up. THIS IS WRONG!. In fact so wrong that the unit does not even recognize input from and of your buttons. The red led light will not turn green confirming that it recognized any inputs from your steering wheel controls. I got mine to work using the Dipswitch settings of 1 2 3 down, 4 up. As stated by PAC This setting is most commonly used by pioneer units. On the Wiring harnesses there are no instructions out of the box that will tell you what wire does what. The website does give you most of what's important such as ground, 12v accessory and 12 v analog (positive wire from your steering wheel control) but that harness has like 12 or 13 other wires so your kind of left with confusion for a bit. Hooking this up to an Atoto unit The other wire harness has a 4 wire harness with a blue/yellow wire, Brown wire, a ground, and a 3.5 mm jack. That 3.5 mm jack is useless, even though I've seen a video on YouTube pairing this unit with an Atoto a6 and the guy states that the 3.5 mm jack is all you need 🤦🏾♂️. I've left several questions on said video about how it was hooked up but no answers of course. You will take the blue/yellow wire, brown wire, and connect them. Now from the atoto radio you will have a brown steering key #(+) and orange with black stripe Steering wheel key (+) connect those together. Now you will take all four of those wires and connect them together and it should work. Again the website tells you none of this and I had to spend hours finding out for myself. I have noticed it works but is very laggy. The unit recognizes the input and will turn green as the buttons are pressed but it doesn't do that great of a job communicating with the radio. This is the first interface I have ever used so I cannot compare it to others, but I will say if you have the extra money get a few universal interfaces and see what works best for you. Or at least use one that has clear correct instructions. I'm not displeased with the interface nor am I completely satisfied. But I am displeased at the blatant wrong information being put out on their website. I was told "Pac" was top teir when it came to this kind of stuff but obviously they missed their mark on this one. Sorry for the long review but if I can help someone out then all this time spent was worth it.
M**A
amazing adapter for a great price!
simple to install and allowed me to install alpine double din in my 17 Nissan frontier without a problem controls worked flawlessly and I was able to do the program manually. Its not too bulky and fits behind pretty much any radio. would recommend to anyone looking for affordable module that can adapt to multiple vehicles without spending a fortune.
C**N
Worked perfect for my 2010 F150
I installed a Kenwood 8709S in my 2010 F150 (base stereo/CD player with SYNC, no navigation) and loved the new stereo, but quickly realized how annoying it was to have to use the touch screen for everything with no steering wheel controls. I got this adapter to try it out as I didn't wanna spend $80 on the maestro unit.... and it works perfectly! The instructions on the website were spot on for my specific vehicle after I entered in the year/make/model and receiver brand. You just flip the rows of switches based on what it's connecting to (outlined clearly on the website) to set the controller for your car/stereo. It describes what wires to connect with both a diagram of the actual pin connector, and with the colors of the wire on the factory vehicle harness. If you can do basic wiring/splicing, this will work great. A few T junctions and some splicing, and it's working just as described. Now I can control my radio without having to focus on a touch screen in the dash, which was a pain when I'm driving 110 miles on the freeway every day. I can't recommend it enough.
O**L
Works great, when it's working. A little tricky to program.
I installed the SWI-RC in an older car (1991 Mitsubishi) along with a brand new Pioneer head unit. The SWI-RC works great, when it works. I was able to program the steering wheel buttons to perform the desired functions (more on that later). But I have had to reprogram the unit twice, with no obvious reason as to why it unprogrammed itself. Actually, it's like the buttons shifted...suddenly "Preset +" became mapped to "Source," and so on. I hope the unit will settle down and retain its correct programming. As others have noted, the wiring harness has two ground wires, but the instructions don't mention that at all. I connected both wires to a single ring terminal and attached it to ground. The biggest challenge I faced was in programming the unit...it kept failing on the final step. To work with my particular steering wheel buttons, I programmed the first 3 functions, then skipped one undesired function, then programmed 3 more, and skipped the final 6. That is, I pressed the recessed "Program" button on the unit itself 6 times to indicate I was skipping those 6 undesired functions. Here are the instructions PAC provided, to illustrate why I did that: "7. If you come across a command in the chart that your steering wheel does not have, or you do not want to program, press the Program Button on the side of the SWI interface. 8. The LED will flash once rapidly and then stay on confirming that you have successfully skipped that command and are ready for the next button. 9. When you are done programming all the buttons, wait for about 7 seconds. The LED will flash 3 times indicating it is done programming. The LED will then flash 5 times indicating the version number." The final 6 button presses all went fine, indicating the functions were skipped. I then waited 7 seconds and the unit flashed 3 times, but then instead of flashing 5 times to indicate my version number, it began flashing quickly and continuously. I reprogrammed the unit (starting from Step 1) several times, with the same result. I verified my wiring connections, and all were good. I tried programming a 14th "skip", since PAC does show 13 steps for some head units, and 14 steps for others, but that didn't help. Finally, I called tech support. The guy I talked with was actually quite helpful, had me run through the programming again, but STOP after the 7th function (that is, not continue on to skip the final 6 undesired functions by pressing the "Program" button). I waited, got 3 flashes, and then got 5 flashes! Yes! I tested the controls, and they worked! That finally did it! I wish I had thought of stopping after #7 in the first place. I should have read the instructions literally..."when you are done programming all the *buttons*..." rather than thinking I needed to program all of the *functions*. Anyway, I hope this helps someone else if they encounter the same difficulty.
H**D
but I would like to attempt to explain it in more detail
A previous reviewer hinted at how to connect this device, the PAC SWI-RC Steering Wheel Control Interface, for use with the ALLOMN Universal Car DVD GPS Player Steering Wheel Wireless Remote Controller, ALLOMN Universal Car DVD GPS Player Steering Wheel Wireless Remote Controller with Audio Volume Bluetooth Switch for DVD Player GPS Navigation System but I would like to attempt to explain it in more detail. Both of these devices are available on Amazon and I purchased both of them from Amazon. Please note that you would use these two devices together if your car does not have audio controls on the steering wheel AND your aftermarket stereo does not have a KEY 1 and KEY 2 wire. My aftermarket stereo (JVC) had a one-wire input for a steering wheel control device. The PAC SWI-RC has a one wire output for steering wheel control (blue/yellow). The first step is to connect these two wires together so that the PAC SWI-RC can send a steering wheel control signal to the aftermarket stereo (JVC in my case). Now, the undocumented method on how to connect the PAC SWI-RC to the ALLOMN steering wheel remote control: The PAC SWI-RC has 3 white wires, (actually one white wire, one white/black wire, and one white/red wire). The ALLOMN remote control has two white wires, labeled KEY 1 and KEY 2. In total you have five white wires, three from the PAC SWI-RC and two from the ALLOMN remote control. Wire ALL 5 of these white wires together as one big connection. I know it may seem counter-intuitive, but the signals carried on these wires are resistance-based, and you can wire all of these 5 wires together. Then you must set the Vehicle Version # to nine (9) on the PAC SWI-RC. The PAC SWI-RC instructions explain how to program the Vehicle Version number into the PAC SWI-RC (this is Step 4 – Programming the Interface). (In case anyone is interested, the ALLOMN remote control sends a resistance signal on the KEY 1 wire for each of the top 4 buttons on the remote, and sends a resistance signal on the KEY 2 wire for each of the bottom 4 buttons on the remote. You can use a voltmeter to verify this.) Of course you must also set the Radio Select Switch on the PAC SWI-RC and properly wire the red and black wires of both the PAC SWI-RC and the ALLOMN remote control. The steps to do this are all documented in the instructions for each device. Once you have properly connected all wires, including the five white wires all together, and set the Radio Select Switch to your radio manufacturer, and the Vehicle Version # to 9, you can then follow the instructions for the PAC SWI-RC on Mapping the SWC Button Functions. I was able to map all 8 buttons on the ALLOMN remote control. I can control volume up, volume down, next track, previous track, mute, music source (e.g. AM, FM, Bluetooth, AUX), phone answer, and phone end/reject from my ALLOMN remote control. The PAC SWI-RC rates 5 stars and the ALLOMN remote control rates five stars as well. As it seems with auto audio equipment, the documentation can sometimes be frustrating if you’re a novice like me. In fairness to PAC, they do a very good job with their printed documentation and web-site (their SWI-RC calculator helped me solve this connection problem with the ALLOMN remote control). PAC just does not have documentation on their website or in their printed instructions on how to specifically ‘talk to’ the ALLOMN remote control (that I could find anyway). In any event, I hope these instructions help if you have a need to use these two devices together. There may be other ways to wire these two devices together, but this was the method that worked for me.
H**I
PAC JAPANではありません。
PAC JAPANの商品ではありませんでした。商品はPAC JAPANとあるのですが。性能は問題ないですが、日本語取説がPAC USAの製品であるためありません。PAC JAPANの保証も受けれません。その違いがあるので、注意が必要です。
L**T
Really good but your radio model may limit what u can program
Works well, instructions are good but quite a bit of paperwork most of which you don't need for your car. I would recommend looking this up on You Tube - found a couple of great videos which stepped through the process. Should check the PAC website and look at the instructions first as this unit can be programmed for loads of functions, but I found that I was limited by the radio I have. ie; I have the Kenwood DDX 372BT but cannot program the 'end call' button on my steering wheel. This model of Kenwood doesn't allow it. Worth checking you can program what you want. Easy to wire up and once you find the instructions that pertain to you, quite easy to follow after a couple of reads. Good price too.
N**4
Very flexible unit. Can be used for loads of different installs.
Works perfectly and very flexible.
C**O
¡Excelente! 👍🏻
En verdad funciona estupendamente bien, sin necesidad de andar detectando ni reconfigurando nada. Tenía instalado el Metra Axxess ASWC-1 en una Jeep Patriot, pero nunca funcionó bien. A veces estaba funcionando, apagaba el vehículo para recoger algo rápidamente, y al volverme a subir ya no funcionaba absolutamente ninguno de los controles del volante. Incluso cambié el dispositivo pensando que tenía un modelo defectuoso, y el siguiente siguió haciendo lo mismo a pesar de que todas las conexiones se hicieron por medio de conectores por soldadura caliente y era casi imposible haber tenido un falso contacto. Este PAC es exactamente lo contrario: lo conectas, y sin configurar absolutamente nada funcionan TODOS los botones del volante (contestar llamadas, activar Siri, cambiar canción, cambiar volumen, etc.), y no se "desconecta" jamás. Es muy importante ir a su página de configuración e ingresar los datos exactos del vehículo y marca del estéreo para que se indique cómo deben de ir las palancas del DipSwitch. Adicionalmente, se indica exactamente a qué cables debe conectarse del vehículo. En el caso de esta Jeep simplemente fueron los de energía y el cable rosa a un solo punto del vehículo. Voilà ! Funciona perfectamente. Quizá el único punto que puedo mencionar como "malo" (pero no es malo en absoluto) es que sus cables están muy largos y que tiene dos grupos de cables que se conectan a ambos lados del dispositivo (hubieran cabido en sólo uno). Esto no tiene nada de malo per se, pero si alguien tiene un tablero pequeño, un estéreo estorboso, y muy, muy poquito espacio para instalación, posiblemente se le complique un poquito encontrarle lugar. (por los cables largos es fácil ponerlo en otro lugar del tablero donde sí quepa, y siempre hay posibilidad de recortarlos, pero lo menciono simplemente como un aspecto a tomarse en cuenta). No es el caso de la Jeep donde sobra espacio y cupo perfectamente. En este caso particular está conectado a un estéreo Alpine iLX-107.
F**K
Love the simplicity of this!
A very nice product with easy to follow instructions
Trustpilot
5 days ago
1 month ago