


🎯 Elevate your projection game with precision and style!
The VideoSecu PJ2W universal projector ceiling mount offers versatile, heavy-duty support with adjustable arms and height extension from 5.9" to 26.7". Crafted from alloy steel, it supports projectors up to 44 lbs and features independent tilt and swivel adjustments, integrated cable management, and a no-slip locking system for a sleek, professional installation that fits most projector models (excluding Epson).
| Manufacturer | VideoSecu |
| Brand | VideoSecu |
| Item Weight | 4.22 pounds |
| Product Dimensions | 13 x 2.5 x 2.5 inches |
| Item model number | PJ2W |
| Is Discontinued By Manufacturer | No |
| Color | White |
| Shape | Rectangular |
| Material Type | Alloy Steel |
| Manufacturer Part Number | PJ2W |
A**E
Most adaptable & affordable option
After looking at many projector mounts and briefly considering building one from scratch, I bought this one. It's both well made and well suited to the job. The price is fantastic! The instructions and illustrations are helpful. With a couple of hours for experimentation and final installation I've mounted an Optoma HD25e so it both adjusts easily and holds the position I've set.I opted to leave the adjustments tightened just enough to firmly hold position, but loose enough that I can tweak them by hand if needed without tools. I had worried that fine adjustment might be difficult, but have found it easy to tweak every adjustment by hand to within 1/16" on screen.This mount is strong enough to securely hold many times more weight than my projector. I also like that if ever desired I can dismount the projector from the ceiling simply by removing one screw to lift it off the safety catch, then three more screws if I want to remove the mounting bracket from the projector. This will be very handy if/when I want to take my projector to an event or replace the lamp.Everything I needed was included in the package except a Phillips screwdriver, and a pair of needle nose vice grips (a simple open end wrench would be better but I didn't bother to dig one out of my toolkit).Caveat: If you're seeking simplicity, buy the expensive mount made solely for your projector and hire someone to install it. For anyone with some basic understanding of simple tools and ability to improvise, this mount is easier to figure out than most Ikea furniture I've encountered. For the majority of projectors it would probably be even easier to install than it was for me.Details:Keep in mind this is a "universal" mount, so you may need to improvise some depending on how "standard" your projector's mounting connections are. Improvising with this mount was easy, because it's designed with lots of flexibility. Getting it to work with my Optoma HD25e took an hour of experimenting with several options before choosing, but it was great having several choices and the actual installation only took another hour or so.I ended up using only three of the four adjustable sliding mounting arms, and reversed one of them in the slide so that I could position the bracket at the projector's center of gravity (CG). The CG could have been left off balance because there's ample strength in the mount and adjustments, but I wanted to ensure there's no creep over time so I took the extra time to balance the mount (when held in my hand by the bracket, the projector hangs at something near my target angle when installed). Reversing that one sliding bracket also required removing the slide itself and shifting it to another hole for mounting to the main bracket. Doing that enabled me to place the CG where it needed to be. I placed the fourth sliding arm pressed firmly atop the projector's vertical tilt adjustment foot thinking that might help with fine vertical adjustment, but that was totally unnecessary.The distance I wanted from the ceiling is in the range not available with this mount. It could be changed fairly easily by simply cutting the two sliding metal channels that comprise the extension arm. Doing that would reduce the range of extension available to include the distance I wanted. Instead I opted to mount it without the extension and adjust the screen placement instead. In my case, since I use a tilted rigid foam core screen with a taller aspect ratio than my HD25e projector, I simply tilted the screen backward a couple of inches and shifted the image placement toward the top where I wanted it anyway. Another option would have been to tilt the extension arm, and thus gain another inch or two of reduction in distance from the ceiling, but doing so would make the projector off CG and thus potentially less stable long term. The amount of tilt in the extension would be limited by the angle adjustment limits on each end of the extension.
T**R
Great value - perfect for valuted ceilings
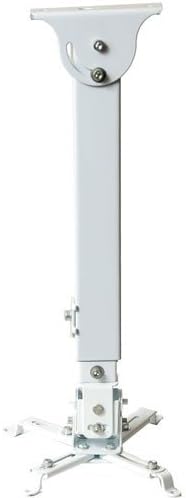
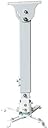
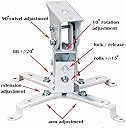
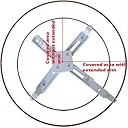
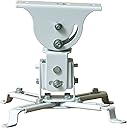
I was expecting to pay a small fortune to find a projector mount for my vaulted ceiling. This was one of (if not the) least expensive projector mounts I've seen that works with a vaulted ceiling. The price is even amazing for a flat ceiling mount.I wasn't expecting too much given the low price, but this mount does it all. It is EXTREMELY stable. I attempted to put my full weight on it by hanging from it (don't try that at home, kids) before trusting it with my projector. It held my weight with no problem at all, and I wouldn't be surprised if it could hold over 200 lbs. Not that there are many home-theater projectors even close to that weight, but it should give you an idea of just how strong this is.Installation wasn't difficult. The instructions it came with weren't too good. Basically just an exploded view diagram of how the pieces go together. Since the mount is universal, that means you need to figure out how to connect it to your projector since there is no real standard for where projector manufacturers place the mounting hole screws. It took me several tries to get 3 of the 4 holes aligned on mine - which would have been sufficient, but it finally occurred to me that I could reverse one of the brackets to get all 4 screws in. I forget what I did exactly, since this was months ago, but just keep in mind that you will need to "MacGyver" this thing a little bit.Once the bracket and bar are attached to the ceiling, do a quick test by pulling it down with about 30 lbs of force to ensure the bracket is locked in there and that the parts were installed correctly. Mine slid a quarter of an inch before coming to rest - after that I couldn't budge it. Then slide the projector with the rest of the mounting assembly onto the bracket.After the projector is placed on the bracket, it is just a matter of aligning everything with the projector on. It may take a few minutes to get perfect alignment since making minor adjustments on each axis requires slightly unscrewing, making an minor adjustment, then tightening a bolt. It might have been easier if it were a ball and socket adjustment to align everything at once with one bolt. However the alignment is something you only have to do once during installation, so it's not that bad.One adjustment that is slightly hidden is the left/right adjustment. Many other reviewers complain about the lack of left/right adjustment, but it's there just a bit hidden. Refer to the product photos on Amazon, one of them shows where that adjustment is located. It only gives you +/- 5 degrees of adjustment so you do have to be slightly on target when you mount the main bolts to your ceiling, but it doesn't have to be absolutely perfect.Using zip-ties for the cables (power, VGA, HDMI, or whatever you're using) running along the post make the installation very tidy. There might be a way to route the cables inside of the post if you plan it out right, but I didn't bother.The original projector is going to be replaced soon, I will update this review after trying the mount with the new projector...most likely a different brand projector.Overall, this is a great mount for a great price. I highly recommend it!
Trustpilot
2 months ago
1 week ago