We remain fully operational. Our teams are working around the clock to ensure your deliveries continue safely.

DOWNLOAD THE APP


Customer Services
Copyright © 2025 Desertcart Holdings Limited
DOWNLOAD THE APP


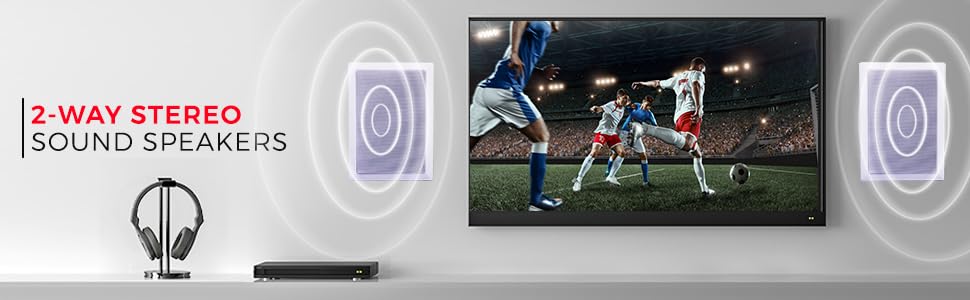
🎶 Elevate your space with sound that’s as sharp as your style!
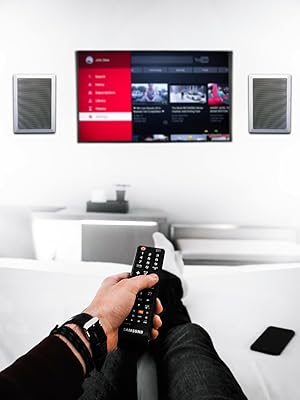
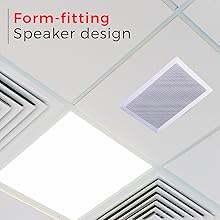
The Pyle PDIW87 is a 6.5-inch in-wall/in-ceiling enclosed speaker system delivering up to 400 watts peak power with a wide 50Hz-20kHz frequency response. Featuring a 1-inch titanium dome tweeter and long-throw woofer, it offers full-range stereo sound with deep bass. Designed for flush mounting, it fits seamlessly into home or office environments, compatible with standard 4-8 Ohm audio systems. Ideal for custom surround sound setups, it combines powerful performance with a sleek white finish for a clean, modern aesthetic.


| ASIN | B0013CGBHK |
| Audio Driver Size | 6.5 Inches |
| Audio Driver Type | Dynamic Driver |
| Colour | White |
| Compatible Devices | Gaming Console, Laptop, MP3 Player, Smartphone, Tablet, Television |
| Control Method | App |
| Country of Origin | USA |
| Customer Package Type | Standard Packaging |
| Customer Reviews | 4.2 4.2 out of 5 stars (99) |
| Date First Available | 9 August 2012 |
| Generic Name | Accessory |
| Global Trade Identification Number | 00068888886529 |
| Impedance | 4 Ohms |
| Included Components | Warranty Card |
| Indoor/Outdoor Usage | Indoor |
| Is Waterproof | False |
| Item Weight | 3 kg 990 g |
| Item model number | PDIW67 |
| Manufacturer | DJ Tech Pro USA, LLC |
| Material | Plastic/Metal, Titanium, Paper/Polypropylene |
| Model Name | Pyle Pro PDIW67 |
| Mounting Type | Ceiling Mount |
| Net Quantity | 1 Count |
| Number Of Circuits | 2 |
| Number of Items | 2 |
| Other display features | Wireless |
| Power Source | Corded Electric |
| Product Dimensions | 10.7D x 24.1W x 33H Centimeters |
| Recommended Uses For Product | For Music Players |
| Series number | 67 |
| Set Name | 2 |
| Shape | Rectangular Prism |
| Speaker Size | 6.5 Inches |
| Speaker Type | In Ceiling, In Wall |
| Special Feature | Subwoofer |
| Special features | Subwoofer |
| Specific Uses For Product | Home Theatre |
| Style | Speaker |
| Subwoofer Connectivity Technology | Wired |
| Subwoofer Diameter | 6.5 Inches |
| Surround Sound Channel Configuration | 2 1 |
| Tweeter Diameter | 1 Inches |
| UPC | 102930729386 858399216393 151902955551 068888886529 012303301562 100177415154 163120776511 172302693157 |
| Water Resistance Level | Not Water Resistant |
| Wireless Communication Technology | Bluetooth |
| Woofer Diameter | 6.5 Inches |
D**Y
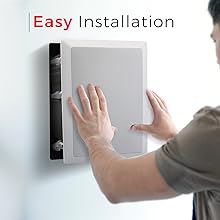
I was skeptical, but wow I'm happy with the purchase. I bought 4 sets to put in our new house. These are inexpensive speakers that actually sound pretty good! They are plenty loud, and have decent range for a cheap speaker mounted in the ceiling. I am cheap, so I am using only 1 speaker per room. They sound just fine in this configuration. These are at least as good, if not better, and cost about half compared to the speakers I put in my last house. Yes, there were no mounting issues, and the build quality was much better, but honestly, these sound better than the old ones! First, be very careful when mounting these! If you follow these directions, you should have no problems with mounting, if not, you will probably break every mount and be very angry at your speakers. 1a/3a. OPTIONAL: I highly recommend getting some small washers that fit the screw and are about 3/8 inch diameter. If you are super worried about how these look when installed, you can spray paint your washer black. I didn't, and unless you study the ceiling carefully, you don't notice the silver washers (homemade washers from an old piece of metal I had laying around, drilled with drill press and cut with tin snips). 1b. Unpack the speakers. 2. Get your favorite electric drill or screwdriver (I'm calling it a driver from here on out to avoid confusion). 3b. Remove the screws one at a time and put a washer on the screw. 4. Place the white flip out clamp in it's spot and start threading the screw in with your driver. After it is started, carefully align the flip out clamp so that it can easily be pulled into the track. Continue tightening the screw and watch the clamp carefully so that it does not bind on any edges, if it does bind, stop tightening at once and back up, or it will snap the brittle plastic. You might have to spin the screw back and forth a bit to get it to start down the track. In my experience, once it started down the track, it was able to make it all the way. 5. Once the clamp has been brought down the track by tightening the screw, reverse your driver so that the clamp travels back up the track. Stop as soon as it clears the edge and swings out of the track. Repeat the screwing and unscrewing one more time, being careful to make sure the screw does not bind when you first swing it in place by tightening the screw. Once the clamp has traveled down and up twice, loosen the screw until it once again JUST swings out of the track. If you did it right, the clamp has a small amount of tension on it, and will hold itself in place and not flop in the way when you tilt the speaker. 6. Repeat each step with all the mounts. You can do one speaker at a time, or unbox them all and get it over with. I did each one before I mounted it in the ceiling. 7. Cut your holes using the template as a guide, hook up speaker wires, push speaker into place, and tighten the screw that swings the clamp into place. 8. DON'T OVER-TIGHTEN the screw! If you over tighten, it will break the track guide at the base, which renders the mount point useless. If you didn't choose to install washers, you can easily pull the screw through the opening, which means that the clamp does not work. For me it was easier to use washers and set my drill to a very light clutch setting. Snug is way to tight, what we are going for here is just enough to pull the speaker up to the ceiling, and no further. I would buy these again. **If you found this review helpful, please mark it as helpful by clicking "Yes" below.**
S**E
cut-out dimensions: 8.24-Inch (w) x 11.76-Inch (h) x 3. 68-Inch (d) —- these are a lie. I double checked the installation manual and it states the same as above. BUT THE BOX THEY COME IN state the ACTUAL mounting depth of 4.25” … I wish I would have read that before cutting holes in my wall. THESE DO NOT FIT 2x4 walls with drywall (4”) they stick out 1/4 inch. Not sure why this product even exists as an in wall speaker to be completely blunt but here we are! I already have the holes cut so not sure what I’m going to do now. Likely going to have to cut down the rear speaker enclosure and hope there’s space between the magnet and the enclosure or get out some silicone? The enclosures also don’t match the centre channel speaker of the same series, I think they changed the product’s enclosure (the older style enclosure on the centre speaker fits a 2x4 wall - imagine that!) without updating the documentation. Second pic is the centre channel for reference, note the 1/4” thick bezel vs the ‘flush’ bezel of these useless speakers. 1 star is too generous as the wrong documentation has resulted in either damage to my house I need to fix, or, I need to damage the speaker enclosure to make it fit. Not a lot of options and not a happy customer. Edit: took apart the speaker and it is like it’s designed to fit a 2x4 wall without the enclosure (3rd pic). I am going to cut the top 1/4” or so off the enclosure and add some foam stripping to make a tight seal against the back wall to recreate the enclosure using the back drywall as the top of the box.
P**L
Ok
M**S
This is my second set of these speakers. This time I got the “not new” ones. They came in a different box which did NOT have the template and one speaker was clearly damaged in one corner ( dropped or similar). I recommend the speakers but only new ones if you want a cutout template and no visible blemishes.
T**H
These will not fit flush in a 2x4 wall. They are 1/8” too deep. Had to remove insulation box from back of speaker to allow it to fit flush.
Trustpilot
1 day ago
1 week ago