Some deliveries may take a little longer than usual due to regional shipping conditions.

DOWNLOAD THE APP


Customer Services
Copyright © 2025 Desertcart Holdings Limited
DOWNLOAD THE APP


✨ Revamp Your Space with Style!
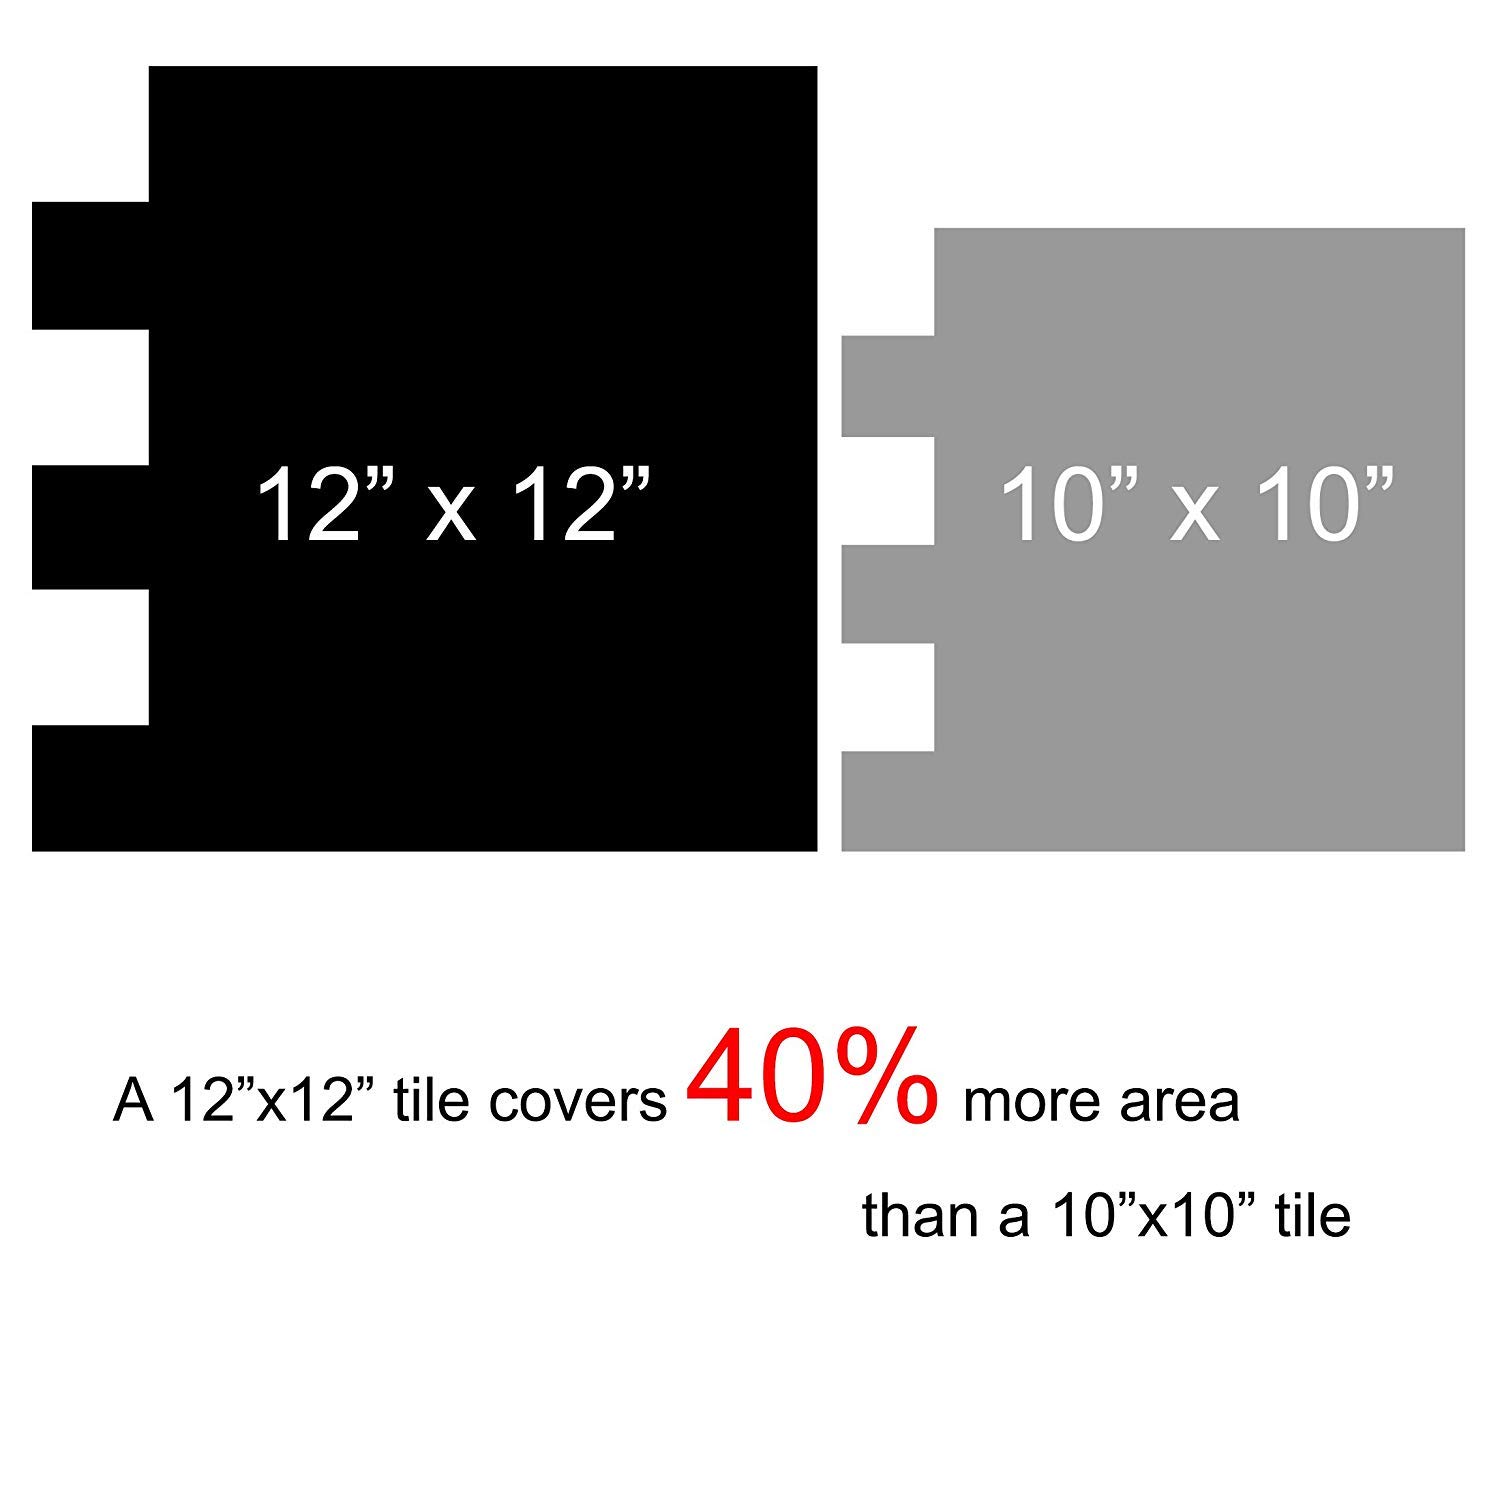
The Art3d 12"x12" Peel and Stick Backsplash Tile in Marble Grey offers a stylish and practical solution for home renovations. Each pack contains six self-adhesive tiles that are easy to install, heat and moisture resistant, and perfect for various applications, from kitchen islands to bathroom walls.


| Brand | Art3d |
| Material | Epoxy resin + PET back |
| Size | A42 - 12" x 12" |
| Color | Gray |
| Finish Type | Painted |
| Style | Modern |
| Installation Type | Peel and Stick |
| Product Dimensions | 12"L x 12"W |
| Pattern | Marble |
| Item Weight | 1.32 Pounds |
| Shape | Square |
| Item Thickness | 0.06 Inches |
| Edge Style | Square Edge |
| Unit Count | 6 Square Feet |
| Item Display Dimensions | 11.81 inches |
| Recommended Uses For Product | Kitchen Backsplashes, Kitchen island walls, bathroom backsplashes, bedroom walls, laundry rooms etc. |
| Form Factor | Square |
| Water Resistance Level | Moisture Resistant |
| Special Feature | Lightweight |
| UPC | 712809594542 |
| Manufacturer | Art3d |
| Part Number | A17042P6 |
| Item Weight | 1.32 pounds |
| Is Discontinued By Manufacturer | No |
| Finish | Painted |
| Item Package Quantity | 6 |
| Number Of Pieces | 6 |
| Special Features | Lightweight |
| Batteries Included? | No |
| Batteries Required? | No |
B**E
Measure carefully before ordering.
Inexpensive way to upgrade. Looks nice and easy to install.
A**S
This Product Rocks!!
This product is amazing!! I have wanted to replace my kitchen backsplash for a long time but it would have been a huge expense. I had horrible square porcelain tile with early 90’s colors. This product adhered directly to the tile and was fairly easy to put up. Once you you cannot see the underlying tile indentions. This looks like real tile! Huge difference for little cost. LOVE!!
W**E
Nice
Very beautiful and easy but a bit expensive for only 6 tiles in
D**Y
Easy install looks great
I ordered this item for my newly purchased house which didn’t have back splash but had some stain from previous owner. I was very nervous about this item as I thought it will not stay on and damage my wall. But, it worked great, followed the instructions exactly. I have painted wall, so I cleaned it and left it for 24 hrs and then peeled and installed as instructed the next day. The end product look good. The only thing I didn’t like is how it says ‘overlap’... it makes sense for the in between tile but for the end tile, I had to be extra creative with the ones I already had cut off, I used that to hide the ‘overlap’.Overall, great result!!
J**N
Buy 3m adhesive. Very sticky/hard to reposition with 3m glue but worth it for continued durability
This was pretty easy. I bought 3m adhesive to make sure it would stay put. (I cook and steam things a lot.)I started on the right edge and worked my way left. I placed my pieces down to my granite counter top figuring I could then fill in top pieces near cabinets last. I see other people have left a slight gap down near countertops and jmo but I think that makes it obvious it isnt real tiles. So my suggestion would be place first tile down touching the top of counter top. I then just needed a piece 2 tiles wide to cover across the top (which would be the bottom of my cabinet) . Tiles are 12 inches high and I would say my counter to cabinet height is close to 13 inches high. On that little bit of space I used 14 tiles. QUICK TIP ON OUTLETS:When I came to the outlets I put a touch of nail polish on each corner of where outlet goes on the wall. I then placed tile (the art3d paper still covering the adhesive) on wall...pressed and the polish left 4 dots so I could see width and length to make the outlet cut. Some people use chalk...that works also. Good luck!
Trustpilot
3 weeks ago
1 month ago