
Desert Online General Trading LLC
Dubai, United Arab Emirates
Desert Online General Trading LLC
Dubai, United Arab Emirates


🌟 Elevate your interiors with the magic of liquid wood!
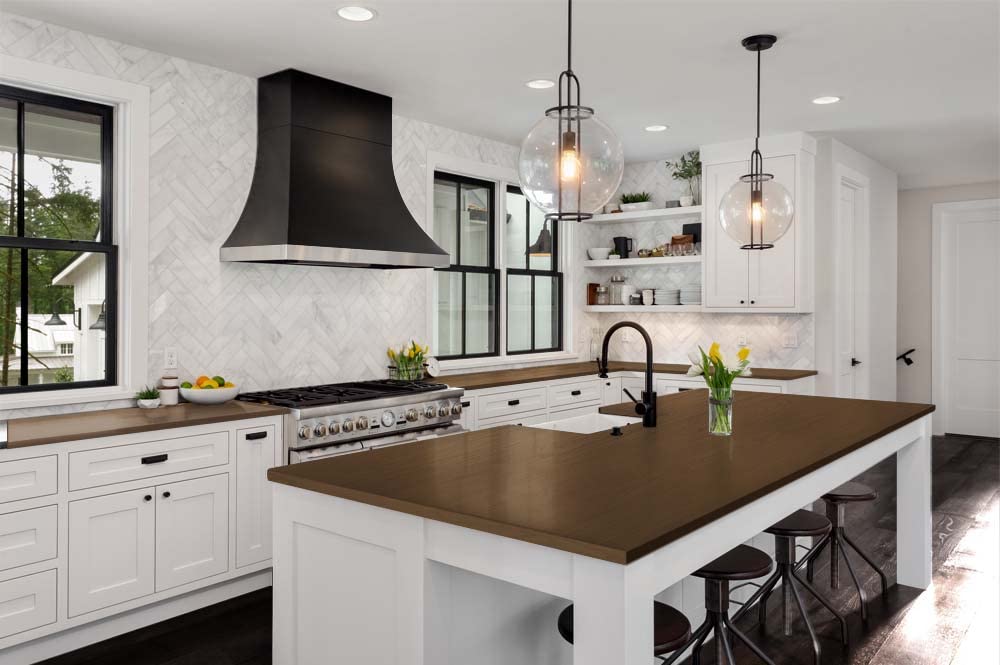
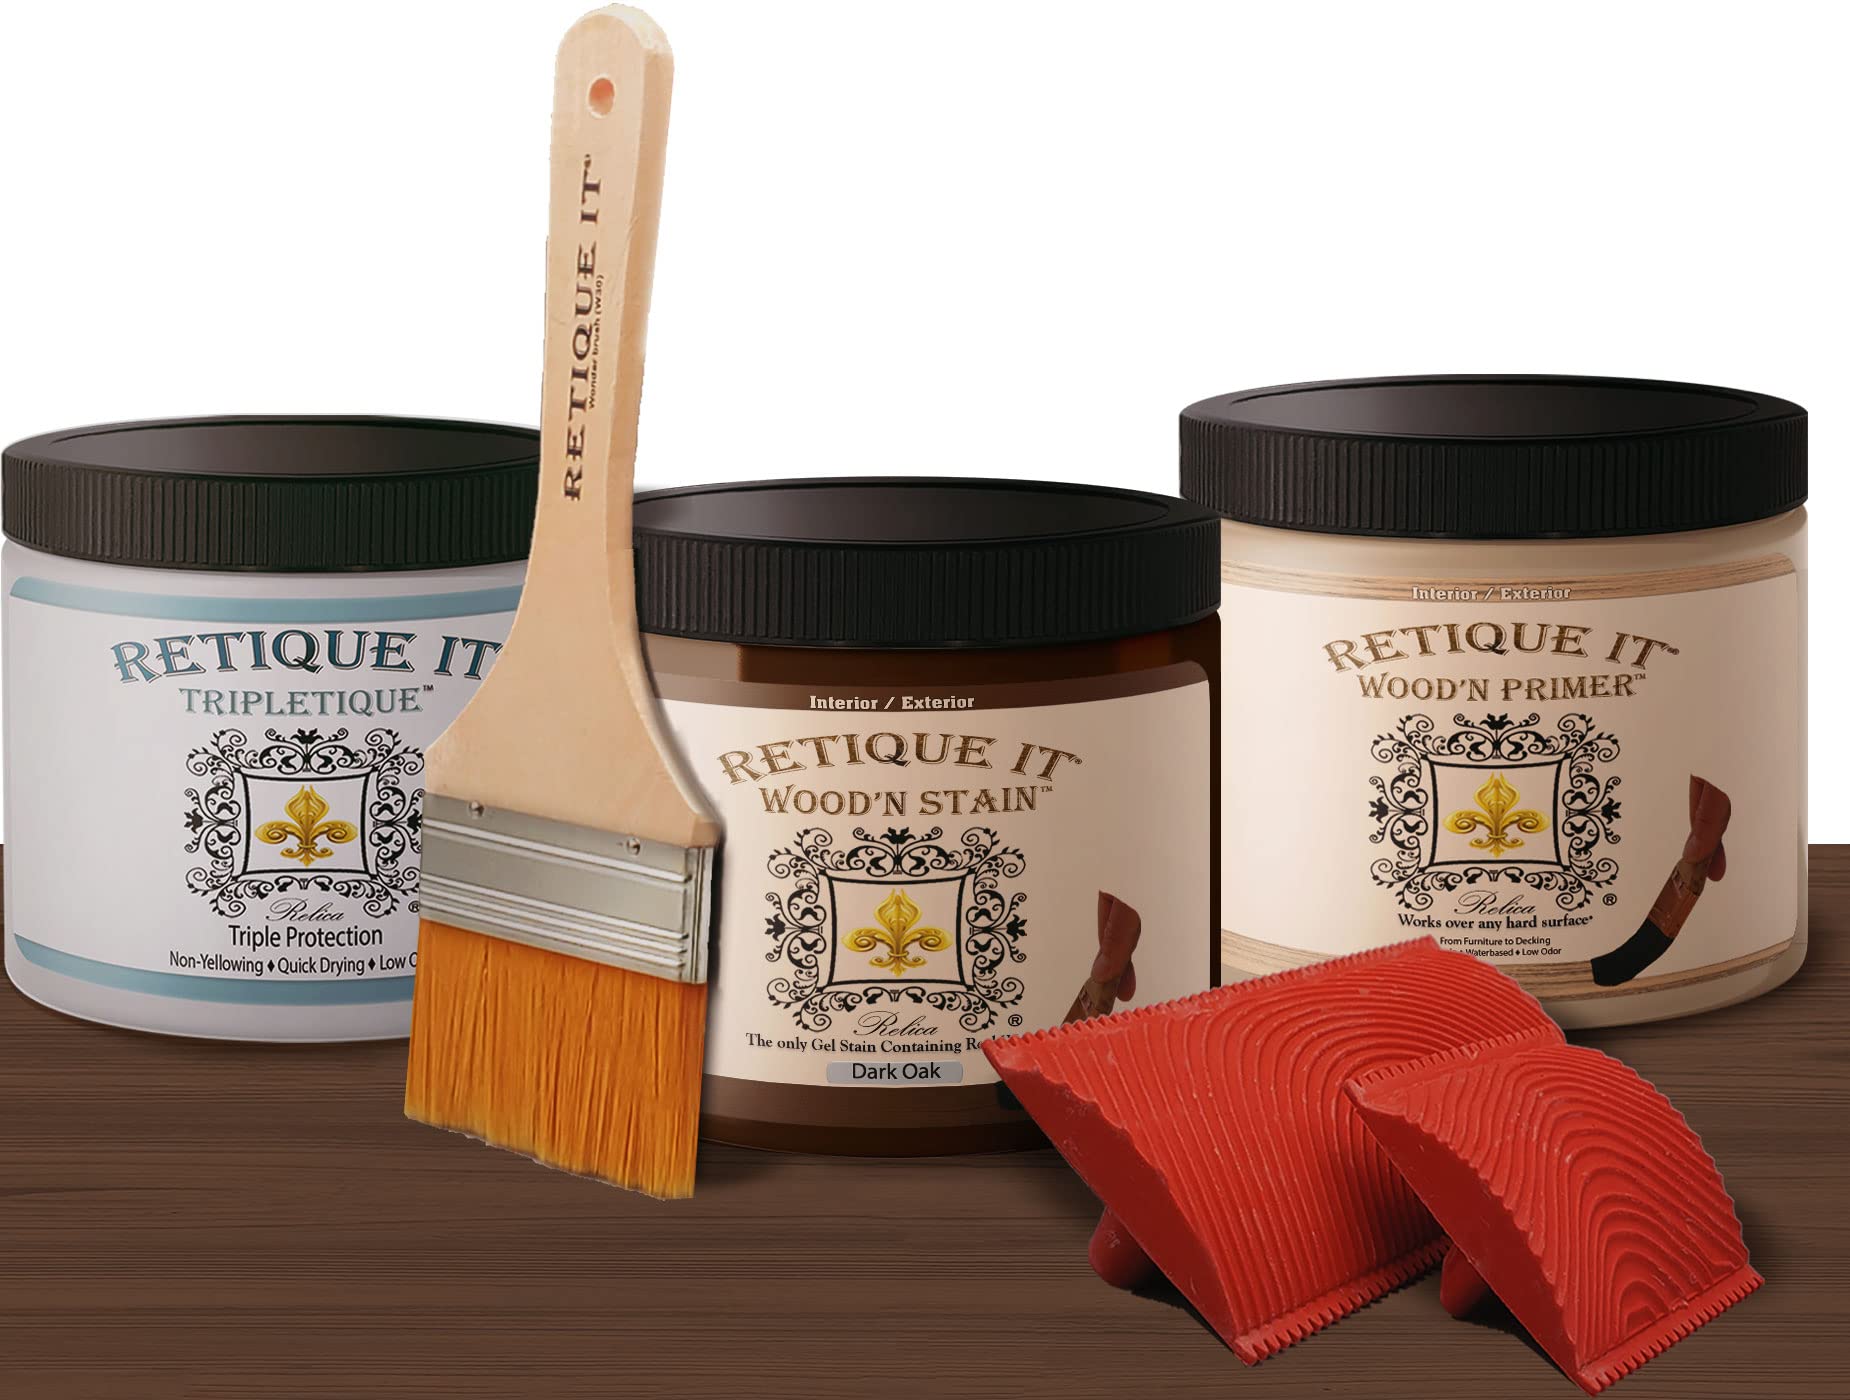
The Retique It Liquid Wood Countertop Kit is a revolutionary product that allows you to transform any surface into a stunning wood finish. With over 60% recycled wood fibers, this eco-friendly, water-based solution is easy to apply and clean up, making it perfect for both DIY enthusiasts and professionals. The kit includes everything you need for a flawless finish, ensuring your home looks cohesive and stylish.
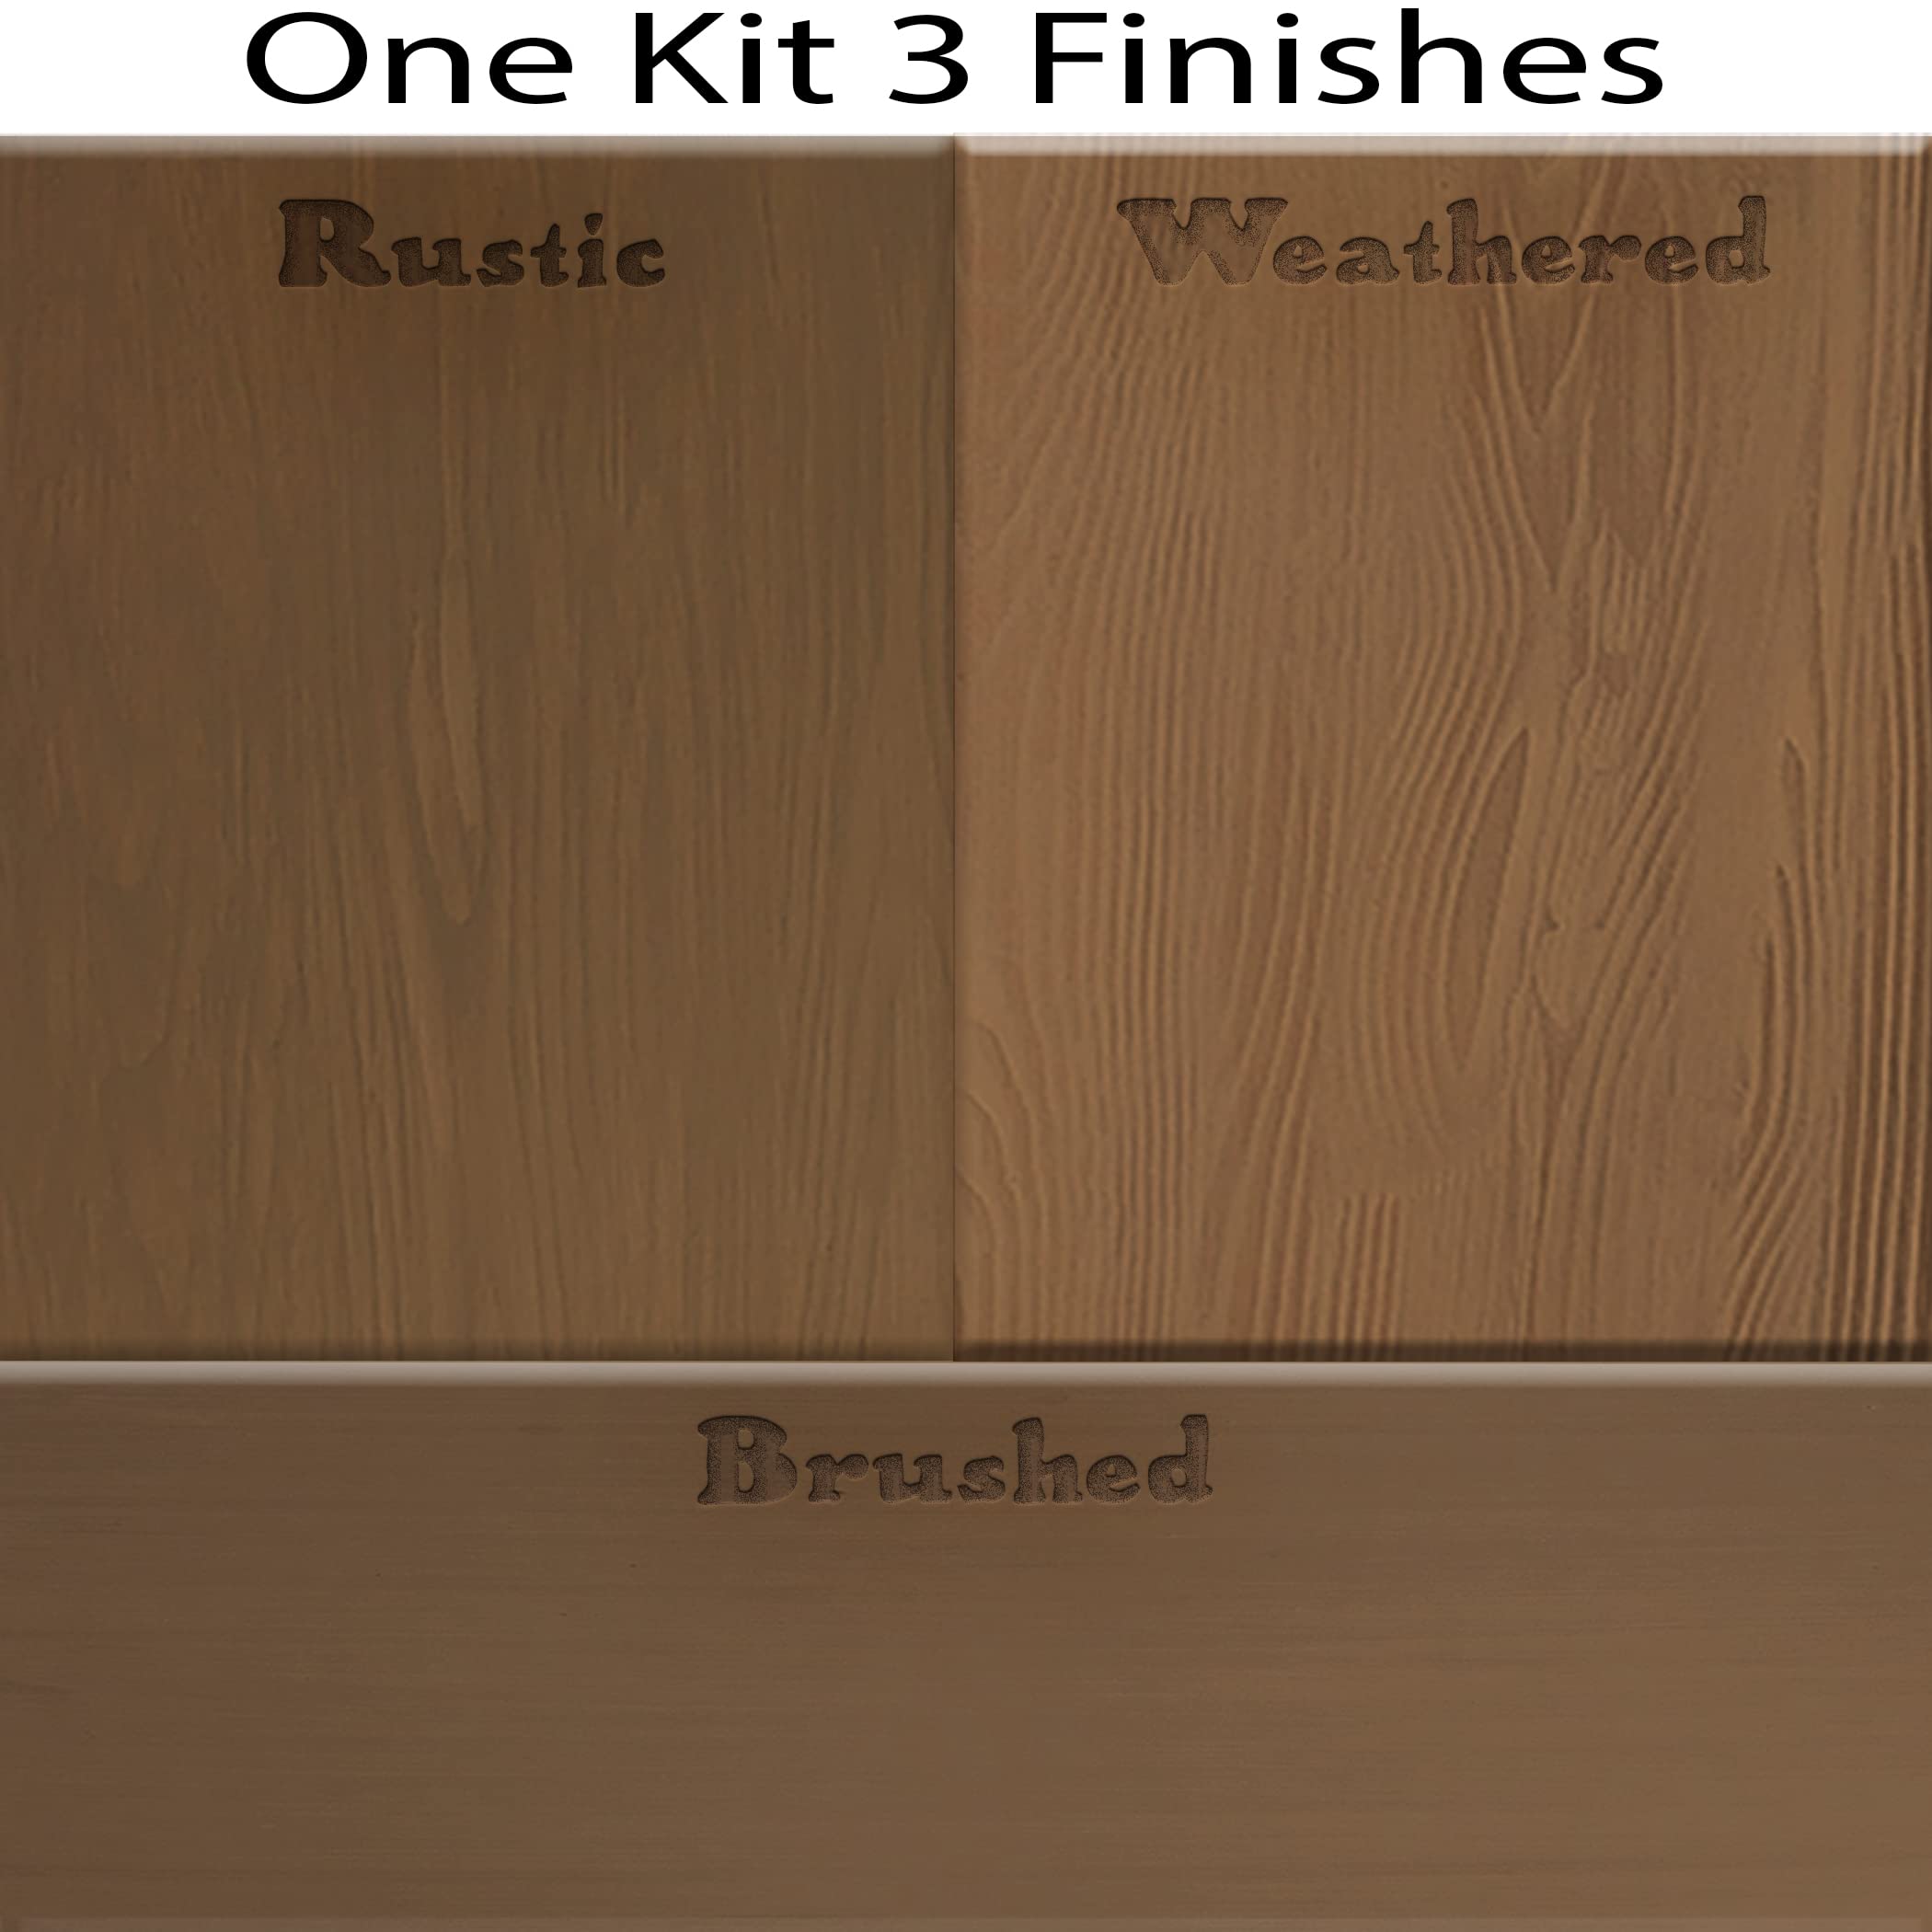
| Color | 25 Dark Oak |
| Brand | Retique It |
| Surface Recommendation | Any Countertop |
| Material | Liquid Wood |
| Model Name | RETQ-WoodnStain-CounterTopKits |
| Size | 24 oz (Island) |
| Coating Description | Liquid Wood Coating |
| Item dimensions L x W x H | 7.5 x 5.5 x 5.5 inches |
| Item Weight | 4 Pounds |
| Finish Type | Finished Wood |
| Recommended Uses For Product | Countertop, Indoor |
| Coverage | 50 sq ft |
| Special Feature | Waterbased, Low odor, Durable, Liquid Wood Based, Easy Clean-up |
| Liquid Volume | 32 Fluid Ounces |
| Paint Type | liquid wood coating |
| Package Information | Jar |
| Warranty Type | Satisfaction Guaranteed |
| Manufacturer | Renaissance Innovations, LLC |
| Part Number | RETQ-WoodnKit16-DarkOak-Tripletique16 |
| Item Weight | 4 pounds |
| Product Dimensions | 7.5 x 5.5 x 5.5 inches |
| Country of Origin | USA |
| Item model number | RETQ-WoodnStain |
| Finish | Finished Wood |
| Installation Method | Countertop |
| Item Package Quantity | 1 |
| Special Features | Waterbased, Low odor, Durable, Liquid Wood Based, Easy Clean-up |
| Usage | Amateur, Homeowner, Contractor, Professional, DIY |
| Included Components | Wood'n Stain, Graining Tool Set, Wood'n Primer, 3" Wonderbrush |
| Batteries Required? | No |
R**K
EZ!! Nice finish
Easy as 1-2-3!! Seems durable. No issues yet. Complete and cheap alternative to new countertops.
S**A
Stunning, but take your time!
Application is very straight forward, and minor imperfections only add to the natural look of the wood grain.Take your time with prep! We have laminate surface counter tops, so I did multiple rounds of stripping with cleaners, dish soap, and alcohol before hitting it with a sander to create a rougher surface and cleaning all over again. If you can, remove your sink. If you can't, apply lots of tape and prepare for additional challenge in getting that texture to flow around the sink.The paint goes on easy. Humidity is high in Seattle, so extra dry time and a hair dryer were needed, but that also allows a bit of extra time in running the texture blocks through multiple times to get the "right" pattern. Note, the texture blocks do NOT get into corners well. I ended up snipping the rubber edging off of one block so I could really jam it up into the corner before making my pull, this helped a lot, but still wasn't 100% perfect. Fortunately a line of caulk is enough to cover that last funky edge bit.DO NOT try to fix or touch up any patterning after it has already begun to dry. Running the texture blocks over partially dry texture will smear things in unpleasant ways.Trust the process. The base layers of light are going to look WAY too light, that's OK, itll really start to take form once you add your texture layer. I used Old Oak hoping for warm tones and while it's neutral on its own, it picks up and enhances the rest of the warm tones in my kitchen like a champ. I only ended up using one texture/stain layer. I didn't want to go too dark, and one was plenty.Use ALL of your epoxy clear coat. Even if you don't need all of your paint or stain, just keep adding clear layers until you're out. Kitchens get banged up, pans get dropped or dragged across surfaces, spouses dong always use cutting boards, etc. It looks shiny when wet, but tones down as soon as it dries for a nice satin sheen.
O**Y
Welcome to your new counters!
I was a little reticent to buy this product because it was expensive for a product I didn't know. I watched the videos. The videos made the process seem easy, which made me even more skeptical. After doing my counters, some things would be helpful to know.1. The description could have been better at saying how much counter the product would cover. After doing my counters, nearly half of the containers are still full. There is more product here than you will guess!2. The directions say you will need two coats of primer. Don't be stingy, thinking you have to make the primer stretch. Good thorough coverage is essential.3. Do not worry about the primer not being dark. You don't want it to be.4. find something to practice using the graining tool if you can. The video makes it look easy. This is the one potential issue. You will want to practice with the tool.5. When putting the wood stain, follow the video! This stain dries fast, and if you need to make corrections, you'll have to re-primer it once it's dry.6. Remember this is not the final product When you do the first coat of stain. Don't question that the primer comes through and looks light. You want it to do that!7. Do not over applying stain when putting down your grain. If it's too thick, the tool will create puddles.8. After making the grain, I ran the brush over the grain very lightly, and I really liked how that looked. (This is where practice beforehand if preferable to find what you want)9. Do your counter in sections. If your strip is too long, you'll run the risk of the stain drying.10. After you get your grain, you'll put down the second coat of stain. Please don't put it on too thick. Always run the stain with the grain.11. Amazingly, the second coat will not cover up your grain. It's easier to put on thin coats and add more. If you overdo it, you must let it dry and re-primer it. Use a utility knife to cut the work from the paint tape if needed.12. If you have a backsplash or trim and you use trim tape, be very careful when removing the pain tape. If you pull too fast, it will pull up the work you just did. Don't be alarmed if the paint and stain looks like gel; that's what it is.13. When using the sealer, do as the video says. Please don't put it on too thick, and put on the sealer evenly, like in the video. Chances are you're going to have sealer to spare when done.Take your time, and don't rush. The results are truly outstanding.
R**L
Look great
Love this. Look and feel like real wood and for a beginner DIYer it was way easy. If I would have slowed down my counters would probably look professionally done.
N**N
This is amazing stuff!!
It was so easy! The hardest part was waiting for it to dry fully!! I was able to do my whole kitchen with this box! I have only had them done a few months but the sealant has held up beautifully even in the counter surrounding the kitchen sink!
3**G
Don’t waste your money
After spending this much money for the product, and having to wait a ridiculous amount of time for it to come In, the main tool to complete this was missing. And this company offers a NO RETURN policy. So I decided to go buy the tool myself, and the color is NOTHING like shown it is a horrible color. DO NOT buy this product. There is no satisfaction guarentee because they know it’s a crap product.
N**S
It works
The media could not be loaded. I have black granite countertops that sucks the life out of you in the kitchen, and will run my wallet dry if I pay to have them professionally replaced. Contemplated buying butcher block, but this was cheaper. Easy to follow steps. I did have to take everything off and try again when I made a nick on the primer and it started peeling off, but the second time around I was more cautious. I might go a darker shade later, but for now I love it. Im not sure if my brush strokes and application were messy but there is maybe one spot that might look like messy paint on the edges. You really can’t tell it’s not wood until you get up real close and investigate.I bought the larger option so I could try it on my dining table and other surface areas. Overall good alternative option to countertop replacement, and if you don’t like it, you can always scrape it off.
Trustpilot
1 week ago
1 month ago