Description
🌡️ Master your heat game with precision & power!
- SMART ALARM OUTPUT - Built-in relay alarm output compatible with buzzers to alert you instantly on temperature deviations.
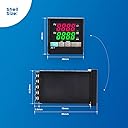
- DUAL DIGITAL DISPLAY - Simultaneously monitor actual temperature and setpoint in °C or °F for instant clarity.
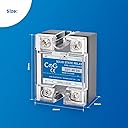
- ROBUST SSR INTEGRATION - Includes a powerful 40A Solid State Relay for silent, reliable switching under heavy loads.
- VERSATILE SENSOR COMPATIBILITY - Supports 2-wire & 3-wire sensors including K, J, N, W3-25, W5-26 thermocouples plus PT100 & Cu50.
- PRECISION AUTO TUNING PID CONTROL - Achieve ultra-stable temperature with ±0.5% accuracy and adaptive auto-tune algorithms.
This PID Temperature Controller Kit is a professional-grade digital solution featuring a 40A solid state relay, versatile sensor support including K-type thermocouples, and a dual-window LCD for real-time and setpoint temperature display. Designed for precise temperature management with auto-tuning PID algorithms, it ensures ±0.5% accuracy and reliable alarm outputs, making it ideal for industrial, lab, or advanced DIY applications.