Desertcart purchases this item on your behalf and handles shipping, customs, and support to Sri Lanka.
⚡ Light Up Every Adventure — Bright, Tough & Ready to Ride!
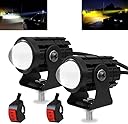
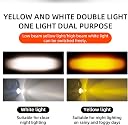
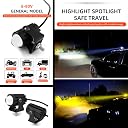
This 2-piece LED spotlight set features powerful 24W dual-color (white and amber) lighting with a versatile ON-ON-OFF switch, designed for universal fitment on motorcycles, ATVs, trucks, and SUVs. Engineered with IP67 waterproof rating, durable aluminum housing, and stainless steel mounts, it ensures reliable performance in all weather conditions. The energy-efficient LEDs provide bright 6,000K illumination with a long 5,000-hour lifespan, enhancing safety and style on every ride.
| ASIN | B077FYL37G |
| Additional Features | High Beam, Waterproof |
| Auto Part Position | Front Outside |
| Automotive Fit Type | Universal Fit |
| Best Sellers Rank | #734,031 in Automotive ( See Top 100 in Automotive ) #535 in Powersports Accessory Lights |
| Brand | GOODKSSOP |
| Brand Name | GOODKSSOP |
| Color | black |
| Compatible with Vehicle Type | ATV, Motorcycle, Passenger Car, SUV, Tractor, Truck |
| Customer Reviews | 3.9 out of 5 stars 325 Reviews |
| Item Weight | 0.2 kg |
| Lens Color | Clear |
| Lens Material | Plastic |
| Light Source | LED |
| Light Source Type | LED |
| Manufacturer | GOODKSSOP |
| Manufacturer Part Number | LMLU2BKA2 |
| Model Number | LMLU2BKA2 |
| Number of Items | 2 |
| Set Name | 2pcs Super Bright 24W LED Two-Color White Amber Spotlight + 2pcs ON-ON-OFF Switch |
| Special Feature | High Beam, Waterproof |
| Specific Uses For Product | Head Lights |
| UPC | 735317624488 |
| Unit Count | 2 Count |
| Vehicle Service Type | ATV , Motorcycle, Passenger Car, SUV, Tractor, Truck |
| Voltage | 12 volts |
| Wattage | 24 watts |
T**Y
Nice little light with wide voltage range up 80v!
Wide voltage range! Some users complaining about output might be using 12v. I can tell you at 50v the light output is pretty good and beam is tightly focused not a flood light. Small size, not expensive, looks durable. So far these look great. Theses are for a power wheels toy so I don’t want the lights to use up a lot of power. I didn’t want to use a voltage rectifier to reduce voltage because they waste energy In the form of heat. The switch is a nice bonus as are the multiple light modes including strobe. So far my only complaint is the wires are a bit on the thin size, prob 20-22 gauge so strain relief FYI.
L**D
Small and bright
Lights are small but they are bright perfect for motorcycle.
E**L
Up and Down
I'm actually impressed on the focus and brightness of these. I put them on a snowmobile as aux lighting up front and they light up the trail ahead really well. Others have said about the waterproofing. It would be nice to be able to put an o-ring or something around the lens to keep the water/snow out, but I really don't think it will be a factor in my case. While there are no instruction, it was fairly easy to figure out. Black is ground, white is + for the white light, and yellow is + for the yellow light. The one thing that would have been nice is something to tell which side goes up. I installed mine and when the whites are perfectly aimed, when I switch to yellow they are pointed at the sky. Not a big issue, I'll swap them, but a mark or something to show up or down would have been nice.
S**E
How are these rated so high!?
These lights are junk! The lights might be waterproof but the switch definitely isn't, the included switch is terrible. Check out the picture! The mount bracket is flimsy and hard to use. It was mangled as I tried to tighten it down enough to not move on my mount and its all but impossible to tighten the lights down enough to keep them from "walking" down. The lights are not very bright. They might, and I mean MIGHT help me be more visible but they do not offer any added lighting for my driving experience. I may reconfigure these as turn signals as that is about as bright as they are. The only big pro to the lights is they are lightweight! If only they were brighter and had a better mounting system or at the very least, came with a half way decent switch.
P**E
Lights work great for that added Safety.
I installed these on my 2012 V-Strom to add extra lighting to the front of my bike for safety reasons. My fellow riders have all commented how visible these lights are. There are 3 modes: Low, High and Flashing. I would have preferred the High Beam only mode but for this price you can't beat it. With the supplied switch, you simply turn the power off and on to get to the desired mode. I believe it defaults to the last mode when the power remains off for several minutes. There are two screws that attach the light housing to the bracket. I wrapped some electrical tape around the rubber turn signal extensions for protection and mounted my lights to them. There was just enough play, after loosening those screws and then retightening them, to allow me to point the lights in more of a horizontally outward position. One may have to remove one of the screws to the bracket permanently if more horizontal adjustment is necessary. I do have one minor gripe... the lights came with a white connector sticking out the back of the light as opposed to a black one shown in the picture. A little spray paint or electrical tape can help solve this if it is a problem.
M**R
Works, but be prepared to MacGyver it
Pros: Inexpensive, bright, made of metal instead of plastic, works as advertised. Cons: Very limited adjustment, no instructions whatsoever (see below for wiring instructions), supplied wiring too short, no fuse included. These do what they say they'll do but I had to monkey around with them to get them aimed and connected correctly. As far as aiming, the only way to adjust them is to loosen the clamp and rotate them on the bar they're clamped to. In other words, they rotate on that axis only. I have them mounted on Hepco and Becker crash bars and there is no part of them that is straight up and down, which is what it would take to get these aimed straight ahead. You could also get them aimed straight ahead if you have a horizontal bar to mount them to that is perpendicular to the bike's direction of travel, such as turn signal arms. But I wanted mine on the crash bars. As it was, both lights were aimed at the ground about 20 feet in front of the bike. This made the lights appear to be very dim from straight ahead. So I had to improvise. There are two small screws that hold one half of the clamp to each light's housing. I removed the rear screw so I could rotate the light up on the one screw that was left. I put Loctite thread locker on that screw to make sure it wouldn't vibrate out since it is now the only screw holding the light to the clamp. I then added some glue (RV Goop) between the light housing and the clamp for added stability. They are now aimed correctly and hopefully will stay that way. Click "Read More" to continue.... Wire length - The wires attached to the lights and the switch are too short. Count on having to splice some longer wires to them (18 gauge wire should be more than enough for the light load of these lights, something like 2.3 amps each). Wiring instructions - follow these instructions at your own risk. Below are instructions for two types of connections, wiring directly to the battery or using a relay. Note that connecting straight to the battery makes it possible to drain your battery if you forget to turn the light switch off after your ride. If you'd rather wire it so the light switch is only activated when the ignition is turned on, go to the "Instructions for wiring with a relay" section below. INSTRUCTIONS FOR WIRING DIRECTLY TO THE BATTERY 1. Disconnect the wire(s) from the battery's negative terminal to prevent shorts while you're working. 2. The lights each have two wires coming from them - a red and a black. Connect the black wires from the lights to the bike's frame (assuming it's a negative ground bike). You could also connect them to the negative battery terminal. 3. Connect the red wires from each light together and then also connect the green wire from the light kit's switch to the same connection. So you now have two reds and a green all connected together. 4. Connect the red wire from the light kit's switch to one side of a 5 amp fuse that you have to supply since it isn't included in the kit. Then connect the other side of the fuse to the battery's positive terminal. 5. Reconnect the wires to the battery's negative terminal that you disconnected in step 1, and test your lights. INSTRUCTIONS FOR WIRING WITH A RELAY Most auto parts stores should sell relays. You only need one 12-volt SPST (Single Pole Single Throw) relay. It's hard to find a single one here on Amazon, but here is a listing for a 2-pack of 12v SPST relays: https://smile.amazon.com/2PCS-Relay-Vehicle-Switches-Starters/dp/B07B7GS4K3/ref=sr_1_9?ie=UTF8&qid=1529943423&sr=8-9&keywords=spst+relay+12v 1. Disconnect the wires from the battery's negative terminal for safety. 2. Connect the signal wire to the relay. The signal wire is any wire on your bike that is energized when the ignition key is turned on. About any wire that has 12v present when the key is turned on, but no voltage when the key is turned off, will work. You will need to see your particular relay's instructions to determine which terminal to connect it to. One of the relay's terminals will connect to the signal wire, and another terminal will connect to ground (frame or battery negative). The relay's instructions should identify these two terminals. 3. Connect the black wires from each of the lights to ground. "Ground" could be the negative battery terminal or bare metal on the bike's frame (if your bike has negative ground). 4. Connect the red wires from each of the lights together on one of the relay's NO (Normally Open) terminals. Again, see the relay's instruction sheet.to identify which terminals are NO terminals. 5. Connect the green wire from the light kit's switch to the NO terminal on the relay.that is paired with the terminal that you connected the red wires to in step 4. The relay's instruction sheet should identify the paired NO terminals. 6. Connect the red wire from the light kit's switch to a 5 amp fuse that you have to supply since it isn't included in the kit, then connect the other end of the fuse to the battery's positive terminal. 7. Reconnect the battery's negative terminal wires that you disconnected in step 1, turn the ignition to the on position, and test your lights.
J**J
Imagine these are as cheap as you think, then imagine they're cheaper
I know the price is right but these are really something else. I don't think you could make the metal brackets thinner without them collapsing from their own weight. The lights themselves emit a rectangular beam, not a beam that's rectangular-ish that tapers off at the edges, I mean a literal rectangle. This also means that you can't just mount them any way you want, they have to mounted in a specific orientation or they're going to give you something you don't want. The inside is a hollow tube and in no way waterproof. Same goes for the switch. The wiring is as thin as the mounting brackets, and while the wire gage might be sufficient for the load, given the application, it's pretty sketch since a tiny tug will probably break it. I should have bought something nicer.
A**H
Non dimmable
I use one of these on my electric scooter and they are so bright and fantastic. I tried using a dimmer potentiometer, but caused flickering. That’s because when you turn these on an off they have different settings, bright, dim, and flashing. Would be nice if they could be on a dimmer, but a switch works fine.
V**.
Buena luz, pero le entra agua.
Buena luz, lastima que con dos lavadas a la moto y una lluvia el lente presenta humedad en su interior. Además los controles no son buenos para controlar cada uno las iluminaciones que trae ( blanco y ámbar). No lo recomiendo.
س**ه
المنتج ليس مثل الوصف
انه ليس واسع الجهد يحترق عندما يعمل علي بطاريه ٤٨فولت
J**T
Mauvaise qualité
Une des 2 lumières a cessé de fonctionner après une heure utilisation
O**R
recommandé
Surprenant la calité et l'éclairage pour le pris
M**H
Good for a bicycle
Not too bright for a car.
Trustpilot
3 weeks ago
1 day ago