We remain fully operational. Our teams are working around the clock to ensure your deliveries continue safely.

DOWNLOAD THE APP


Customer Services
Copyright © 2025 Desertcart Holdings Limited
DOWNLOAD THE APP


Illuminate Your Drive! 🚗✨
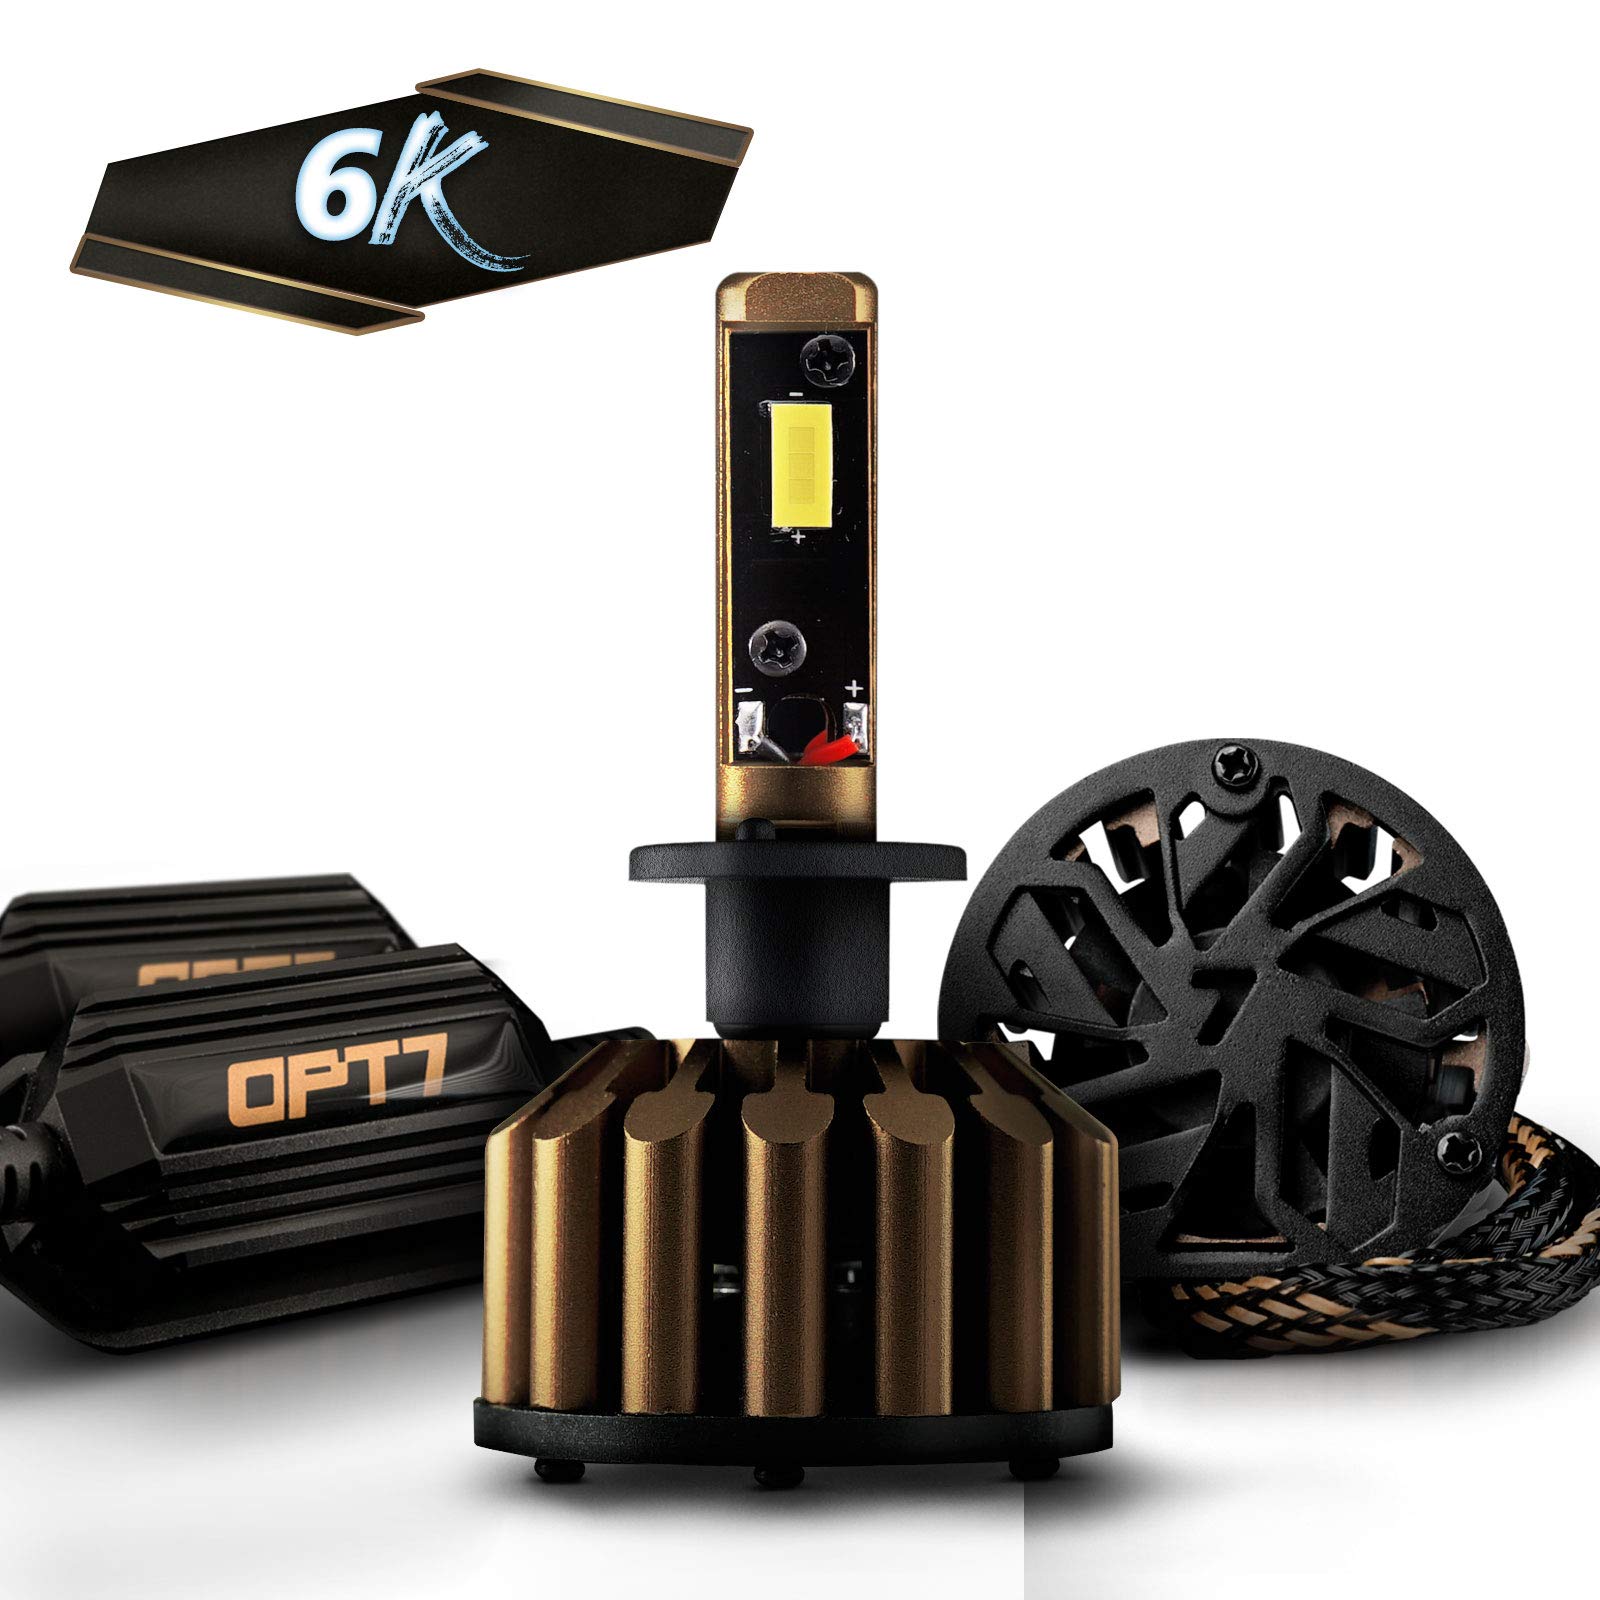
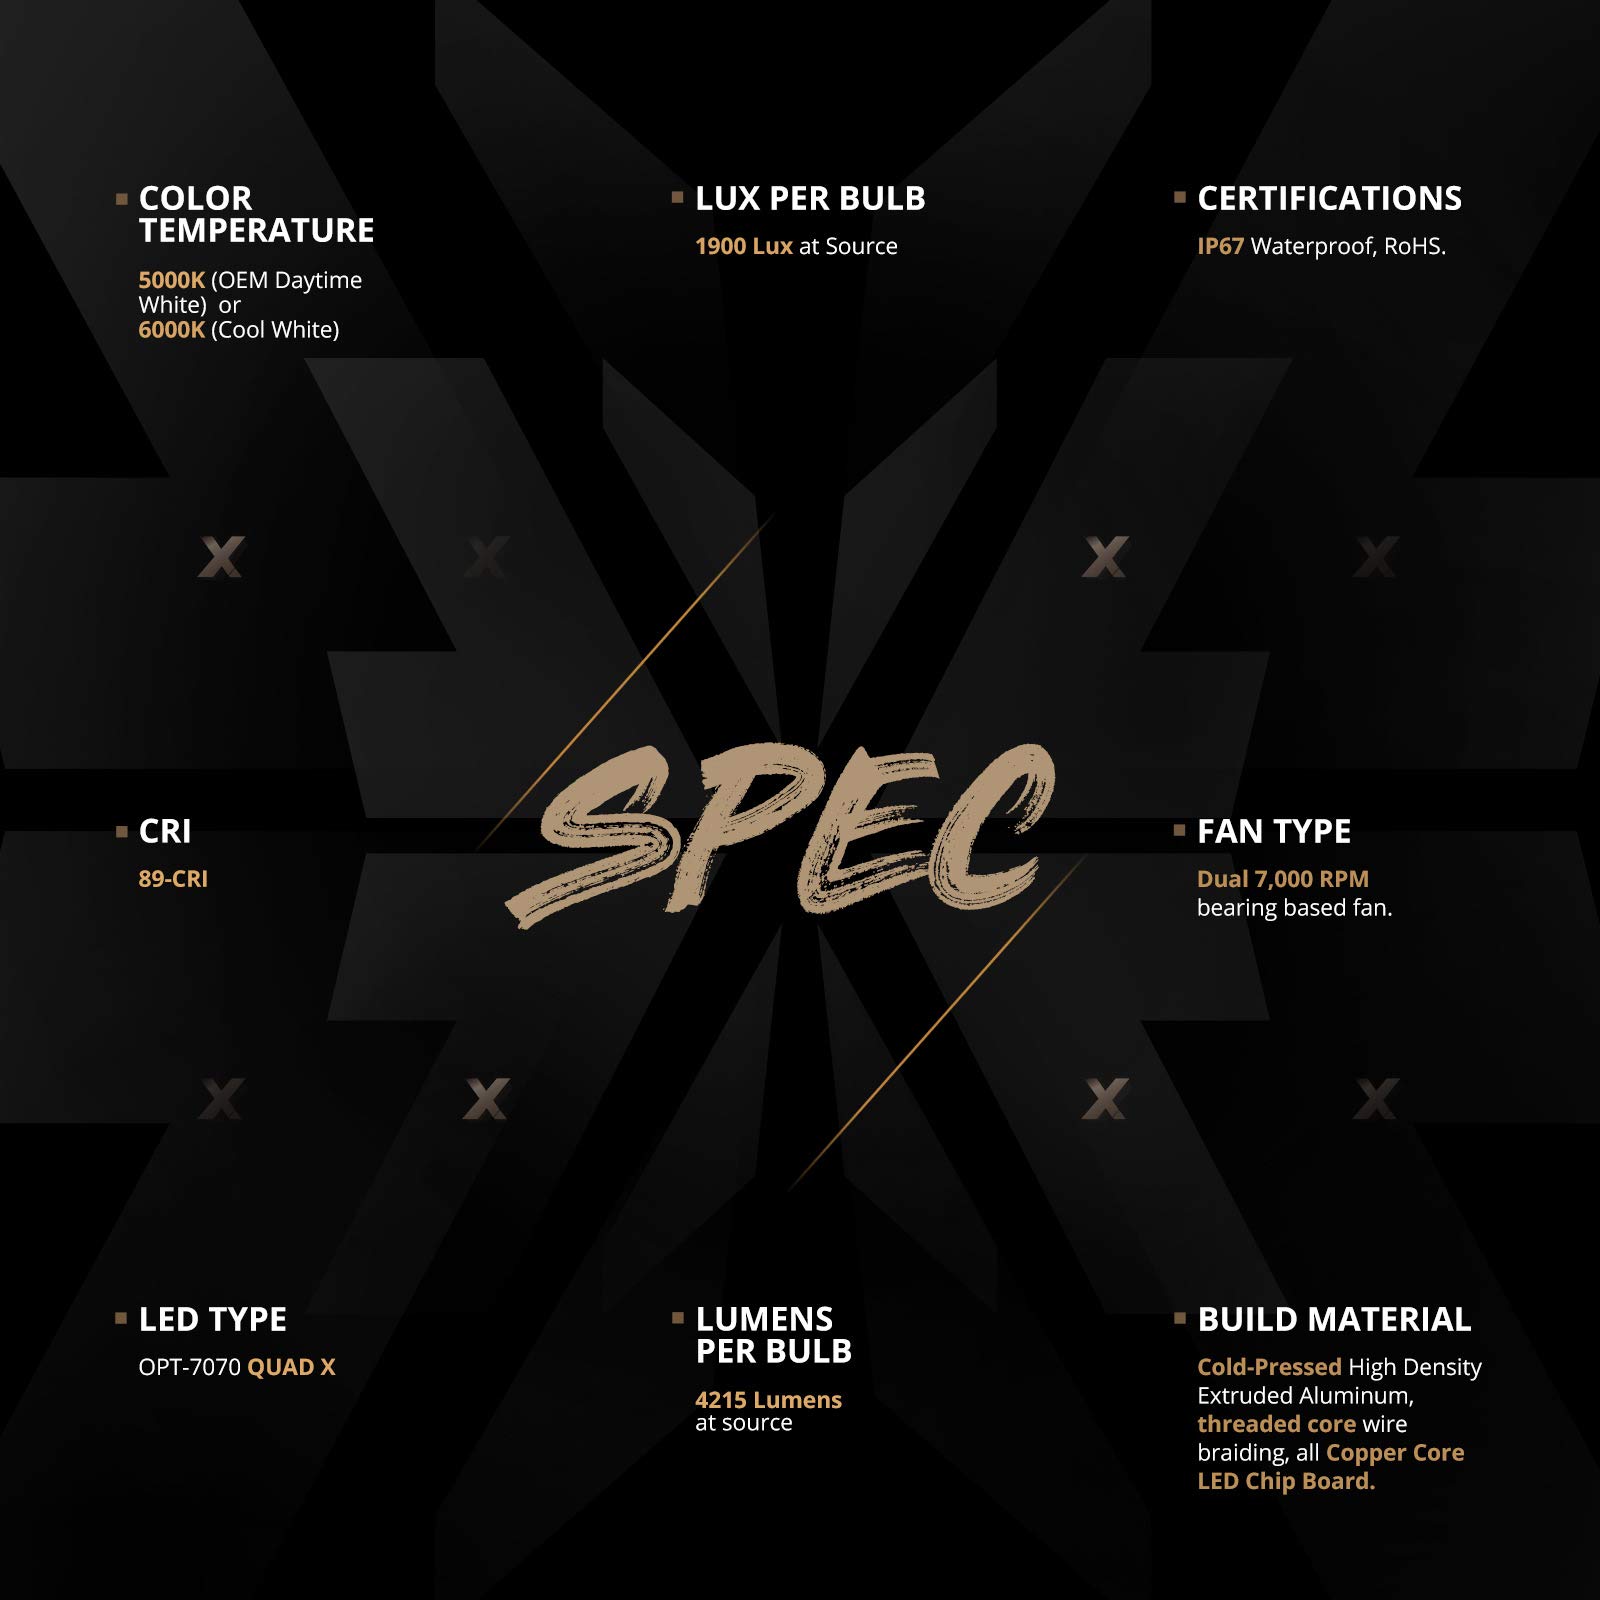
The OPT7 FluxBeam X V2 H1 LED Headlight Bulbs deliver an impressive 13,000Lm brightness at 6,000K, featuring advanced ARC-BEAM technology for optimal light focus. With a lifespan of 50,000 hours and easy installation, these bulbs are designed to enhance your driving experience while eliminating common error messages.
M**O
Almost perfect.
Ok ive been putting off writing this for awhile now. I've got these in my 08 ford edge. Ive had a couple of different led headlights in multiple cars and its pretty hard to predict from reading multiple reviews how the led headlight will perform in your ride because of the multitude of light housing differences. That said, in my ride these lights put out plenty of light. And since almost all of the leds you can buy will put out almost equal amount of light so let's throw light output out the window for the rest of the review. Lets focus on light distribution, since that what separates the men from the boys. In my housing they are HIGHLY focused forward with a good full pattern of no dark spots. Now I emphasized highly focused forward for a reason. So from the housing theres a dark space on the side of the car about 2 feet forward till the light happens. Doesn't sound like it would be a problem, but lets turn the corner. Theres not that much light to see whats coming while turning. Now if I compared these to a regular bulb it would probably be the same. But ive had alot of hid and led headlights and I'm used to having light and lots of it. Its not a real problem as long as I have my fog lights on, which I have the original first verison of these bulbs in. Now the only reason I have them in the fogs is one of those bulbs started to flicker half of the chips on and off so I figured since I needed new ones I would get these to replace them. Now compare this new version to the old version, old version wins hands down. With the original ones I could barely tell that I had the fog light on. To quick review, light output 5, light distribution 4. Old version light output 4, light distribution 5. Hope this helps someone out there as I read alot of reviews myself before I buy things on Amazon.
A**G
55w HID vs FluxbeamX.
(Top) Innovited 55w 6000k HID on left, 55w FluxbeamX on right. (Bottom) My "All On" Mod with all 6 FluxbeamX bulbs.I've used Innovited HID's for 6 years now. I figured I'd try something else.Pro's:-LED ballasts are significantly smaller and easier to mount (although they do not come with mounting hardware/command strips like most HID ballasts). The ballasts are about 2"X1.5"X0.4" which even allowed me to tuck it behind my motorcycle lamp housing. HID ballasts can get up to 3x as big.-probably my favorite is no warm up time like HID's. My GMC Sierra bypasses this flaw by keeping the low beams on at all time when switch from Low/High, but most vehicles only keep two bulbs on at one time and with HID's on a dark road when switching from Low/High you're essentially blind for ~5 seconds.Cons:-When you calculate the lumen rating from the wattage and efficiency it's actually less than the 8,400lm rating of the FluxbeamX, but like others are saying they do seem a little less bright than the HID's. Almost as if the LED's have a focused beam and the HID's have a more broadly spread beam that I can see on the sides of the road.-HID's are much, much cheaper. Hi/Lo/Fog for HID's is $167 vs $330 for the FluxbeamX. HID bulbs also burn much brighter which washes out the color, and causes the bulbs to burn out after about a year. But bulb replacements for HID's are $9 for a pair in any color, so who cares.-In my own personal experience (across 6 years with countless customers) even with the vehicle cranked @ 14 volts, and even with a chancellor ballast the startup current on the ballasts is enough for them not to always ignite. Almost always you can just turn your lights off manually and turn the back on and it fixes the situation, but if you happen to forget and a bulb doesn't ignite you run the risk of getting pulled over.
A**R
The resulting improvement in visibility is absolutely awesome! REVISED
Unbelievably bright! These things work very well in my 2011 Chevrolet Volt, after modification. Follow the directions and DO hook up the lights and modules with a "dry fit" and lay them on top of the housing to test them prior to installation. I found a bad module doing this. OPT7 replaced the module with little fuss, but I dropped the review to four stars because of this, and the need for mods.Note that you will need to slightly trim one of the mounting tabs to enable it to fit in the vehicle mount/locking ring. Nibble off a little at a time with diagonal cutters ("dikes"), or use a Dremel-like device. I recommend looking into the LEFT light bulb housing, with a flashlight, when trying to fit it, to determine which tab needs trimming, and pay attention to the orientation of the OEM bulb and its tabs when removing it, so you can reproduce it when mounting the 9006. I know it doesn't look like it, but there IS enough room to tuck wires and the module into the housing before installation. Also, do all of your trial and error with the LEFT bulb, because the right bulb has far less room in which to work. In fact, I needed to remove the engine intake air cleaner cover, push the bottom half of the air cleaner housing out of the way, and shift a coolant hose upward to get the 9006 LED module into position to push and rotate it into place.AFTER installing the bulbs and modules, and verifying that they work properly, THEN drill some holes in the upper and lower portions of the bulb housing covers. I drilled four 1/4" holes in the top face of each disk, and four more in the bottom face of each disk. Two on each side (top and bottom, for a total of eight holes in each cover) of the vertical "blade" handle, used for rotating and releasing the covers. I recommend making a mark on the covers, to show where they should be when installed correctly. My Volt already had a chalk mark across the cover edge, to the bulb housing, making correct rotation and locking of the cover simple. Make sure the drilled holes are not in the rubber seal area of the covers. I drilled them ~1/2 inch from the edge of the disk.I know this sounds like a LOT to do, but if you're at all handy, it's totally do-able yourself. Go slowly, and pay close attention.The resulting improvement in visibility is absolutely awesome. Why didn't I do this before? Oh, yeah. These didn't exist.Revised, August 2021. One of the two failed after only three years. So much for "longevity". A properly designed LED circuit should last indefinitely. Rating dropped to two stars, from four, and I'll be looking elsewhere for a pair of replacements.
Trustpilot
1 month ago
1 month ago