Some deliveries may take a little longer than usual due to regional shipping conditions.

DOWNLOAD THE APP


Customer Services
Copyright © 2025 Desertcart Holdings Limited
DOWNLOAD THE APP

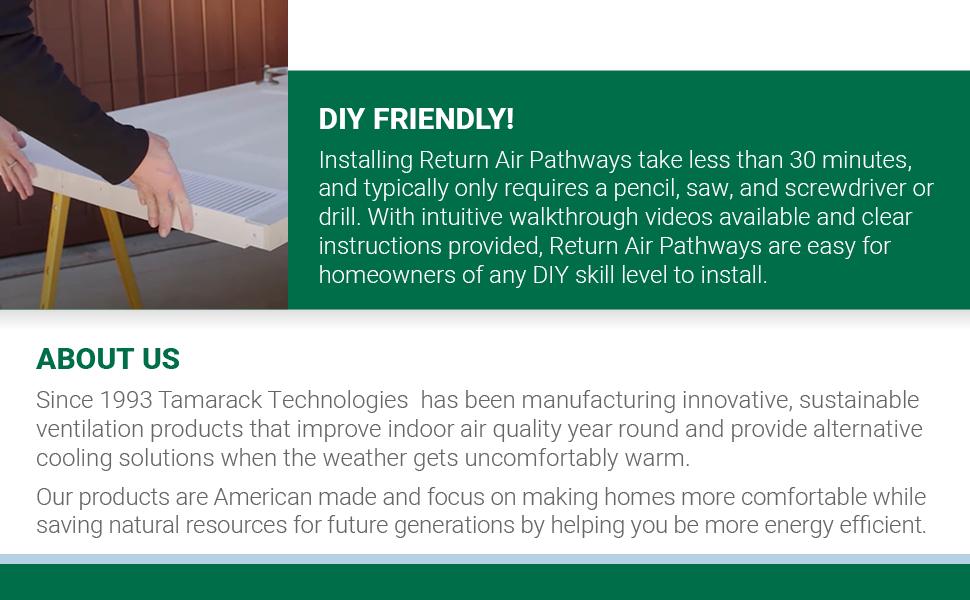
🌬️ Balance your air, boost your comfort, and save smartly!
The Tamarack Air Transfer Grill is a sleek, off-white ABS plastic door vent designed to eliminate air pressure imbalances and improve HVAC efficiency. Measuring 27¼"W x 4¾"H x 1⅝" thick, it installs easily into 1⅜" thick hollow core doors using the included template and screws. Certified by the Better Performance Institute, it balances airflow to maintain even temperatures, reduce moisture, and lower energy costs, all while minimizing noise and light transfer. Durable and backed by a lifetime warranty, it’s the smart upgrade for modern homes seeking comfort and efficiency.


| Brand | Tamarack |
| Color | Can be painted over. |
| Cooling Power | 12000 British Thermal Units |
| Product Dimensions | 1.63"D x 27.25"W x 4.75"H |
| Refrigerant | R-32 |
| Special Feature | Pressure Imbalance Elimination, Durable High-Impact Plastic, No Moving Parts |
G**H
Straightforward Installation & Effective; Short of Kicking, Should be Durable
I installed these vents on the doors of two bedrooms; my goal was faster pressure equalization and more even temperatures in these rooms. HVAC activation tended to pull these doors closed and the jamb of one door was coated with fine dust similar to that around my AC filters. Overall I'm pleased: they seem sturdy enough, there's little noticeable increase in sound or light transmission. Most importantly, the rooms now feel as warm as the rest of the house, even with doors closed. One great indicator during a recent teens/20s cold snap: my roommate stopped turning up the thermostat because his room felt cold, which in turn made the rest of the house too warm. ABS plastic is approx. 1/8" thick, which is reasonably thick for the intended purpose. Installed - with the cardboard insert in place - I found the vents to be sufficiently strong. You might have issues if household members push (kick?) open doors with their feet or there are furniture-chewing pets. Cardboard inserts have a grid of 1/2" equilateral triangles. I wasn't sure if they were factory treated for moisture, so I removed the inserts and sprayed several coats of satin spar urethane. (Inserts will be stiffer when dry, so scrunch them down a few times - they're springy - so they'll fit back in the vents.) The inserts are completely see-through when held up to light, but because they're installed at floor level, the noticeable light at eye-level is minimal. Rather than use the cutout pattern from the box, I used a Speed Square and straight edge to mark out a 4-1/8"H x 24-3/8" W rectangle, centered on the bottom edge of the door. Before cutting with a jigsaw, I drilled a double-set of 3/32" holes in one corner so I could insert the jigsaw blade for the long cut. Cuts were made ON the line. Installation Tips: Make sure your door is 1-3/8" thick AND wide enough to accommodate a 24.5" vent cutout! Ensure that your jigsaw blade will cut at least 1-3/8" deep; higher teeth counts = cleaner cuts. Be careful when cutting a hollow core door: the framing and veneer portions require more pressure than the veneer-only parts. Once you cut through framing and into veneer-only, the sudden drop in resistance could send the saw blade in an undesired direction if you're not careful. Reinforcement: you may or may not have to do this depending on how your door's internal construction. If, after cutting the vent section from a hollow core door, the long exposed edges are flimsy and unsupported, take the section you cut out, remove the veneer on either side, and install inside the door with contact cement, construction adhesive, etc. You may need to clamp & let bond before continuing. Inset enough so it doesn't protrude beyond the cut and interfere with vent installation. (I saw this tip in the 'Fine Homebuilding' website.) Painting: Some reviewers complain about paint not sticking. These vents are shiny ABS plastic, so if you decide to paint I highly recommend web research on something like "painting smooth ABS plastic" for preparation tips. Requirements usually include rinsing with dish detergent, surface roughening with fine-grit sandpaper, wiping down with wax/grease remover and top-coating with plastic-friendly paint.
J**2
Works well to ventilate a room. Not heavy duty but it was easy to install and does its job
I like this product a lot. I have installed several return air pathways that go through walls, which help a lot in allowing the air conditioning to continue to work in rooms that have their doors closed. I bought this for a room where the studs are too close together and I have electrical and pluming issues where I would like to put a normal return air pathway. This door version is actually cheaper and probably easier to install. For this to be an easy project, you should have a jigsaw, but you could probably make it work with other tools if you were dedicated. If you are like my your doors are basically hollow with only thin walls. That makes them easy to cut and this fits right over the hole. Very little light and noise gets through and it looks pretty good installed. It makes a big difference in the air flow. This extends your door downward a quarter of an inch or so unless you chisel away some of the wood at the edges so it fits all the way in. That's what I did and it's a pain because my doors are made of very flimsy material. I ended up putting some caulk around it as well to act as a makeshift glue of sorts. In other words, because this attaches by only two screws at the bottom and because doors are made of really weak stuff, this isn't very securely attached if you don't also use some kind of glue. This is also made of plastic and cardboard. It wouldn't stand up well to being kicked or something. Just be aware of that when you are deciding which doors this is appropriate on. Having done both, I'd say cutting the door and using this is easier than cutting the drywall and making a hole in the wall for the other type of return air pathway. I recommend them both, but this is the easier and slightly cheaper option.
S**T
2 on one door? I did
Works great. 4 stars because I feel it costs more than it should. Still cheaper than other options though. I was able to use 2 on one door. The bottom was easy, but for the top.. I had to buy a chisel and trim away part of the door jamb/stop so it would fit when closed. But why 2? I have floor air vents. It’s summer. Cold air comes from the vents. Hot air rises, cold air sinks. With only the bottom door vent, mainly cold air is leaving the room. Would be great for winter, but not for summer. So I put 2 on the door top/bottom for all seasons. I can verify, it works so much better with 2 instead of just one. (I had only 1 on for a couple days before adding a second.) Light/Privacy: I can’t see any light coming through the vents unless I’m looking directly straight at it and an eye level, and even then it’s not much light coming through. I don’t even see how someone can even notice the cardboard enough to complain about it. Theres also not much difference with passing through noise and sound. However, i have a studio.. so I need to figure out some soundproofing. The plastic isn’t as cheap as others have made it seem like. It feels durable. But you shouldn’t try to kick it or have your dogs/cats play with it. Thin plastic is still thin plastic. I will now be making a DIY vent cover to stick on the bottom vent for summer, and to stick on the top vent for winter for further airflow testing. Good product. Cheap (all things considered). But it should still be cheaper. It’s plastic and cardboard.
J**R
Easy peasy
Well made with easy install instructions including a cut out template that made cutting the bottom of my doors way easier. They slide right on and with two screws to hold them in place (included), it took just a few minutes to do the install. The hardest part was removing the doors to take them out to the garage to cut them (I installed three)!
A**R
This really works well!
This was so easy install! We recently got our home insulated and ductwork sealed. Our daughter's room had no return vent, so what was happening was the rest of our home would get nice and cool, but at night with her door shut it was significantly warmer in her room and open her door was not an option at night. With the door open and air on it was 70 degrees in her room. Same as the rest of the home. With it closed for 1 hour, no vent it was 74 degrees. After installing the vent in her door, a cool 70 degrees. She said last night she had to pull the covers up! You can even feel the air flowing through the vent. Great product!
A**A
Fits great, looks great and works great
We have an addition we build over our garage (huge bedroom with a tray ceiling) and the HVAC guys put the air return at the top of the room when i told them I wanted it at the bottom. (Long Story) Ever since that, in the winter time if the door to that room is closed, it becomes a walk-in freezer. This vent solved that problem. The room is now the same temp as the rest of the house because the cold air that was trapped in the room can now escape through the vent. Installation was easy using a jigsaw, but I have 1 suggestion. when you trace out the pattern, cut the small vertical ends directly or slightly inside the traced line. I went a but outside of it and there was a bit of extra space. if I didn't center the vent, you could see a gap. So, cut inside the lines a bit and if its too tight, you can always remove more material, you can never add more back in. Installation took maybe 20 minutes total from removing the door to putting it back on the hinges This worked fantastic, I couldn't be happier
M**J
Good
Good for ventilation I just wish if they built it with better or stronger material. The plastic is very fragile and the edges are easy to broke since it's within foot steps .
J**S
Great function
Great function
Trustpilot
1 month ago
1 week ago